Flow Builder- Advanced Topics
- 28 Feb 2024
- 10 Minutes to read
- Contributors

- Print
- DarkLight
- PDF
Flow Builder- Advanced Topics
- Updated on 28 Feb 2024
- 10 Minutes to read
- Contributors
- Print
- DarkLight
- PDF
Article summary
Did you find this summary helpful?
Thank you for your feedback
Overview
This guide covers advanced topics relating to the Flow Builder and assumes readers have a certain level of technical knowledge and familiarity with our product.
We explain the different steps and capabilities using relevant examples. We encourage you to try them out for yourself. Use the table of contents at the sidebar to navigate to the desired section.
Topic I: Planning Your Bot
Using the Flow Builder in the Planning Phase
Our platform is, in itself, a great planning tool for the actual bot, laying out the steps in a logical order and then filling in the “details.” This section discusses the flow builder as a flow design tool, as well as different tools you may want to add to your flow.
- Start by envisioning the customer interacting with the bot placing Say steps that describe the questions and possible options the bot will give the customers. Use the title of the step to describe the question asked to the customer (which account number, what age, which dept, etc.), the possible choices the customer may have (over 21, customer service/accounting, etc.), and possible procedure (validation, transferring to a specific channel, or jumping to a different section).
As your Flow grows, zoom out or click on the collapsed mode to see more steps.

- Use the Drag and drop capabilities of the Flow builder to move the different steps.
By holding down the left click and moving the step, the number of steps in the branch appears at the corner of the moving step, and the attachment options appear as grey circles. To switch the order of children, simply drag the branch between the other branches.

- Note for yourself procedures that may repeat themselves or appear at any time during the flow. For example, if the customer is idle, what should happen?
If the customer types something not related to the topic?
What are Standard organizational procedures that are part of the communication, like validation of identification, account details, etc.? - Open the Flow Settings by clicking the icon at the top and determine the reactive steps that will happen if and when the customer does not respond for a set amount of time. Select from the following options:
Let the flow repeat the step that the customer was not responding to.
Let the flow jump to a certain step.
When the flow ends, jump to a certain step.

Finish the processes by clicking Save.


- The Flow Fields tab sets up different fields you may want to use throughout the Flow.
Example: Set the field “Age” and give it a value “>21” so that customers entering an age below 21 will jump to a step that deals with young drivers.
Finish the processes by clicking Save.
Unknown Step

- Place an Unknown step(s) in the Flow followed by the steps that will deal with that situation.
Note: In a flow with more than one unknown step, the customer will be diverted to the closest one. Messages to the customer should reflect the flow advancement. For example, an Unknown step at the top of the flow may be followed by a message asking the user to select a topic, while an Unknown step further down may offer the customer to repeat the last option.
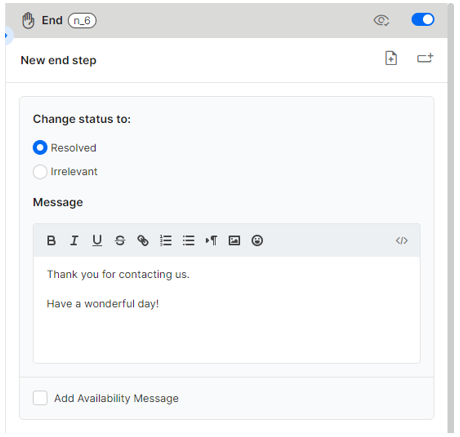
End Step

- Add an End step at the end of each branch of the flow that doesn’t have a Jump step or a Forward step.

Topic II: Flows with APIs
APIs are powerful tools that enable the bot to perform tasks such as sending or pulling data and communicating with 3rd party platforms.
API Step

At the flow builder, select the API step and click + Add API Call to select the type you wish to incorporate into the flow.
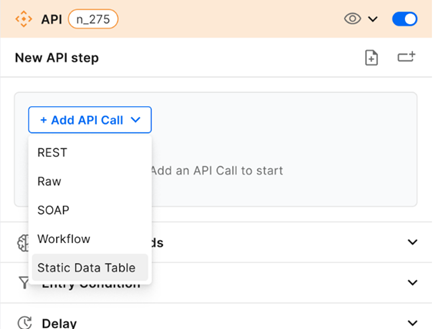
Types of available APIs:
a. REST – An external REST API call with one of its methods (GET, PUT, POST, etc.)
b. Raw – Raw code of the API to activate 3rd party actions.
c. SOAP – An external SOAP API call with one of its methods.
d. Workflow – Code that will activate actions within CommBox.
e. Static Data Table – Pull data from an uploaded table.At the dialog box, enter the information as described below:
For Rest API:
a. Enter the URL and select the REST API methods (GET, PUT, POST, etc.)
b. Select the Content type from the dropdown menu.
c. User Agent (optional) – Enter the browser User Agent originating the request.
d. Enter the Header and Body parameters and click the Test button.
e. Save the response to – Name the data field and response header. Enter this field name in any of the steps that need to display or use the data.
f. Debug Mode (optional) – The Debug Mode is used when seeking help from our customer support. Check this box after contacting us with issues concerning APIs within a flow.
g. Message (optional) – Enter the message for the customer advising what this step is doing.
h. Click Save.
For Raw API:
a. Enter the raw code of the API and click the Test button.
b. Enter the message to the customer and click Save.
For SOAP API:
a. Enter the URL and select the REST API methods (GET, PUT, POST, etc.)
b. Select the Content type from the dropdown menu.
c. Enter the XML file name, the Encoding format, operation, and Action.
d. Enter the parameters and Requested Body parameters and click the Test button.
e. Enter the Response Root to which the API saves the response.
f. Debug Mode (optional) – The Debug Mode is used when seeking help from our customer support. Check this box after contacting us with issues concerning APIs within a flow.
g. Message (optional) – Enter the message for the customer advising what this step is doing.
h. Click Save.
For Workflow:
a. Enter the raw code of the API and click the Test button.
b. Enter the message to the customer and click Save.
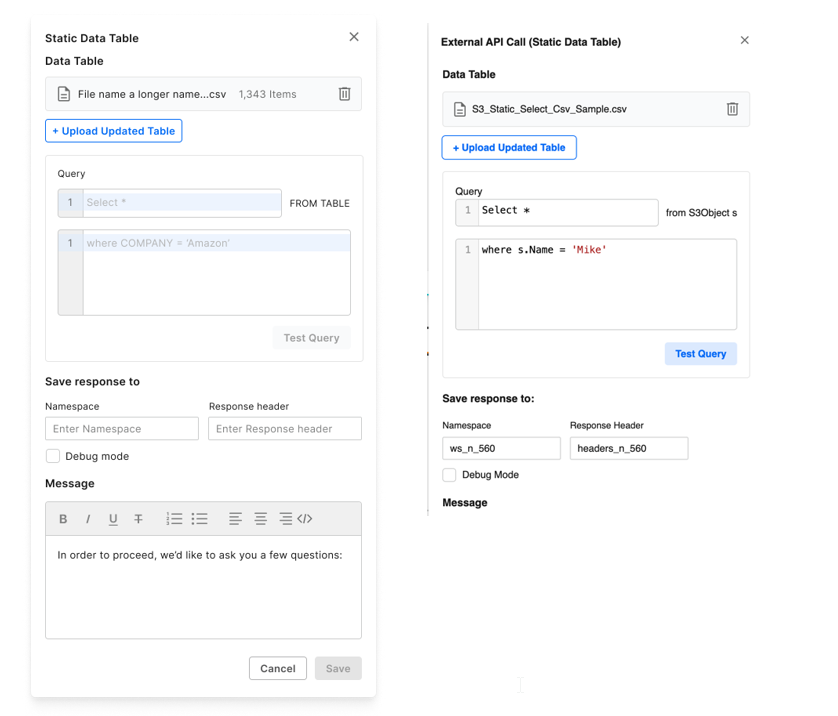
For Static Data Table:
a. Upload the table by clicking the Upload Table button.
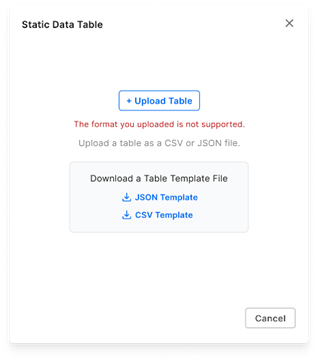
Download templates to see the required format (optional).
b. Set the query parameters for retrieving information from the table.
c. Save the response to – Name the data field and response header. Enter this field name in any of the steps that need to display or use the data.
d. Debug Mode (optional) – The Debug Mode is used when seeking help from our customer support. Check this box after contacting us with issues concerning APIs within a flow.
e. Message (optional) – Enter the message for the customer advising what this step is doing.
f. Click Save.


Error Step
- Add an Error Step to the flow.

a. The Error step must be placed in a higher hierarchy than the relevant API step.
b. When the API fails, the flow will go to the closest Error step above the failed API step, enabling the flow designer to have more than one reaction content to the failed API call.


Topic III: Advanced Capabilities
This section will cover more capabilities that were not covered in the basic BOT creation article.
Intents, Keywords
The Intents and Keywords module enables the system to detect predesignated concepts from the customer's interactions with the bot or the agent. Once an intent is recognized, the system can tag the conversation, suggest a knowledge-based item in response, or direct the bot to a specific step.
Intents act as a step entry condition. Once the intent is recognized anywhere or anytime during the running of the bot, the flow will take the customer to this step.

- At the designated step, expand the Intents and Keywords section.
- Select one of the Intents from the dropdown menu. Note the brain icon in front of the step. In our example, the bot will tag the conversation with a New Driver tag once the customer enters the words “new driver.”
- Enter the appropriate keywords if you don’t have a working intent in place. As with intent, once the customer types in those words, the Flow will come to this step.
To design a specific Intent or Keyword behavior, navigate to Settings > Intents.
To learn more, click here for the user guide.
Entry Point
Sometimes we want the customer to start the flow from a certain point and not from the beginning. It could be a certain section that has very specific functionality, like accepting credit card payments, or just an agent that transfers the customer to a flow wanting to skip the preliminary steps.
The Entry point marks the step that will enable the agent or another bot to start the flow from that step. You may have more than one entry point. Checking the Mark as entry point box will enable the agents to direct the customers to the selected step as part of the manual handover options.
- At the Flow, at the Intents & Keywords section, check the Mark as entry point box.

Save and publish the flow under a different version name. In our example, we choose “CC payment”.
Navigate to Settings, select the channel type, select the specific channel, and open the Automation section at the channel settings.
At the Manual handover options, select the new version name of the Flow that will be the new entry point. Note the arrowhead symbol (>) that signifies a Step of the flow.
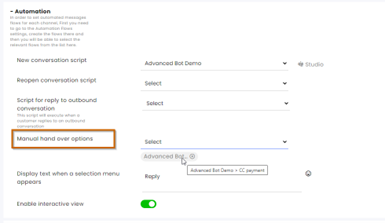
Save settings at the bottom of the screen.

Now, the agent will be able to direct the customer to that section of the flow. In our example, at the end of the conversation, the agent clicks the team members, selects Bot Assignment, and clicks the bot with the entry point. The customer will now be directed to complete payment using a credit card.

Entry Conditions
Entry conditions create a gate to the specific branch in the Flow. If the condition is met, the flow will continue to that branch. It is important to “cover all bases” and create an entry condition to a branch for every possible outcome.
Availability Conditions
Availability Conditions are based on the specific availability status of the channel.
- Select the channel and subchannel (sub-stream) if applicable.
- Select the operator – whether the channel IS (=) at the selected state or IS NOT (≠) at the selected state.
- Select the Channel State:
a. Active – The specific channel is currently Active, within business hours, with available agents.
b. Inactive – The specific channel is currently Inactive.
c. Busy – The channel is Active, within business hours, but there are no available agents (all agents have maximum conversations assigned to them).
d. Off hours – based on the business hours module, the channel is currently after business hours.
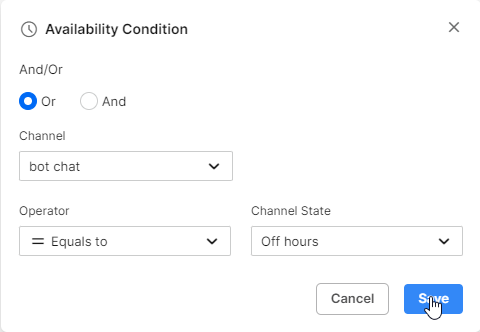
In the example above, the flow will enter this branch only if the conversation at Bot Chat happens to be after hours for that channel (as set in the business hours module). A logical step that may follow will be a message to the customer about reaching the business after hours.
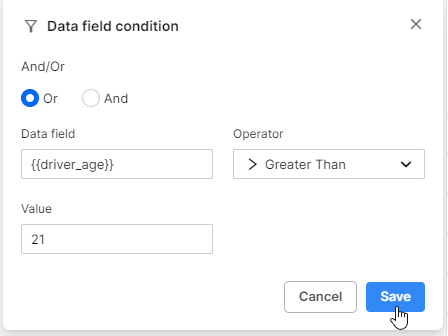
Data field condition
Data fields are created in the Ask Step or in the Flow settings (top center) in the Flow Fields tab.


The field name must be lowercase with underscore instead of spaces.
The Data for the field name must have double curly brackets.
In the example below, for the field driver_age, we want to set the condition that only if the customer enters a number above 21 will the flow enter this branch.
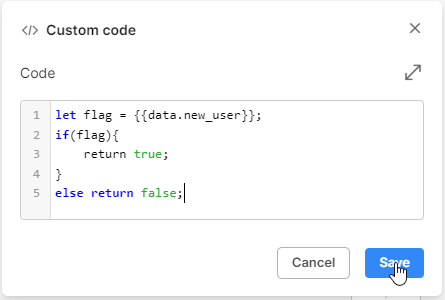
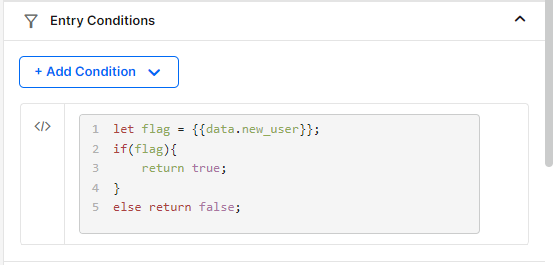
Custom code
Custom code enables the programmers to create their own conditions for the branch of the flow.
In the example below, the system verifies that a certain value is true before proceeding to the next step. Make sure that all same-level steps (“brothers”) of the branch should also have a custom condition so that all bases are covered.
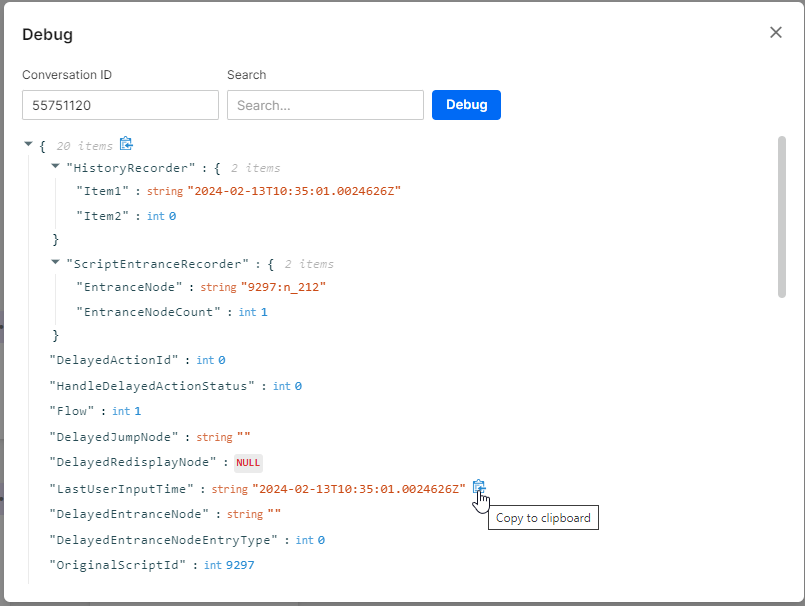
Debugger

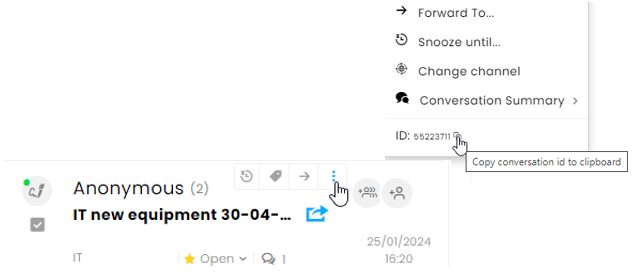
The debugger enables admins to see the historical context of any conversation by entering the conversation ID.
Note that Context data is kept for 48 hours.
Locate the conversation ID by clicking the 3-dot menu at the conversation summary.
Click the copy icon at the bottom of the dialog box.
Open the Debugger by clicking Debug at the top of any Flow.
Paste the conversation ID and click Debug.


Was this article helpful?