Overview
CommBox’s Video Chat allows your customers and agents to see and hear each other directly from the browser or mobile app. It delivers video and audio to just about any device without installing any plugins and offers both synchronous and asynchronous conferencing. Additionally, you can also take snapshots during the video chat!
Key Considerations
A. The call status remains in In Process even after the actual call ends. Agents must manually resolve the conversation.
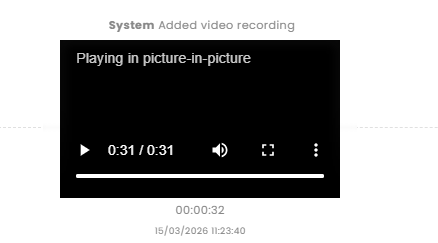
B. Call recording is added to the remarks after the call ends. Agents may download or review the content.
C. Agents can take a snapshot of the customer by clicking the camera icon on the screen.
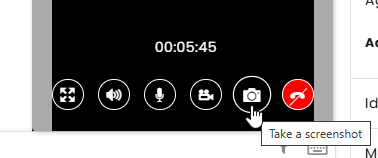
The image will be recorded as a remark in the conversation with a direct link.

D. When Video Recording is enabled (in the General section of the channel settings), 100% of calls are recorded.
E. Use the API: GET /objects/{objectId}/activities?activityType=27 to return the video recording’s metadata.
F. Agents can generate a Single-use Video Chat Links, providing a "Private Video Chat" setting exclusively for each customer (see below).
Creating a New Channel
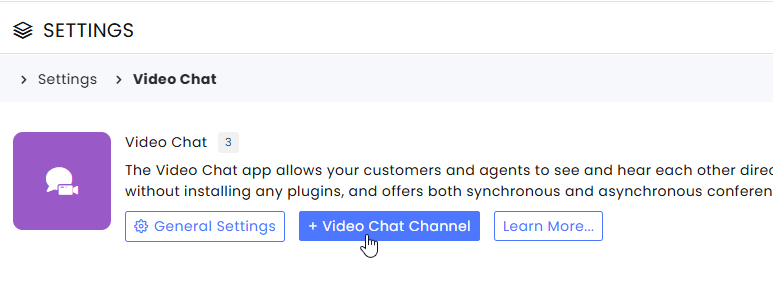
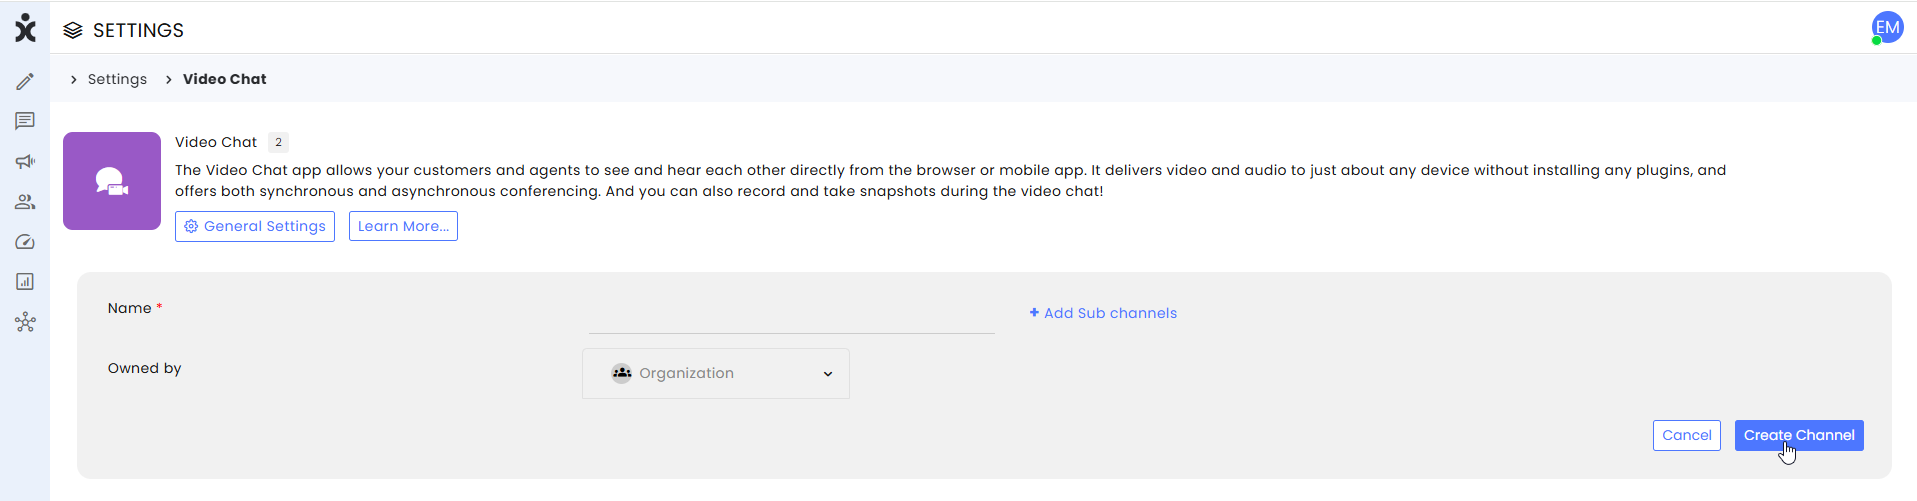
1. At Settings, navigate to the Video Chat module and click +Video Chat Channel button at the top.
2. Add the Channel Name and sub-channel name(s) if necessary (optional).
3. Select the Team that will own this channel (optional), and click Create Channel.
Temporary Video Chat Links
Video Chat Links that expire enhance security by providing a "Private Video Chat" setting generated exclusively for each customer. These links are valid for a single conversation and automatically expire once the conversation is resolved. They cannot be reused, and links not opened expire 30 minutes after being issued, ensuring only the intended customer can access the video chat session.
To enable the video links:
- At Settings, navigate to Video Chat from the communications channels. In the General section of the channel setting of the relevant channel, toggle on the Enable private video chat button.
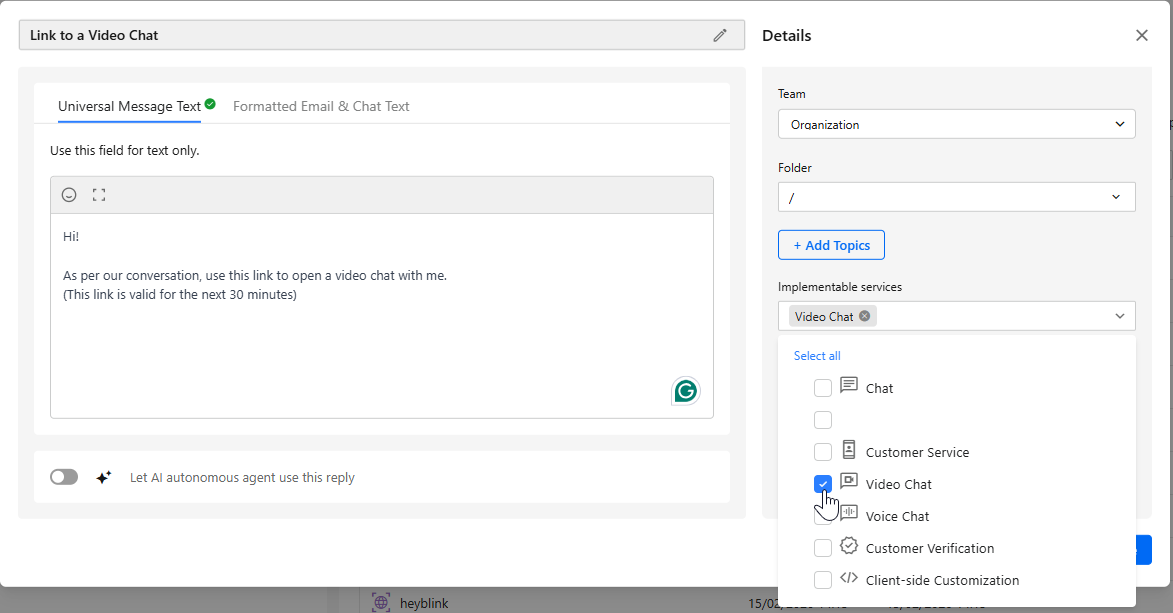
- At Automation Hub, select the Knowledge Base tab, and click a relevant Knowledge Base item or create a new one.
- When creating a new item, enter the heading and content (see example below).
- In the Implementable services, select Video Chat from the list and click Save.
To send a link to video chat to the customer:
- In the reply box or in the Compose section, click on the Knowledge-Based icon.

- Click on the relevant knowledge base item and select the appropriate channel.
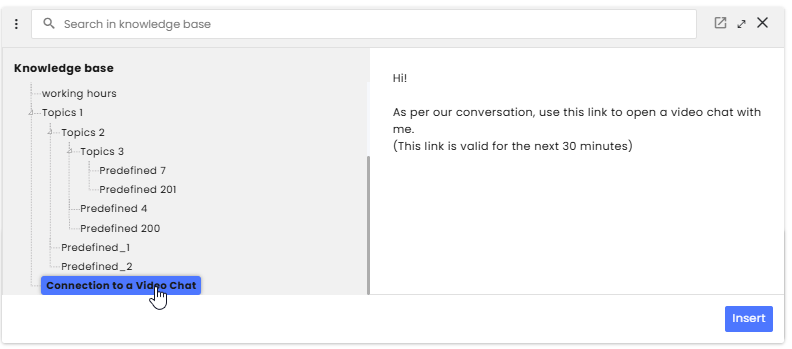
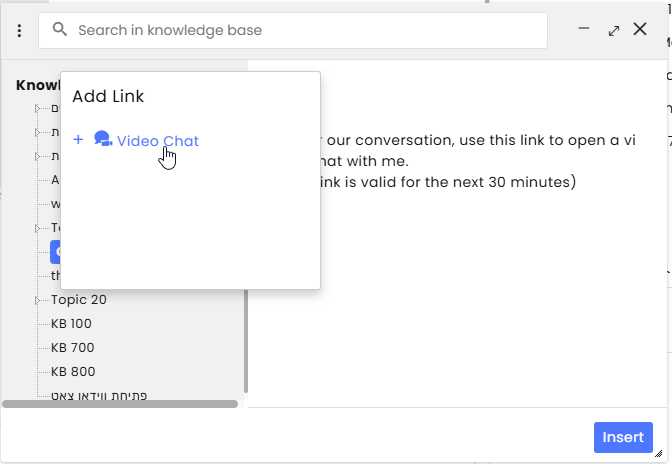
- Click Insert to return to the reply box, edit the text as needed, and click Send.

Channel Settings
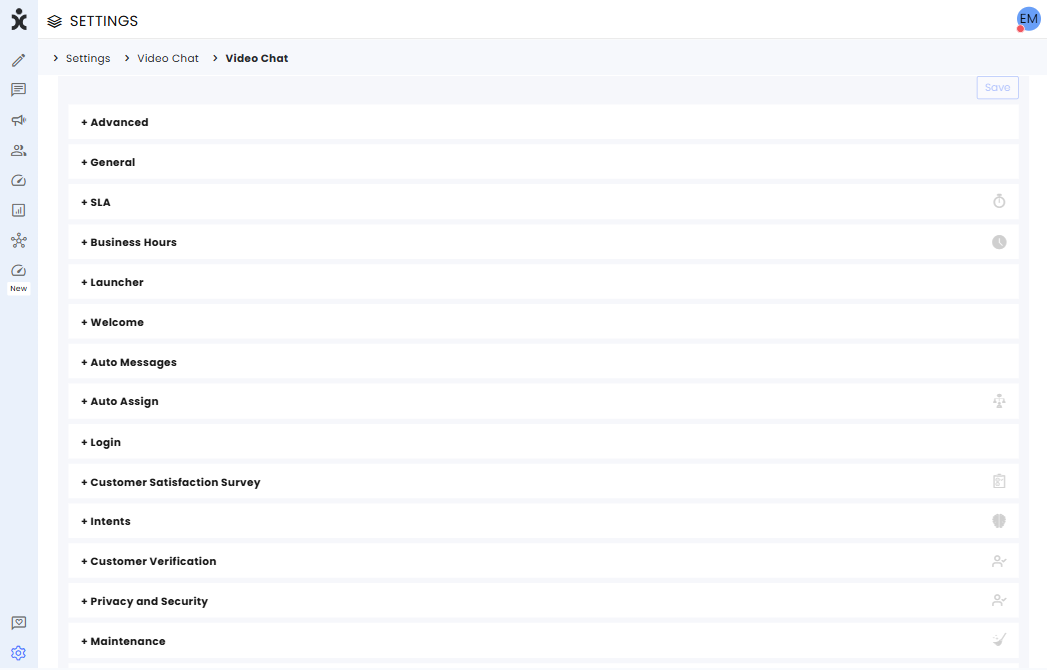
Advanced
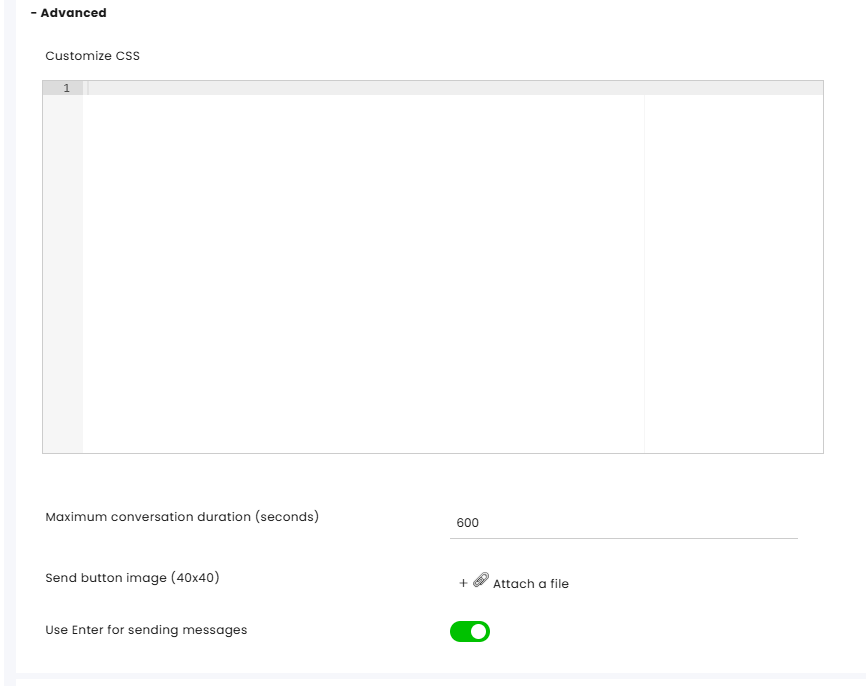
Customize CSS – Enter customization code and click Save.
Maximum conversation duration (seconds) – Limits the time of the conversation.
Send button image (40x40) - Attach an alternative file
Use Enter for sending messages – Enables clicking Enter instead of clicking the Send icon.
General
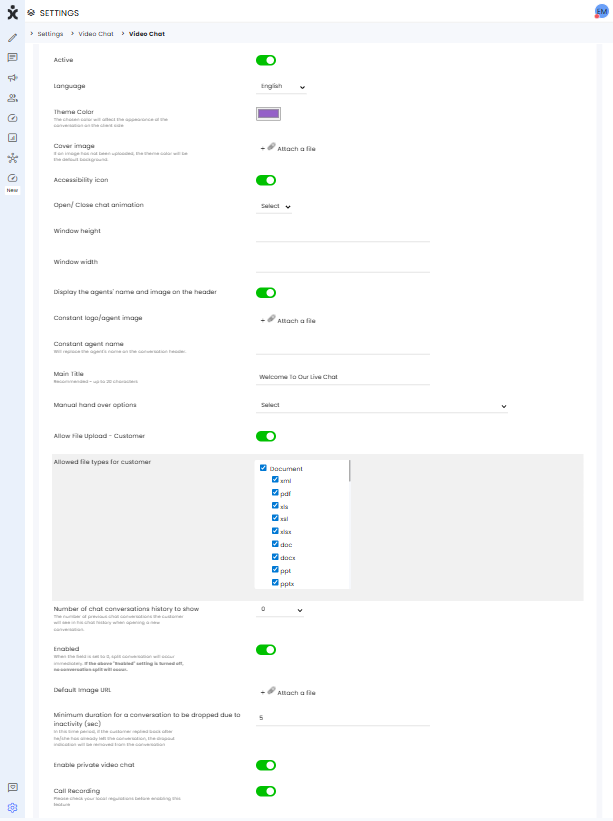
Active – Toggle to activate/deactivate the chat (it’s a similar button on the Channel). The difference is that the Channel button initiates a system restart, meaning it deletes the cache, etc., whereas the button here only boots the system and shuts it down.
Language - The language in which the chat will be displayed
Theme color - The chosen color will affect the appearance of the conversation on the client side
Cover Image - You can upload an image to serve as the default background to the video chat. If an image has not been uploaded, the theme color will be the default background.
Accessibility icon - Toggles on/off the display of accessibility options for visually impaired users
Open/Close chat animation -
- Pop-up - a new window will appear
- Slider - a window will be opened above the button inside the website
Window height - Setting the chat window’s height
Window’s width - Setting the chat window’s width
Display the agent's name and image on the header- When activated, the agent's photo and name will be displayed.
Constant logo/agent image - A photo of the agent that will appear throughout the conversation, a picture that appears before connecting
Constant agent name - Will replace the agent's name on the conversation header. Often, customers emphasize the name of the team and not the agent's name, perhaps because another agent may have been given responsibility for handling the specific issue.
Main title - The title that appears on the Header
Manual handover options – Select the automation flows that agents can use to hand over the conversation and allow the customer to continue with automated assistance.
Allow File Upload - customer - Toggle on/off to let customers upload files to the video chat
Allowed file types for customers - Select the document, audio, image, and video file types that customers are allowed to upload.
Number of chat conversations history to show – The number of previous chat conversations the customer will see in his chat history when opening a new conversation.
Default Image URL - This is the URL of the default image displayed on the video chat background
Minimum duration for a conversation to be dropped due to inactivity (Seconds) – If a customer responds within this time frame after the conversation was dropped due to inactivity, it will not be counted as a dropped conversation. If the score remains zero, the conversation will not be displayed as a dropped conversation.
Enable private video chat – When enabled, an agent can send the customer a one-time link to open a video chat with them.
Call Recording – When enabled, all conversations in this channel are automatically recorded. Please check your local regulations before enabling this feature
SLA

SLA target for first replies (In seconds) - The time elapsed before receiving the first response
Business Hours
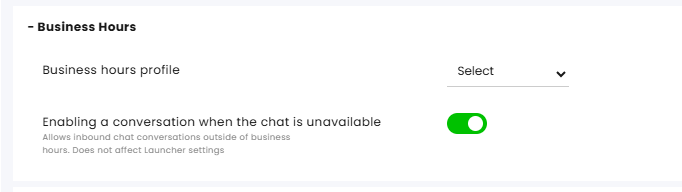
Business Hours profile - Select the Business Hours settings to determine when this channel operates and what auto-messages should be displayed after hours.
Enable a conversation when the chat is unavailable - Toggle On to make Chat conversations possible independently of Business Hours settings.
Click here for more information about this Business Hours.
Launcher
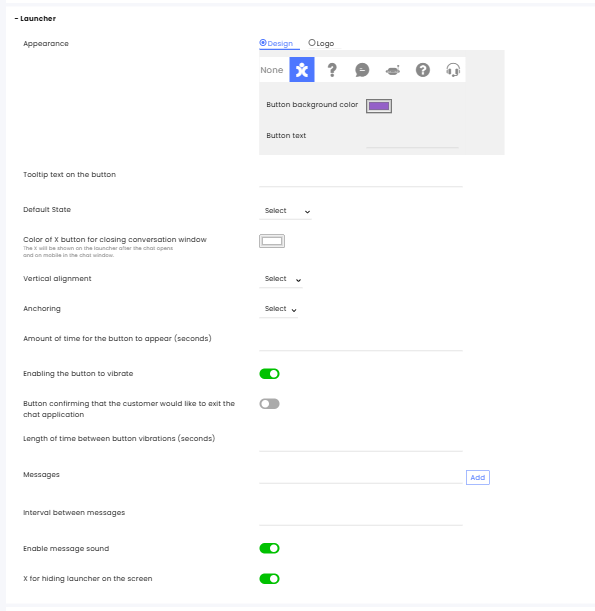
Default state – Describes the Chat presentation on the web page
• Pre-button – Displays the chat launcher when entering the website. Clicking on it will open the chat window.
• Open – Opens the chat window when entering the website
• Hidden – Hides the button, making it reappear after a specified number of seconds set below.
Open/close chat animation – Choose between the Chat popping up or sliding onto the screen.
Appearance – Select Design or Logo icon selection to be displayed inside the launcher.
Design – Select one of our icons:
- Button background color – Select the background color of your launcher
- Button text - Add text to your launch alongside your icon or without an icon
Logo – Select your organization’s logo
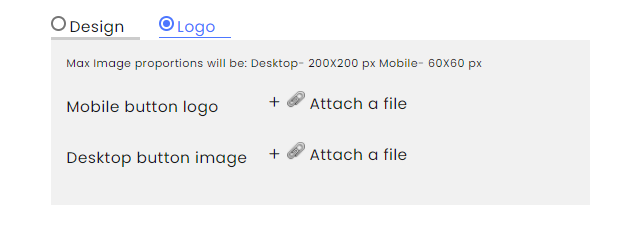
- Mobile button logo – Upload an icon for the launcher on mobile devices.
- Desktop button image – Upload an icon for the launcher on desktop/laptop computers.
Tooltip text on the button - The text that will appear when hovering over the button.
Color of the X button for closing the conversation windows – The X will be shown on the launcher after the chat opens and on mobile in the chat window.
Vertical alignment
- Button - the button located at the bottom of the screen
- Middle button - the button located in the middle of the screen
Anchoring
- Right - button on the right-hand side of the screen
- Left - button on the left-hand side of the screen
Enabling the button to vibrate – Toggle on/off. Setting the button to vibrate on-screen allows the user to locate the chat button on the website more easily
Length of time between button vibrations (seconds) – Set the frequency of the vibrations
Amount of time for the button to appear (seconds) – When the Default State hides the button, this setting determines how many seconds the chat window will appear after a new visitor enters the website.
Messages – Floating messages inviting the user to enter the chat.
Interval between messages - Sets the time between displayed floating messages.
Enable messages sound - Toggle on/off the notification sound, which will be triggered when a message arrives.
X for hiding launcher on the screen – When this option is enabled, the X button to close the chat window will appear inside the conversation window (similar to the mobile experience). Additionally, the conversation window will be positioned above the launcher, effectively hiding it.
Login
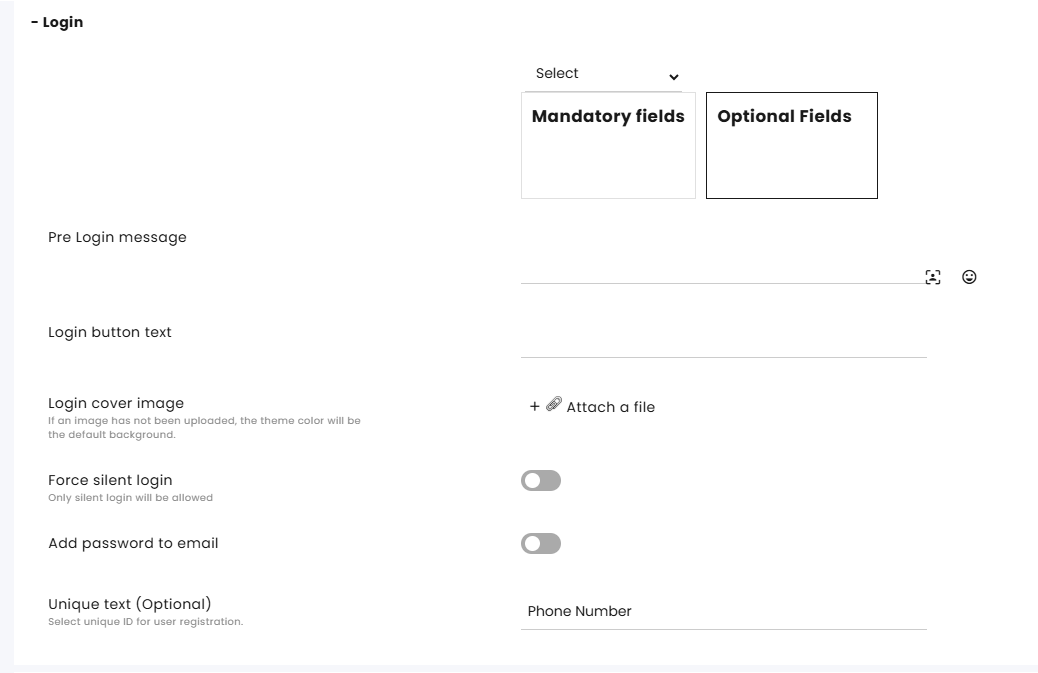
Input fields - In this area, you can define which Customer Info fields the customer will be asked to enter to proceed, and which are mandatory.
- Select the relevant fields from the menu that you want to display. Your selections will appear in the Optional box on the right.
- Drag the fields you wish to make mandatory for the user.
.png)
Force silent login - Enables login without entering identification details by using early identification through the URL.
Adding a password to an email - If an email is selected in the input fields, a password will also be requested.
Unique text (optional) - A unique ID is one of the input fields. When selected above, the text set here will be the title of the Unique ID field in the login form of the chat.
Welcome

Active - Toggle On/Off whether this screen will appear in the Chat.
Cover image – Upload the Welcoming image. If an image was not uploaded, the theme color will be the default background.
Add Contact Us channel - Select which channels your customers can use to contact you (Email, SMS, Messenger, WhatsApp).
Welcome Screen Title – Displays a welcoming message. Select justification and font size.
Welcome Subtitles – Displays a message (up to 100 characters) underneath the main title on the welcome screen.
Loading Animation – Upload a GIF or an SVG file to replace the CommBox uploading animation.
Add external link or a constant message – Add the text for the initial page and the link for the relevant URL.
Call to action text – The initial text is displayed in the chat wizard text box.
Auto Messages

Conversation’s opening messages – Messages to be sent at the beginning of a conversation with a customer.

One-time message – Displayed once before the conversation's opening message.

Automatic response – The automated message sent in response to the end customer’s first message.

Automated response outside of pre-set business hours –This message is sent when a customer sends a message outside set business hours.

Overload message – A message that will be sent to the customer when all available agents are busy.

Post-completion message – A message sent to the customer once the conversation status has been set to Resolved.

Automatic messages while waiting for agent’s first response – This message will be displayed to the customer during the conversation waiting period.
Time in seconds to display the message after waiting – Set the amount of time that must elapse before displaying the waiting message.
Auto Assign
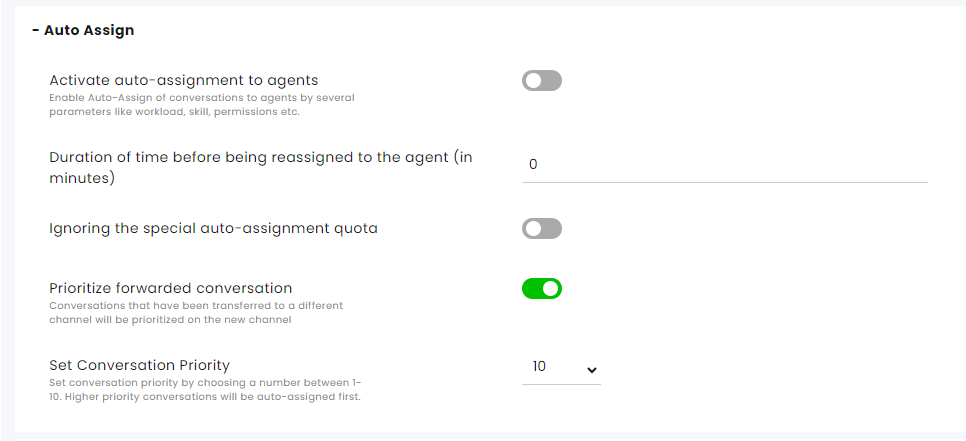
Activate auto-assignment to agents - Activate/Deactivate auto-assignment of conversations from this channel to agents.
Duration of time before being reassigned to the agent (in minutes) - Select the time before the system reassigns conversations to available agents.
Ignore Auto-Assignment quota - Activate/Deactivate this feature. When activated, the system overlooks the agent’s assignment quota and assigns conversations using the special auto-assignment feature.
Special assignments include:
- Send and assign to me - Selected by the agent when initiating communication in Compose.
- Conversation Assign – An agent can select themselves or others as the agents for a conversation.
- Agent in charge – An agent is added to the customer info card as the agent in charge. Customers with an agent in charge are referred to as VIP customers.
- Direct link - When the agent is added as part of the knowledge base link, the conversation will return with a special assignment to that agent.
- Snoozed conversation – Conversations that the agents assigned to themselves at a preset date and time.
Prioritize forwarded conversations - Conversations that were forwarded from another channel will be given priority assignment on the new channel if the following conditions are met:
- The conversation is assigned to an agent while it is being forwarded
- The agent forwarding the conversation has no access to view the destination channel
If the conversation has met all the following criteria, it will receive priority above other conversations.
Set Conversation Priority - Set the priority of the conversations in this channel compared to other communication channels. (1- highest priority, 10 - lowest priority). Conversations with higher priority will automatically pop up to be answered by the agents.
Click here for more information about this capability.
Customer Satisfaction Survey
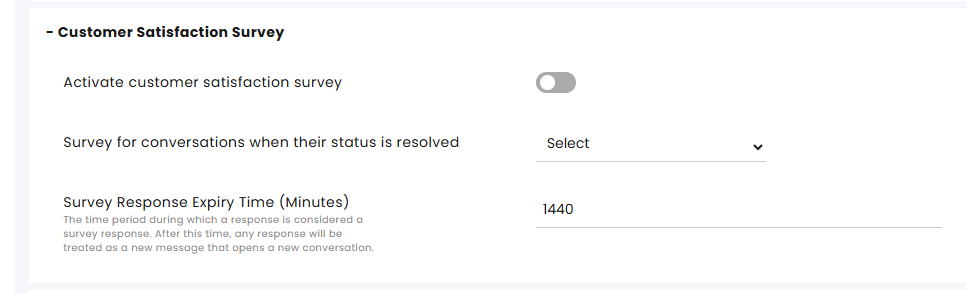
Activating the Customer Satisfaction Survey – Enables sending surveys to customers once their conversation status is set to Resolved.
Survey for the conversations when their status is resolved – Select the survey for this chat.
Survey Response Expiry Time (Minutes) – Specify the duration (in minutes) during which a customer's reply is considered a valid response to the Satisfaction Survey. After this period, any new reply will initiate a new conversation.
In the Customer Satisfaction settings, you can create surveys and customize them.
Click here for more information about this capability.
Customer Verification

These settings work with the Customer Verification tool. This section determines the time from receipt of the Customer Verification (OTP) certificate until re-verification is required.
Interface support is required with our API and usually with your company's verification and customer approval service.
Click here for more information about Customer Verification.
Privacy and Security
.png)
Allow customers to download the conversation - Allow/block customers to download the conversation’s summary.
Allow file upload - Customer: Allow/block customers from uploading files.
Allowed file types for customers: Check the boxes for file types that can be uploaded and sent by the customer.
Allow file upload - Agent: Allow/block the agent from sending files to the customer.
Allowed file types for agents – Specifies which file types are enabled.
Number of digits without disabling sensitive information – When activated, any number with an equal or greater number of digits than specified will be replaced with asterisks (*) to hide sensitive information. For example, if you enter the value three, the number 31782 will appear as 31***.
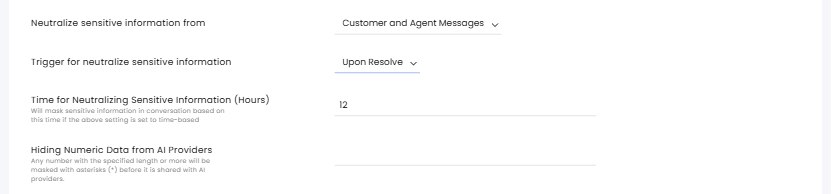
Neutralize sensitive information from - Select whether numeric data should be masked in customer messages only, or in both customer and agent messages.
Trigger for neutralizing sensitive information - Choose whether masking occurs when the conversation status changes to Resolved, or after a fixed time interval (configured in the settings below).
Time for neutralizing sensitive information (Hours) - When Time-based is selected above, enter the number of hours after which numbers will be masked.
Hiding Numeric Data from AI Providers – Specify the maximum number of digits allowed for numeric data before it is uploaded to AI providers. Any number that exceeds this limit will be fully masked with asterisks (*) prior to the upload. For example, if you enter a value of three, numbers like 3.129 and 1452 will be entirely masked. Entering zero will mask all numbers.
.png)
The duration to end a chat without interactions (In Minutes) – Set the time after which the chat session will be terminated, counting from the last message sent by the agent.
Timeout message - This message is sent when the system disconnects the conversation due to inactivity.
Sending alert time (in minutes) before disconnecting chat session following customer no response / no activity – Sets the time before the chat closes due to no response/activity, initiating the message below.
Automatic notification after a conversation is cut off—This notification will be displayed X minutes before the conversation is closed. In your message, include the X parameter that will have the value set above.
Disconnect the customer after a conversation is resolved – Actively disconnects the user at the end of the conversation.
Neuralize credit card numbers - Automatically mask credit card numbers in messages, leaving only the last four digits visible (e.g., **** **** **** 1234). This helps prevent accidental exposure of sensitive payment information. Note: Detection and masking do not currently support certain card networks, including Maestro, UnionPay, RuPay, and Elo.
Approved Domains - Enter domains where this chat window may be embedded and click Add. Leave empty to allow embedding on any domain. Note: Embedding is not supported on legacy browsers (IE11, Safari versions earlier than 14), even for approved domains.
Maintenance
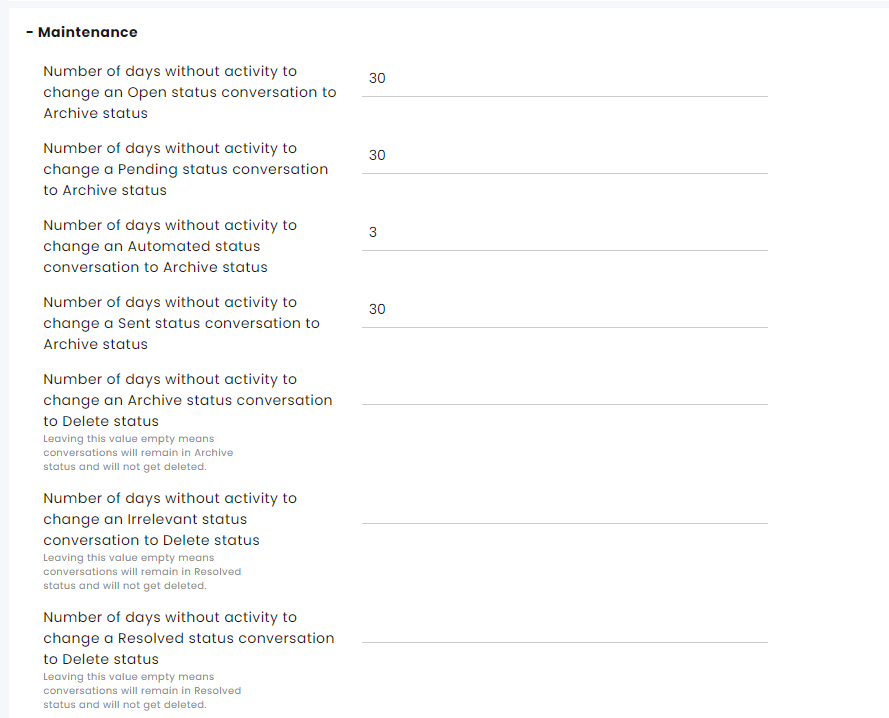
Number of days without activity to change an Open status conversation to Archive status - Default is 30 days.
Number of days without activity to change a Pending status conversation to Archive status - Default is 30 days.
Number of days without activity to change an Automated status conversation to Archive status - Default is 30 days.
Number of days without activity to change a Sent status conversation to Archive status - Default is 30 days.
Number of days without activity to change an Archive status conversation to Delete status - Leaving this value empty means conversations will remain in Archive status and will not get deleted.
Number of days without activity to change an Irrelevant status conversation to Delete status - Leaving this value empty means conversations will remain in Irrelevant status and not get deleted.
Number of days without activity to change a Resolved status conversation to Delete status - Leaving this value empty means conversations will remain in Resolved status and will not get deleted.
Set additional aspects of maintenance, including permanently deleting conversations at the Maintenance settings page.
Click here for more information about this capability.