Overview
CommBox Voice module covers all types of voice interactions and includes all settings for the different available providers.
Supported Voice Providers:
AWS Connect:
The CommBox Voice channel integrates directly with AWS Connect, enabling flexible handling of inbound phone calls based on your existing IVR configuration in AWS.
For setup instructions, see the AWS Connect integration guide.
Twilio:
CommBox runs AI voice agents using Twilio’s APIs and infrastructure. This option enables advanced voice bot capabilities powered by Twilio.
For details, see the Twilio Voice Bot integration guide.
SIP:
CommBox runs AI voice agents using standard SIP trunk connections and supports any SIP trunk provider (not limited to Twilio).
For details, see the SIP Voice Bot integration guide.
This guide provides an overview of the Voice module, how to set up a new voice channel within CommBox, and details about the Channel settings.
Key Considerations
A. Phone calls receive the highest priority compared to other communication channels and can be integrated with some CRMs.
B. Clients can integrate their own AWS Connect with CommBox.
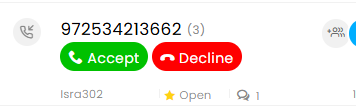
C. When a customer call arrives, the Accept/Decline buttons appear in the conversation list for all active and available agents, or according to the Auto-assign mechanism (if enabled). If an agent clicks Decline, the call is offered to the remaining active and available agents or routed to the next agent in the queue based on the assignment rules.
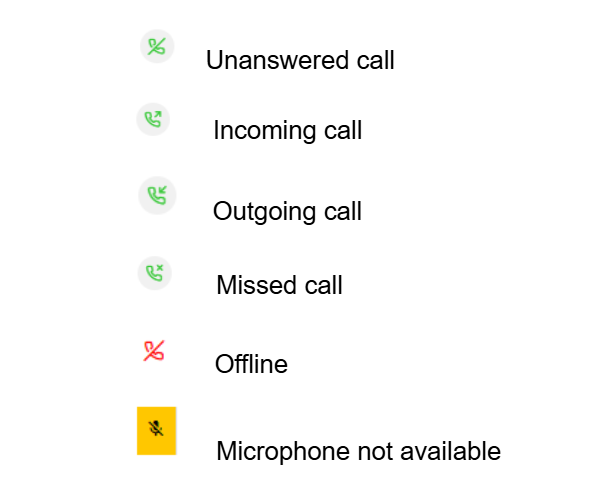
D. Icons that appear at the agent's dashboard:
E. To receive and make calls, the following must be set:
a) The agent must be “active”.
b) The microphone must be enabled.
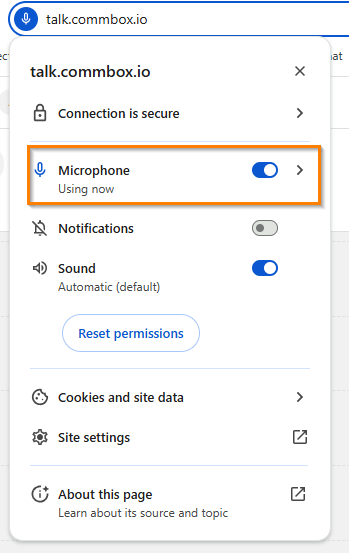
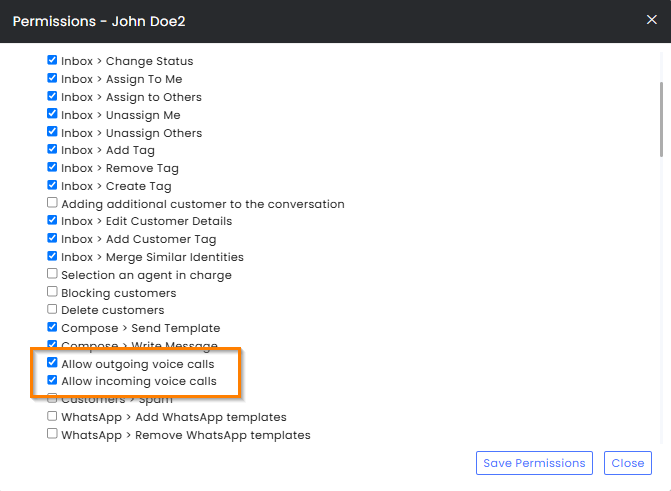
c) Agents must have general permission to make and receive calls (found in the General section)
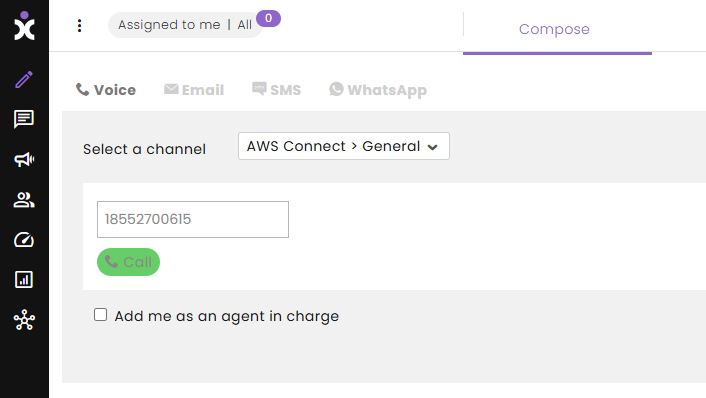
F. Outgoing calls are performed at the Compose section.
Navigate to the Compose section, select the Voice tab, select the desired channel, and enter the phone number with the country code. Click Call.
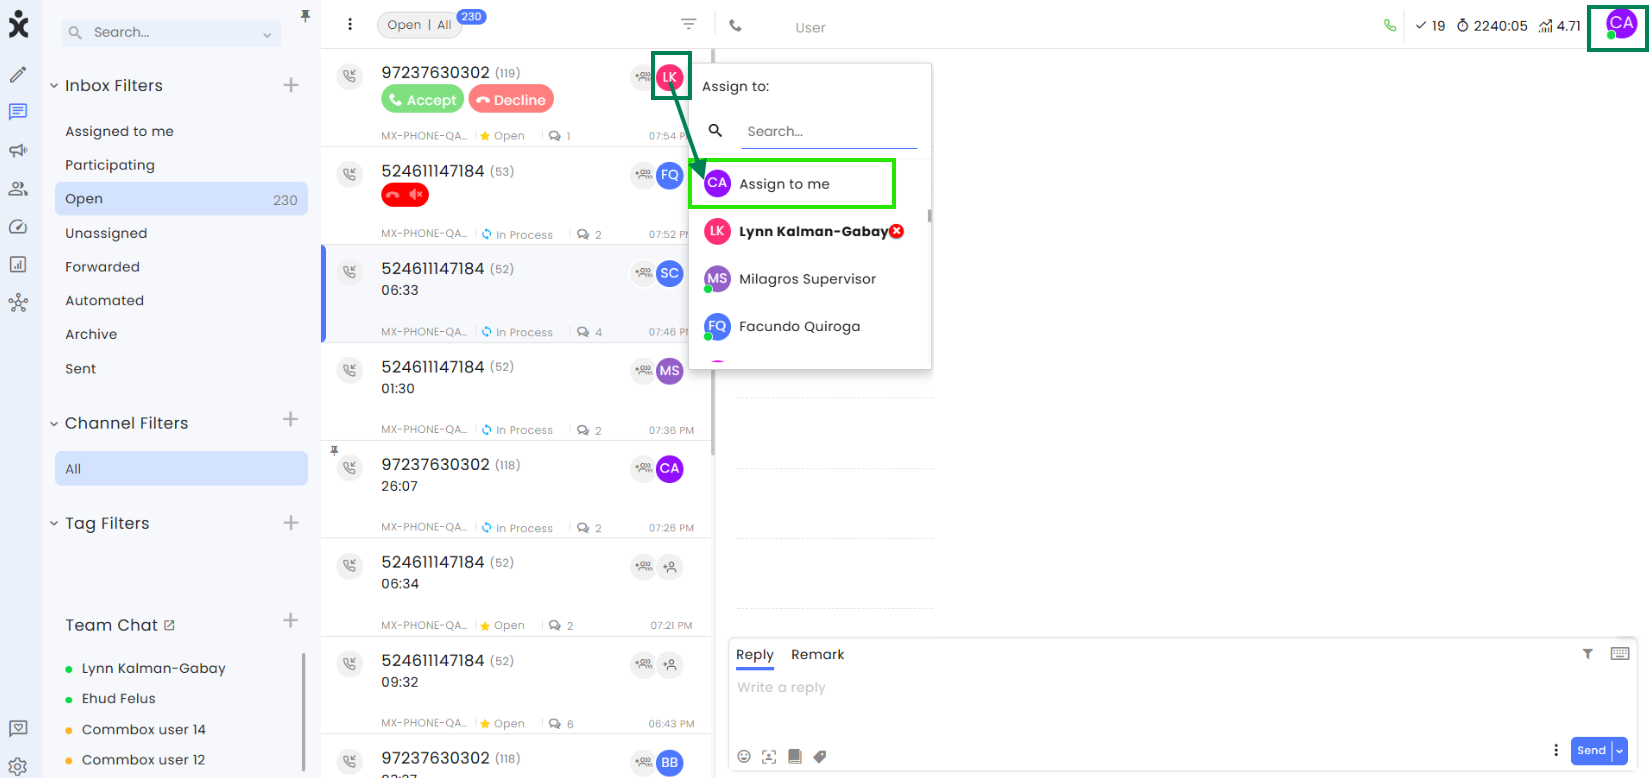
G. An agent can take over a queued call from another agent by clicking the agent’s icon in the conversations list, hovering over their name to remove them (clicking the red circled X), and then selecting Assign to me.
H. Once the call ends, the system’s remarks include the recording link, and the agents can add their comments at the Remarks tab.

I. For a detailed explanation of system messages and how to resolve related issues, see the Understanding Your Call Timeline guide.
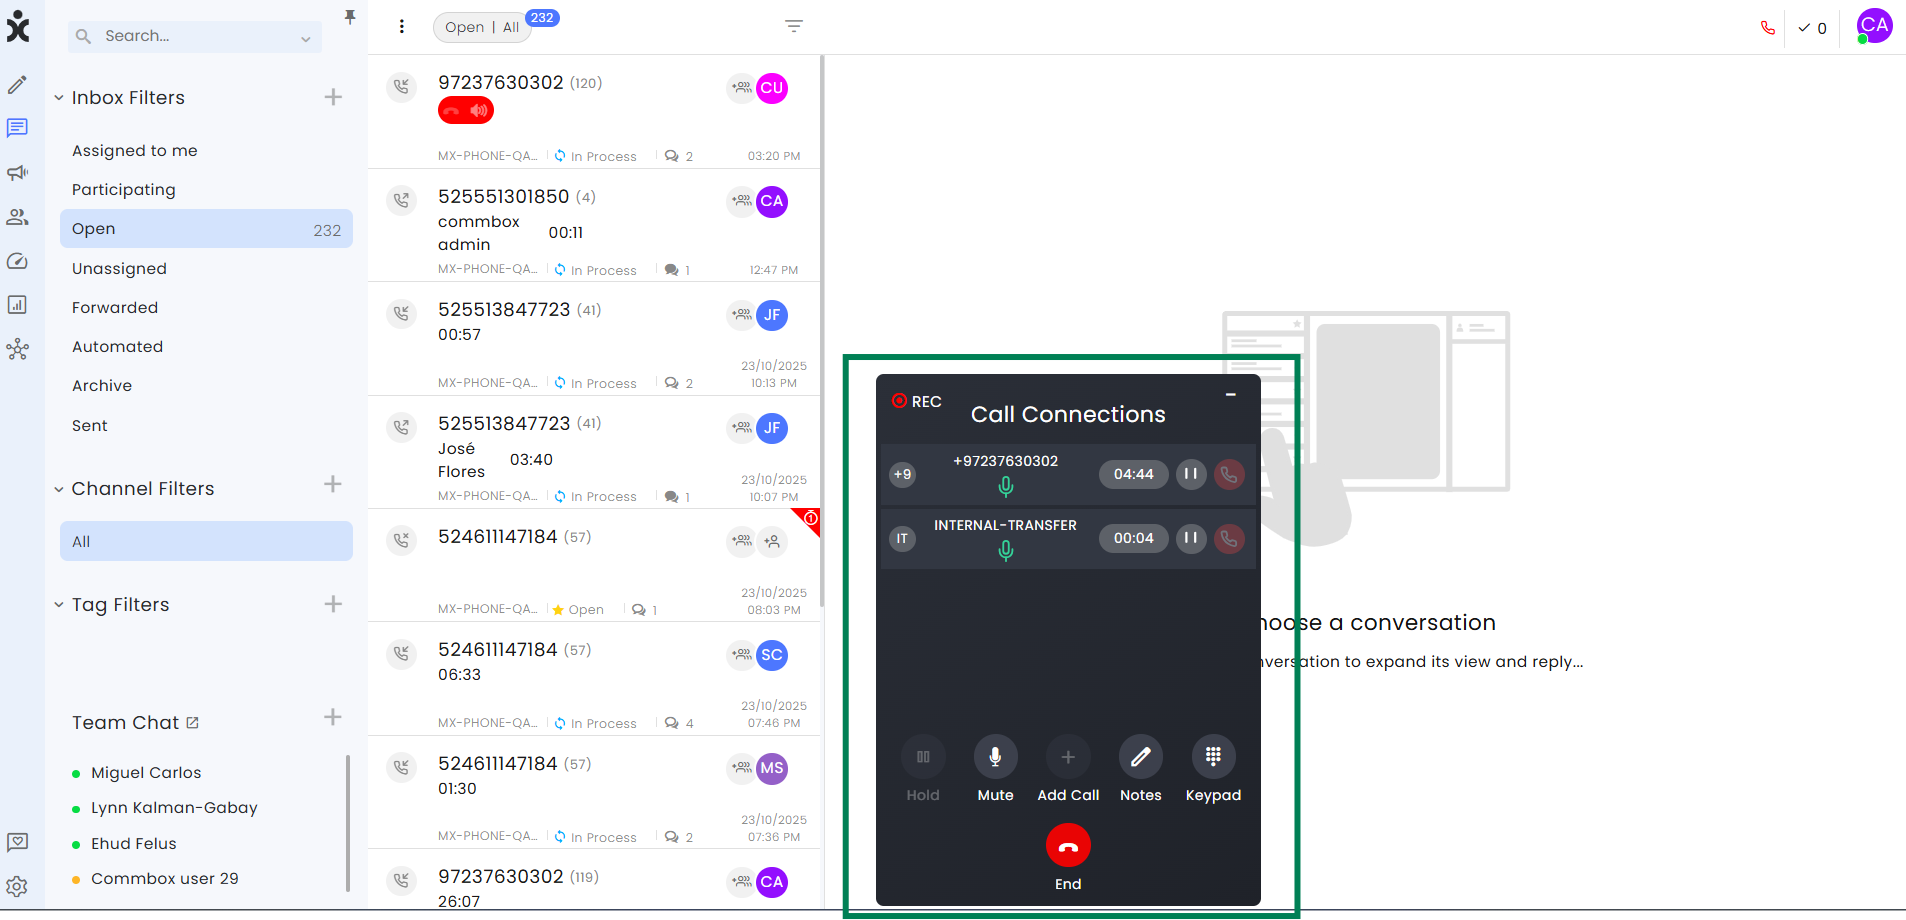
During the Call
The call dialog box opens when a call is made.
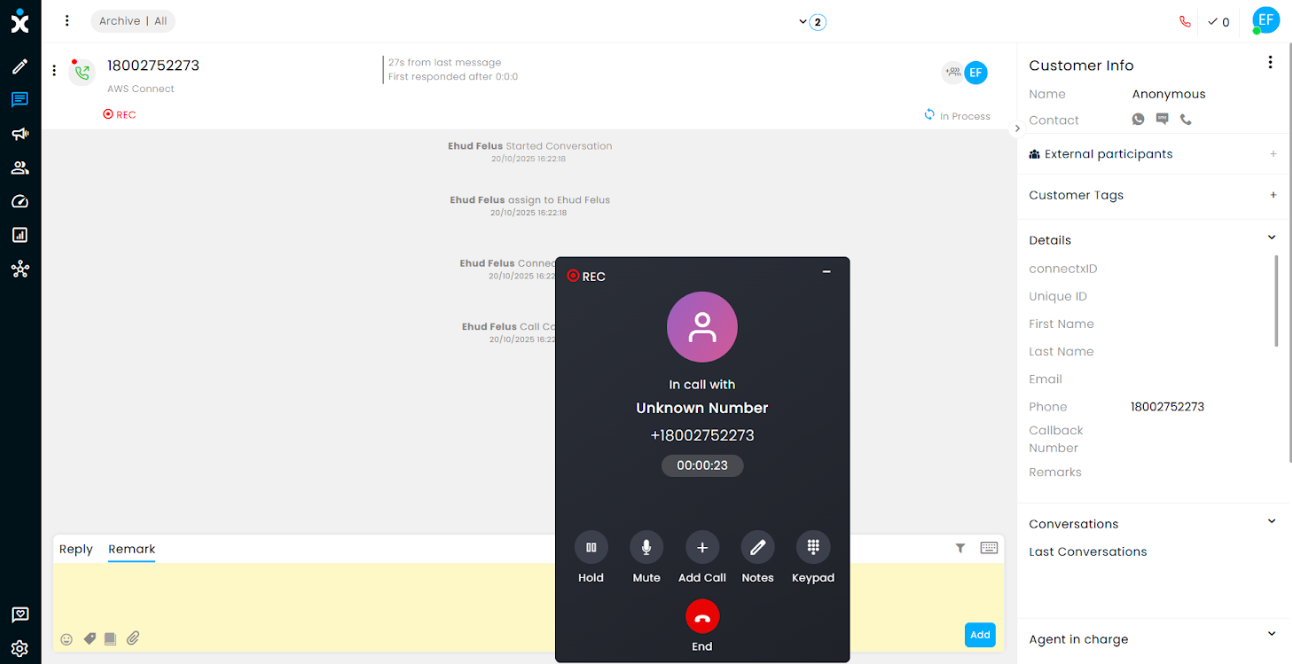
Available actions include:
- Hold - Placing the customer on Hold. Click Resume to continue the conversation.
- Mute (Unmute) the mike of the agent to prevent the customer from hearing the agent.
- Add Call to create a conference call.
- Notes – Opens the Remarks section of the reply box for that call. Agents dealing with other customers don’t have to look for the call (object) in the list of conversations.
- Keypad – Used for entering an extension or navigating IVR menus during outbound calls.
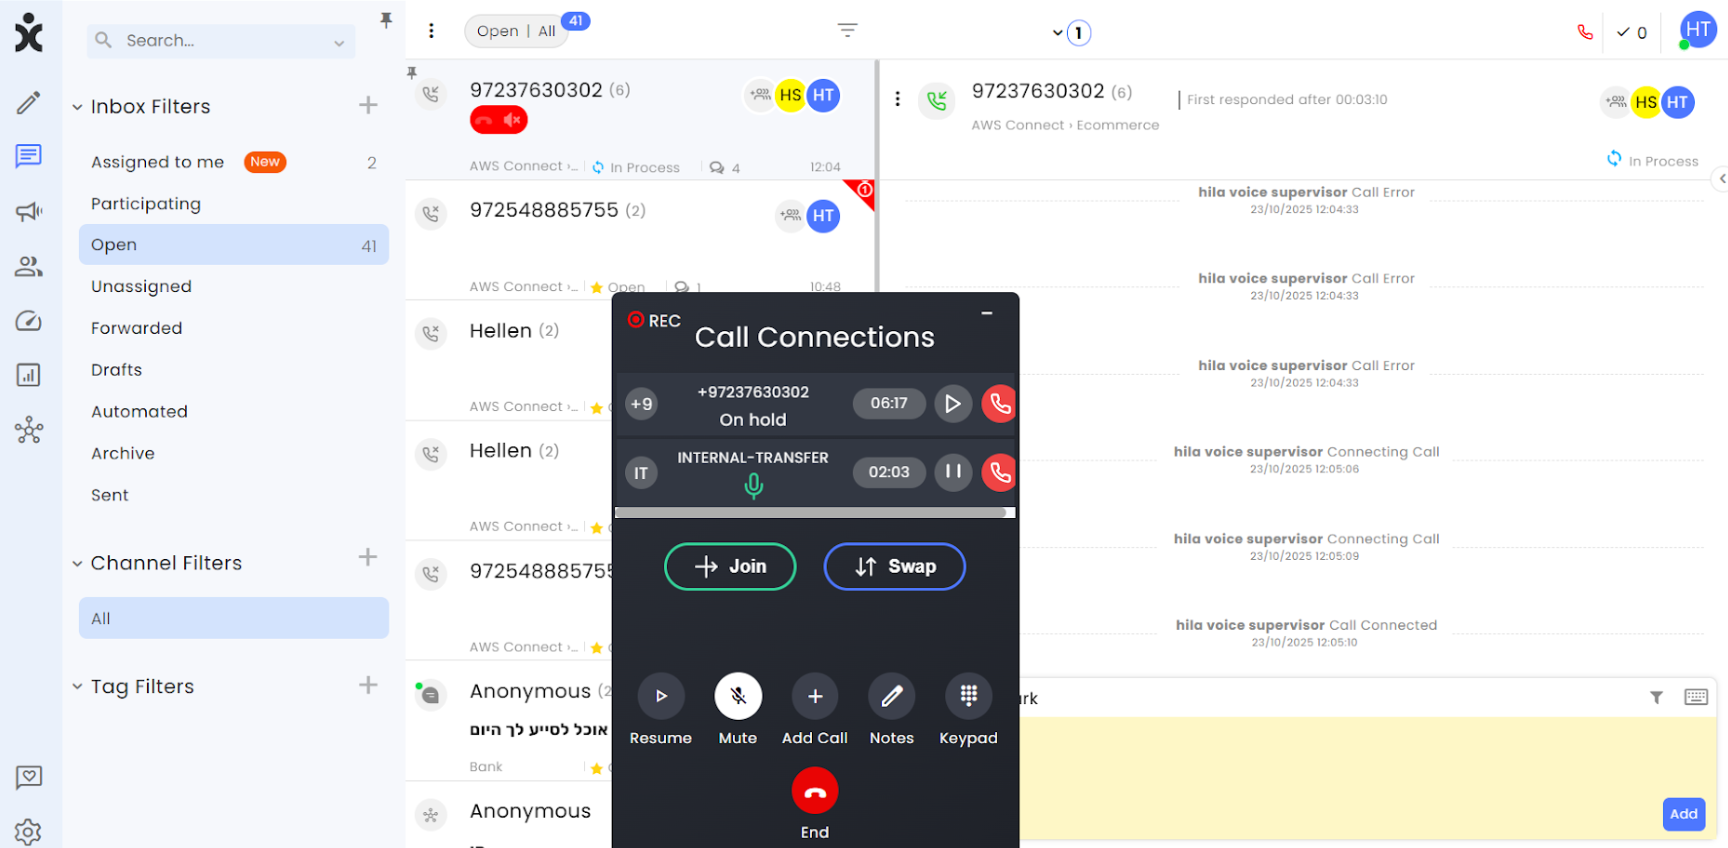
Conference Call
Agents may add additional participants to the active call with the customers.
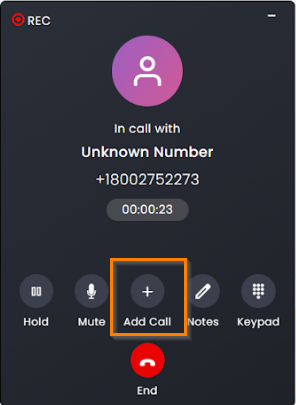
Click the Add Call button, and select the desired available agent from the list, or enter the phone number of the 2nd party. Note that the 1st participant is automatically placed on Hold.

Once the 2nd participant picks up, click Join to conference the callers.
Note: The SWAP button switches on-hold callers to active and active to on-hold.
Call Transfer
A transfer of an active call is done in the object inbox. CommBox enables transferring the customer to another agent in the following ways:
A. Same Channel – Transfer an active call from one agent to another within the same channel.
B. Different Channel – Transfer a call from one agent to another while changing the channel.
C. Transfer to a Queue of the Changed Channel – Transfer a call to a different channel without assigning it to a specific agent, letting the queue logic automatically assign it.
Transfer Calls Between Agents - Same Channel
While in an active call, click on the Personal Settings icon (agent’s initials or image), which will open available agents within the same channel (team). Select a receiving agent for the call.
The call will now be reassigned to the selected agent and will appear in their active call list.
Note: If the selected agent doesn’t answer, the call will automatically move to the next available agent on the same channel.
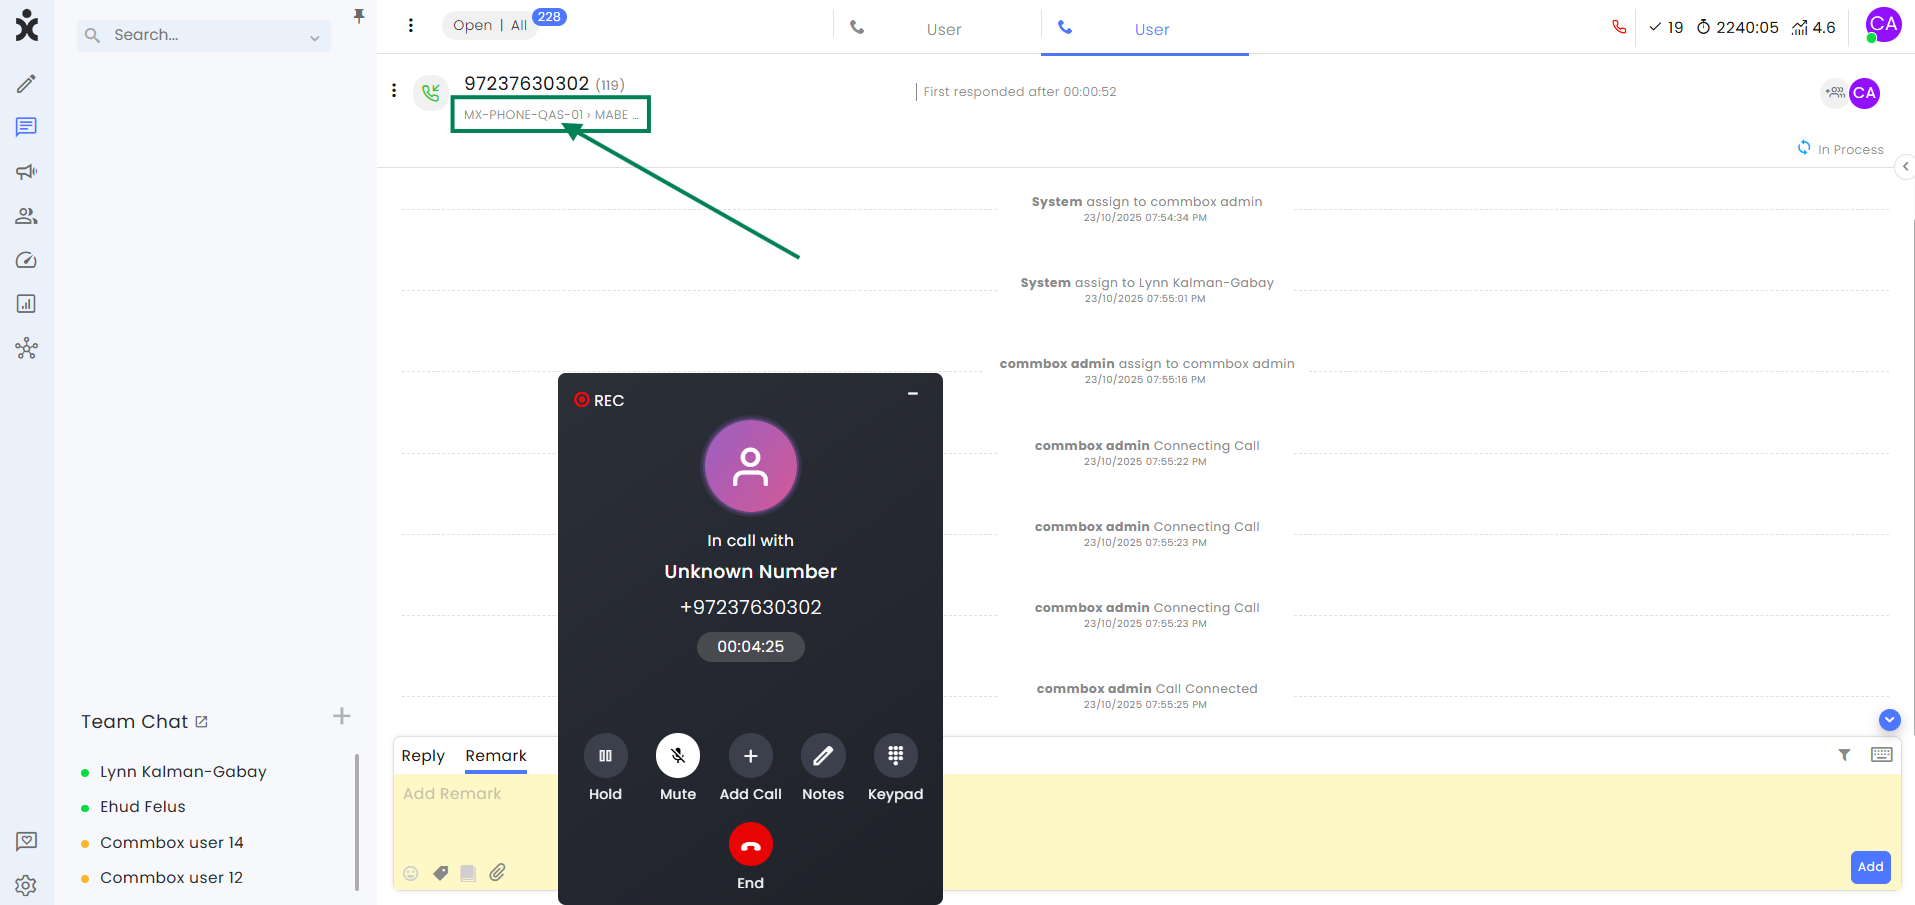
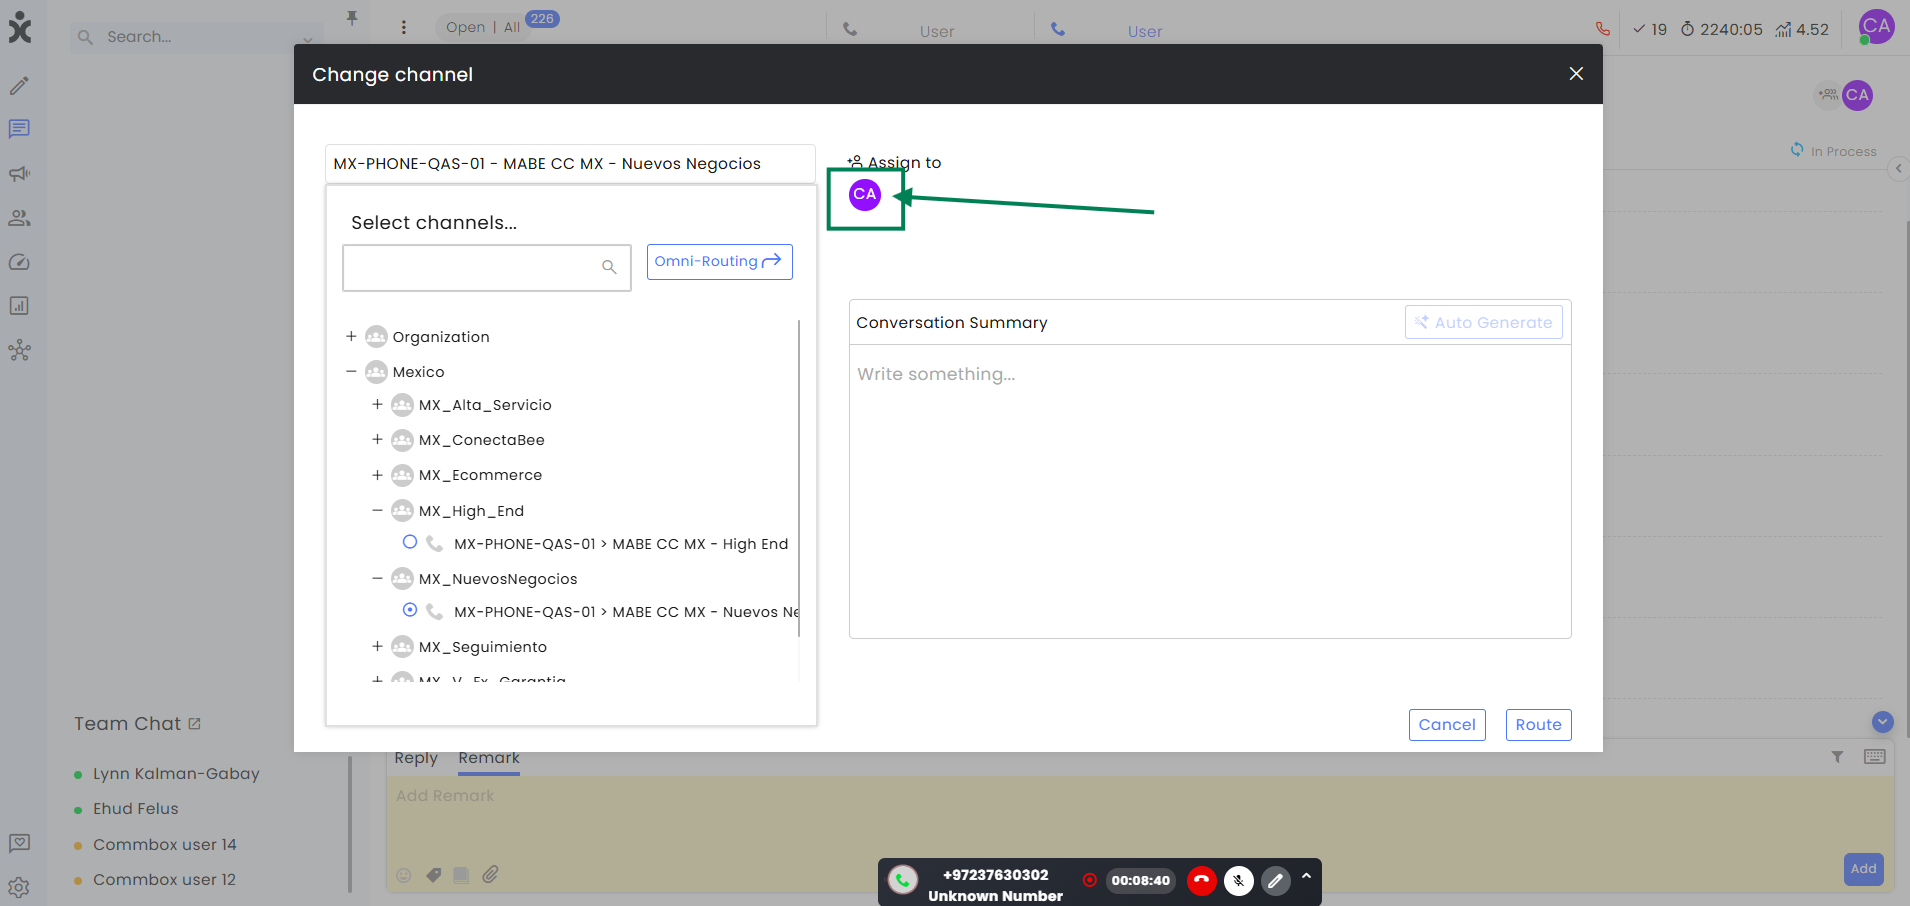
Transfer Calls Between Agents - Different Channel
-
While in an active call, click on the current channel name displayed at the top of the call window (below the customer’s phone number).
-
In the new dialog box, select the desired sub-channel (team) you want to transfer the call to.
-
Click the agent icon at the top of the dialog box.
-
Select the specific agent from that team and click Route at the bottom of the dialog box.
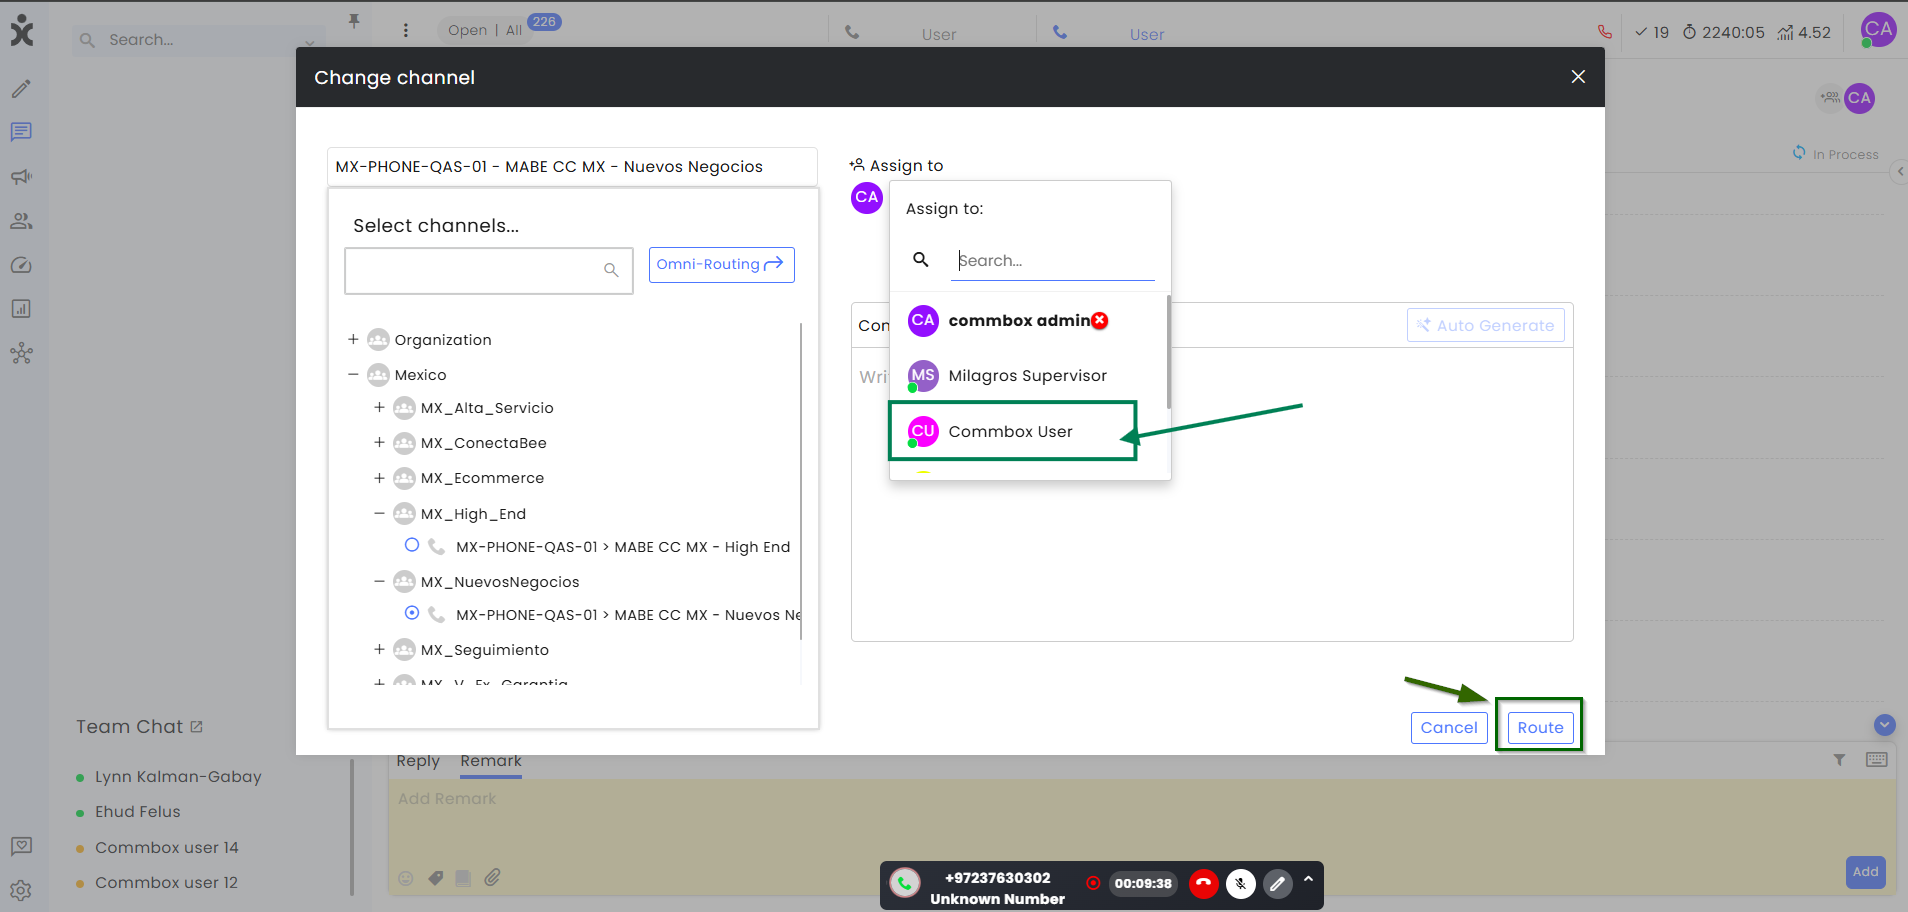
Note: Only active and available agents will appear on the list.
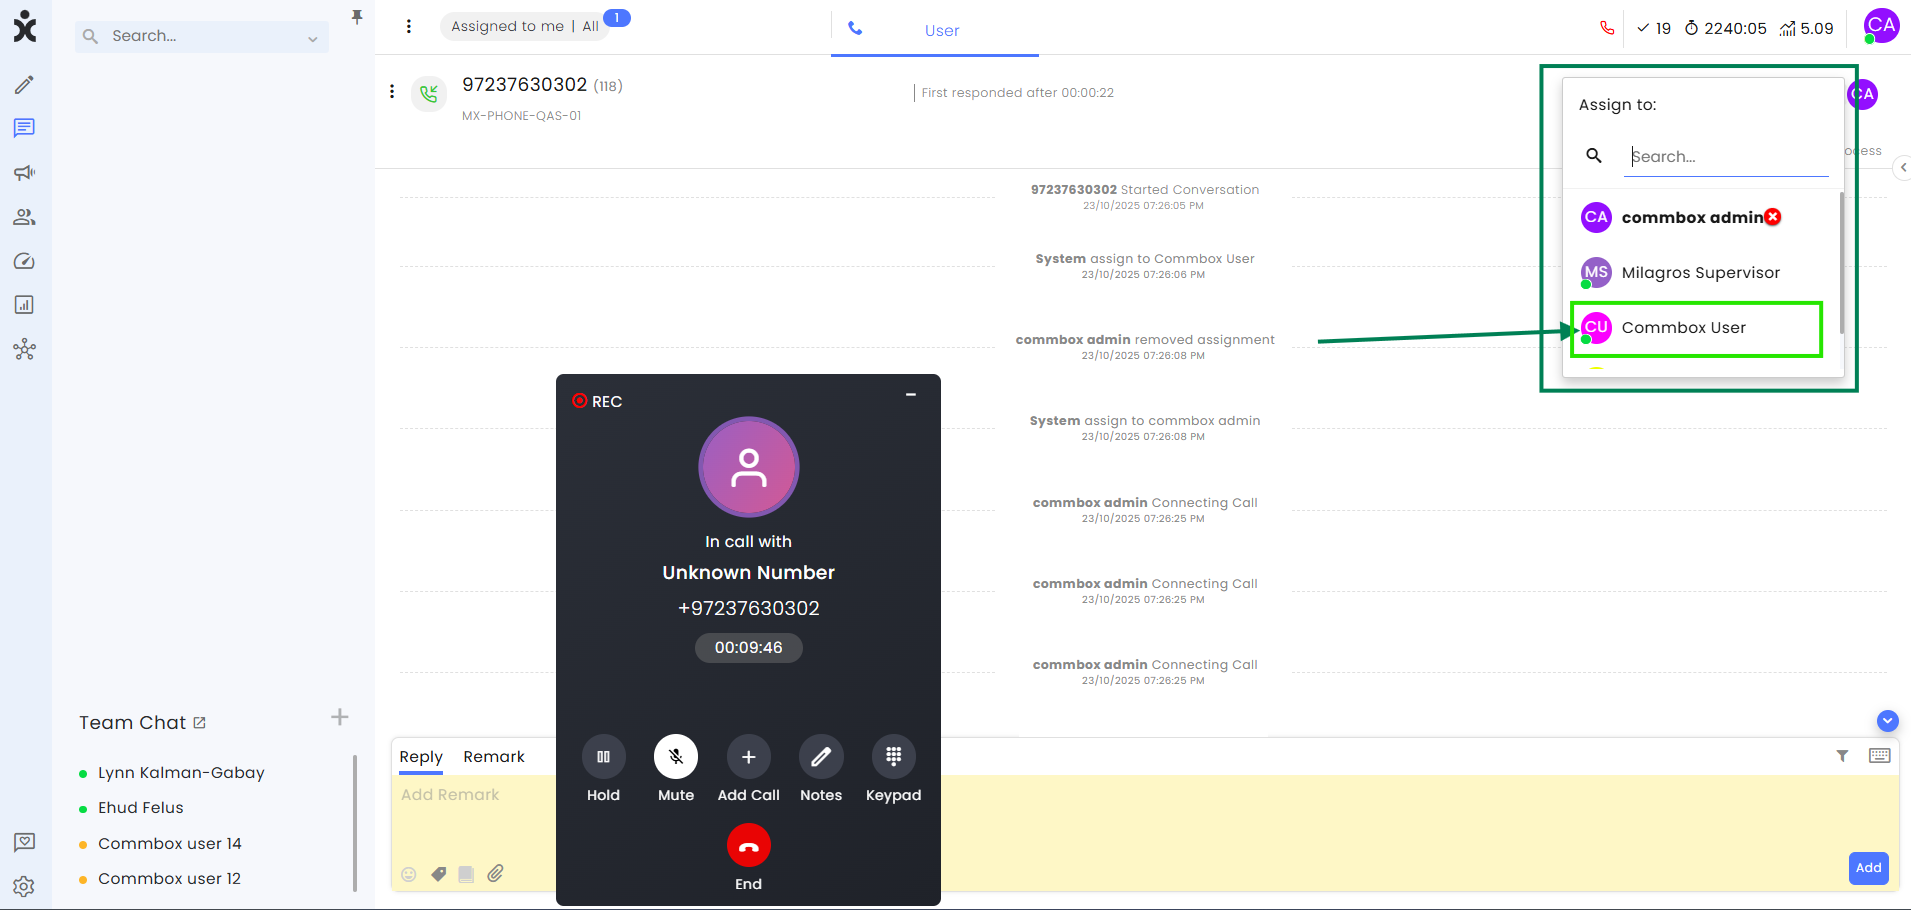
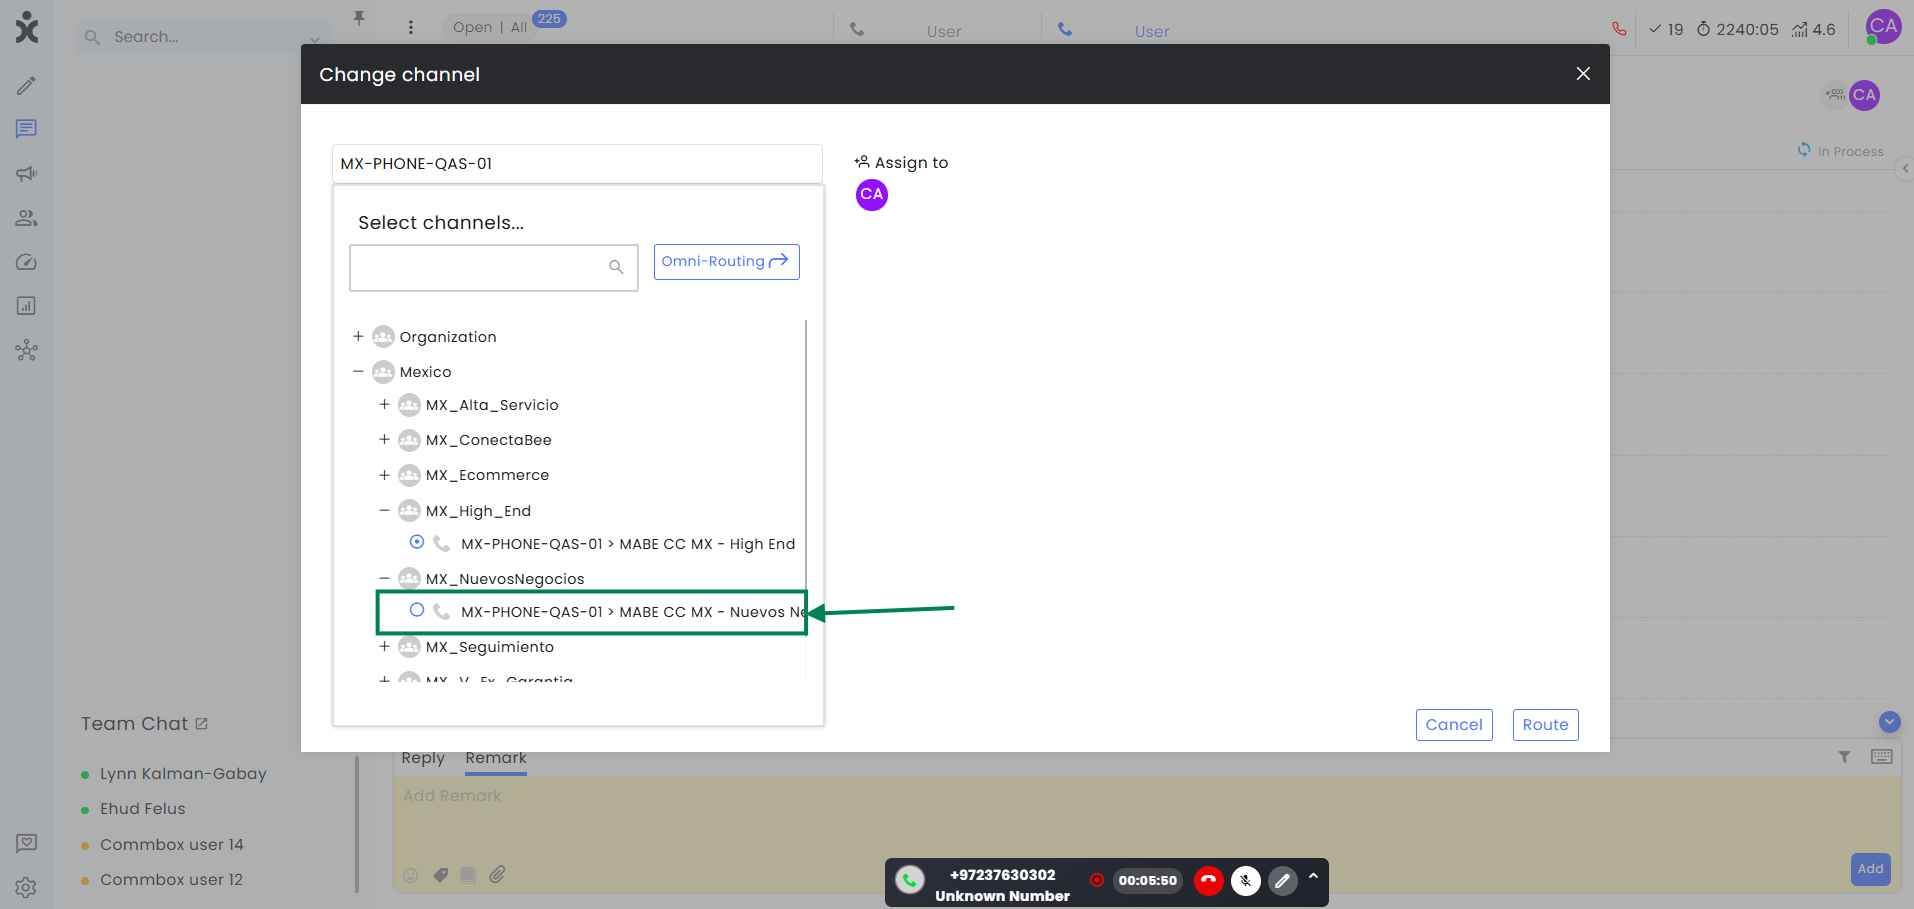
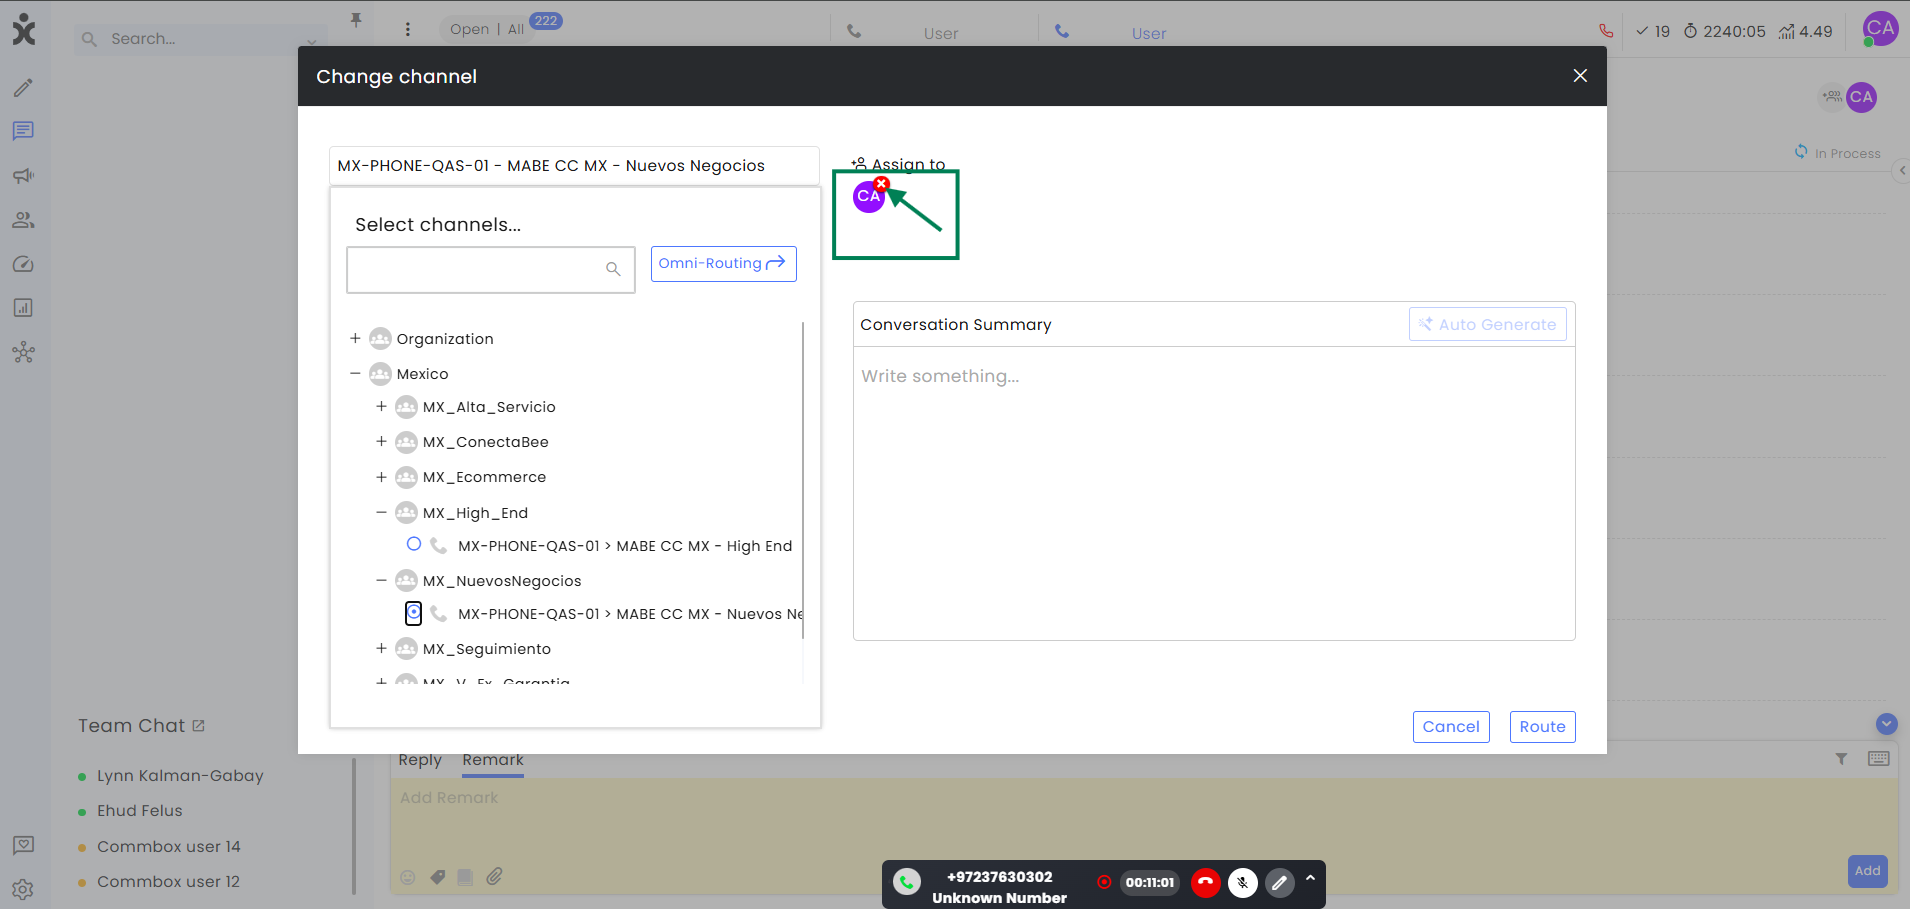
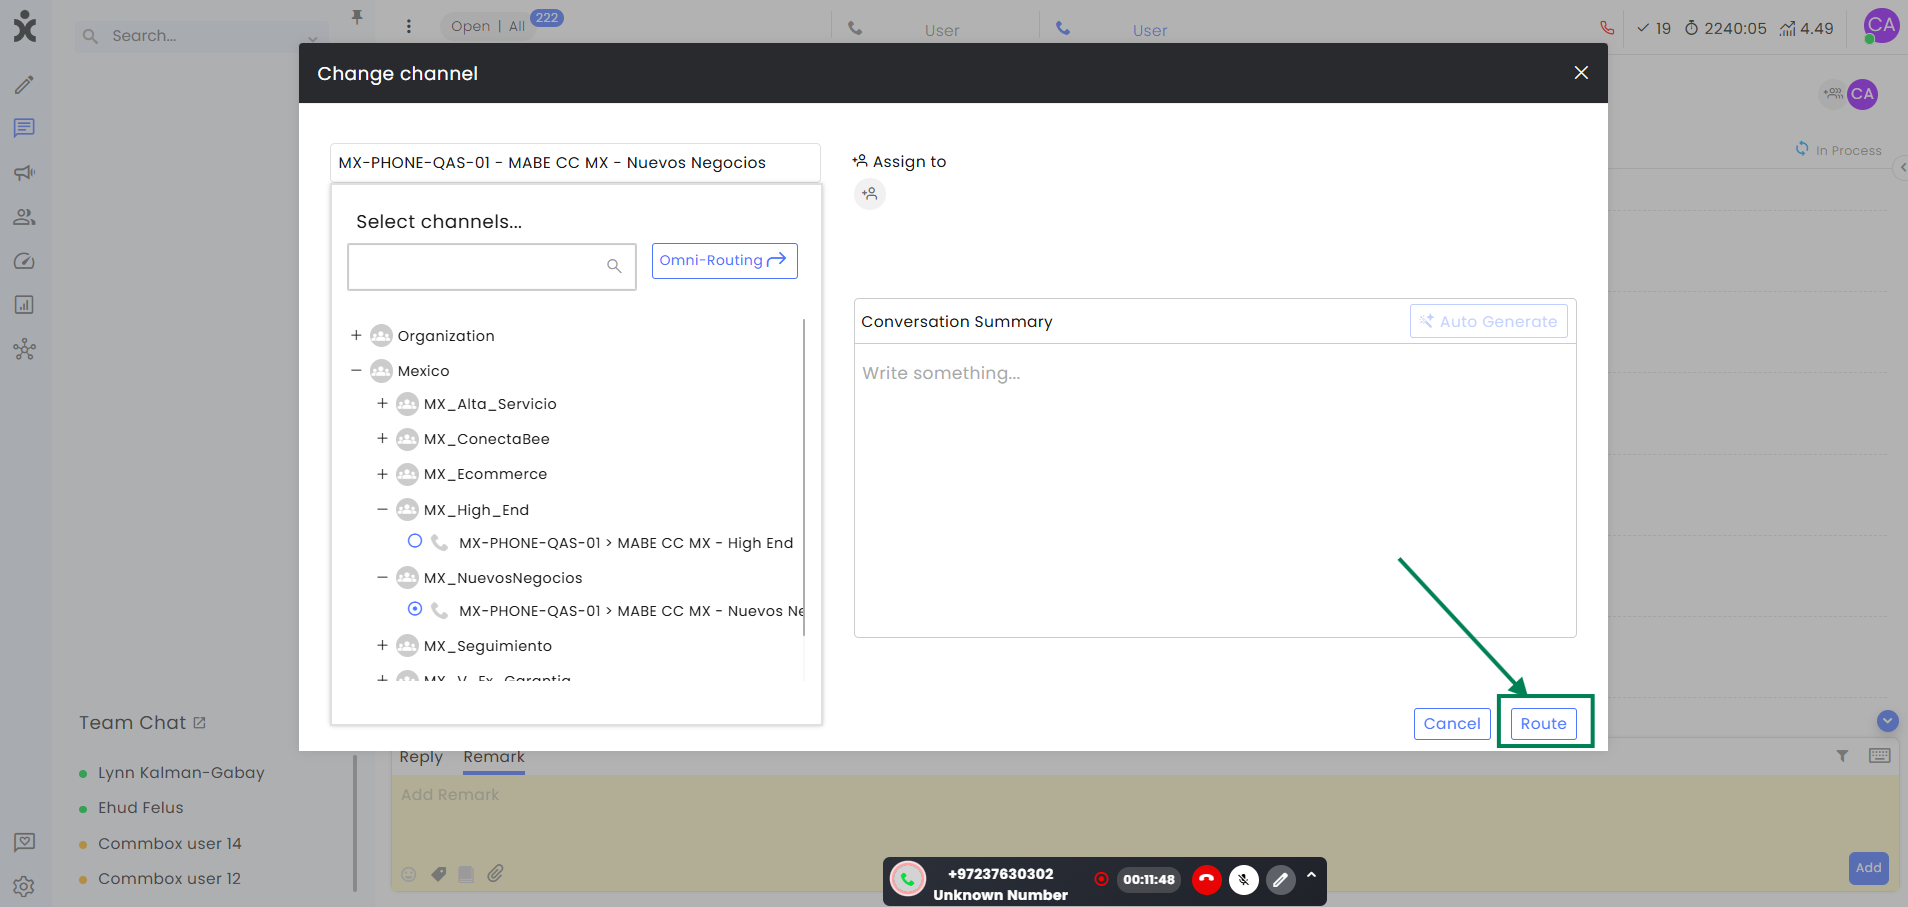
Transfer Calls to a Queue in a Different Channel
-
While in an active call, click on the current channel name displayed at the top of the call window (below the customer’s phone number).
-
In the new dialog box, select the desired sub-channel (team) you want to transfer the call to.
-
Hover over the agent’s initials under the “Assign to” and click on the X button to remove the assignment.
-
Click Route to transfer the call to the queue of the selected sub-channel (team).
Advanced Monitoring Features
CommBox offers the following supervisory or monitoring tools used to manage, train, and support agents while they handle calls:
-
Listening – Enables managers and trainees to just listen to the conversation between the agents and their customers. Agents and customers are NOT aware that the managers are listening to their conversations, and supervisors cannot speak to the call participants.
This tool helps with quality assurance, training, and coaching, while ensuring compliance with scripts or regulations. -
Barging – Enables managers to join the conversation between the agents and their customers, where both agent and customer can hear the manager, who can take an active role in resolving the issues at hand. This ability helps supervisors when a call requires more experienced or higher-level attention than the agent can provide, or when the customers are difficult to handle.
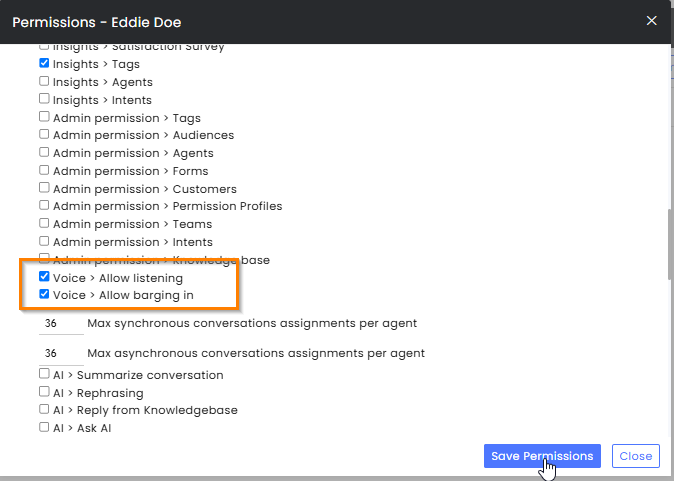
Permissions
To activate these features for non-admin agents, permission must be granted in the Agents’ General permissions section.
✅ Voice > Allow listening
✅ Voice > Allow barging in
To enable barging into conversations, the following additional conditions are required:
- Non-admin agents must have either editing or admin permissions on the specific Voice channel.
- The Auto Assignment toggle must be enabled for agents to receive incoming call assignments.
- Agents must be active (with a green status).
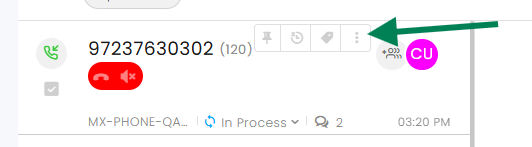
Monitoring Calls
-
Locate the active call you want to monitor in your inbox.
-
Hover over the desired conversation and click the three-dot menu that appears.
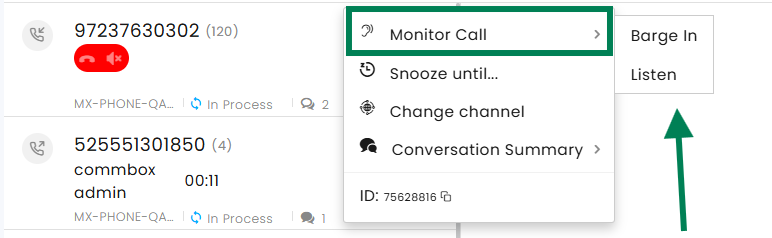
-
At the action menu, hover over the Monitor Call option and select the desired action.
- Barge In – allows you to both listen and speak during the call.
- Listen – allows you to listen only.
(Only the options matching your permissions will appear. If you don’t have monitoring permissions, this menu item won’t be visible.)
-
At the dialog box with the active conversation, you can select to join or listen to the conversation.
-
Note that you cannot end the call or place the customer on Hold.
When you want to end the monitoring session, click the red End button.
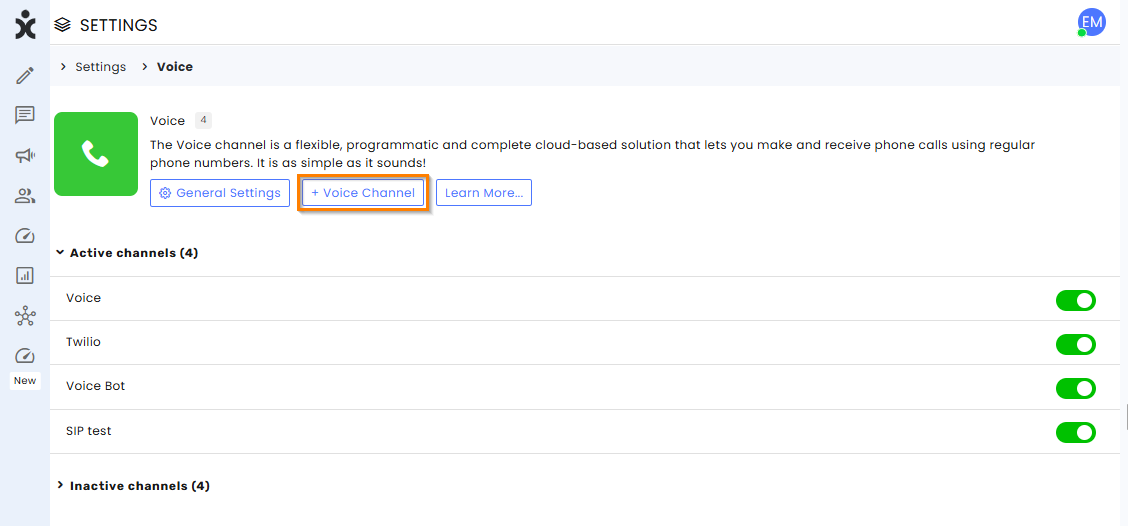
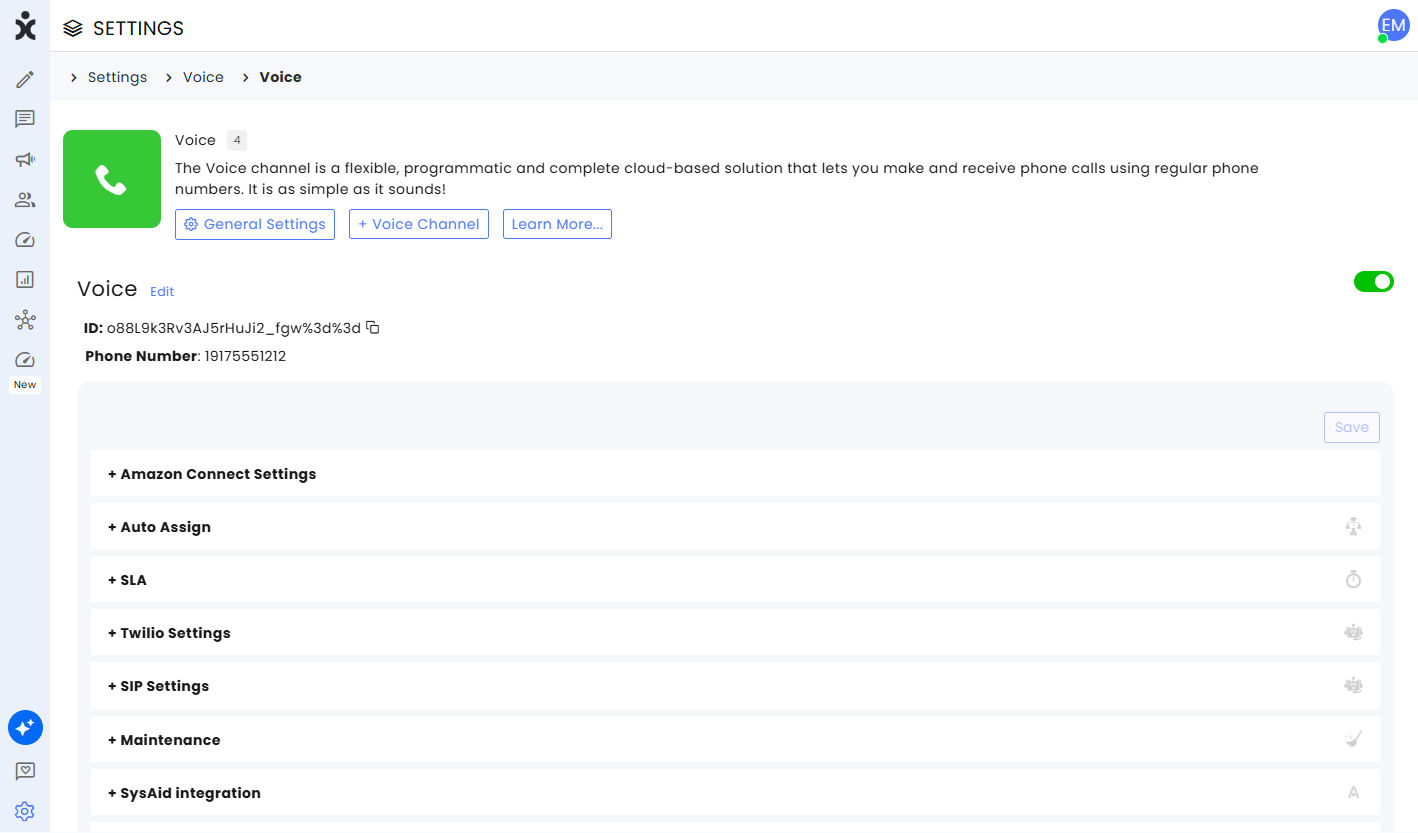
Creating a New Channel
To create a new voice channel in CommBox, you must provide the voice provider ID from either AWS Connect or Twilio.
If you haven't completed the integration, please refer to the AWS Connect Setup guide.
For Twilio as a provider, please refer to the Twilio voice bot guide.
-
Navigate to Settings, select the Voice module, and click the + Voice Channel button at the top.
-
Enter a unique name for the channel and a valid AWS, Twilio, or SIP phone number.
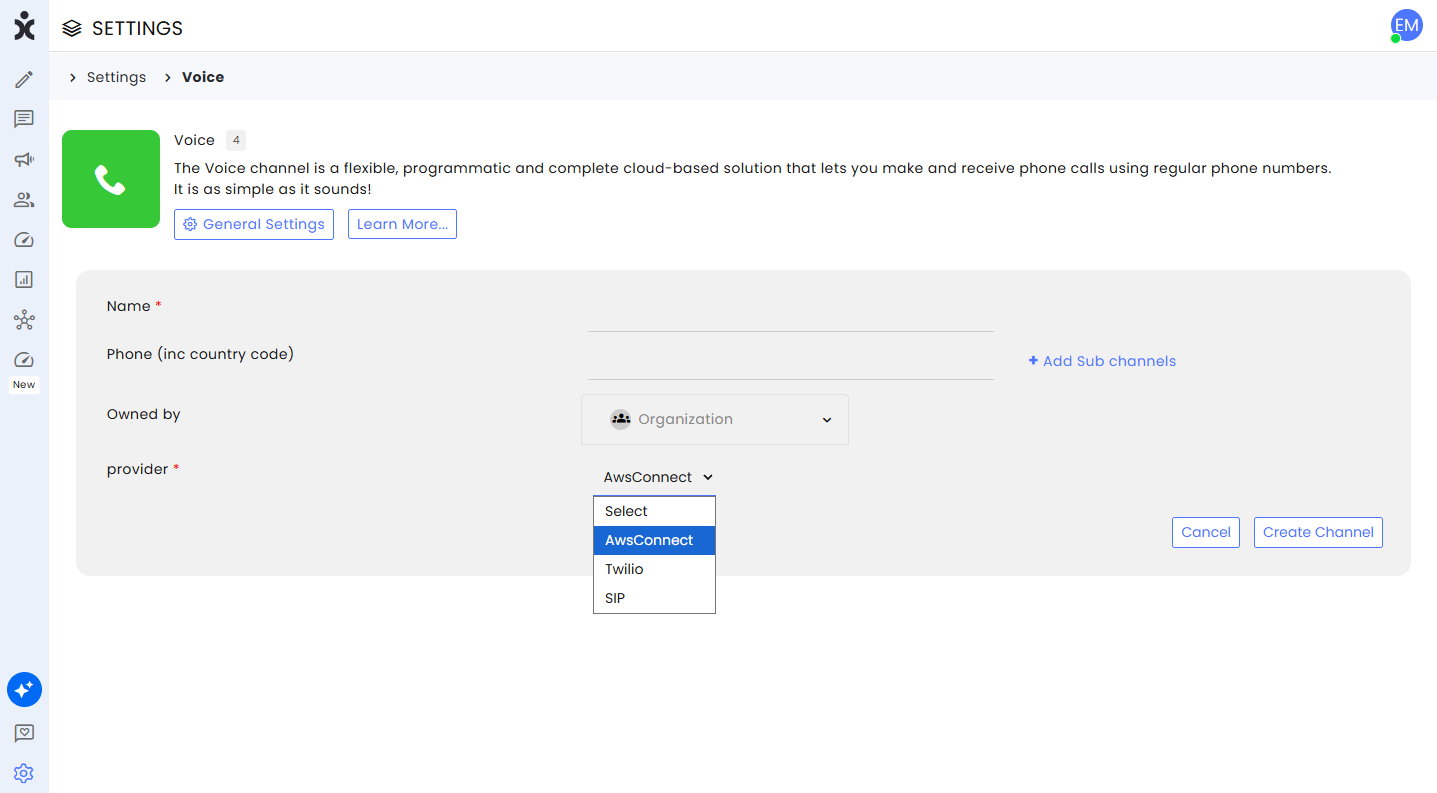
-
Add Subchannels (optional)
-
Select an ownership team (optional)
-
Select the Provider.
-
Click Create Channel.
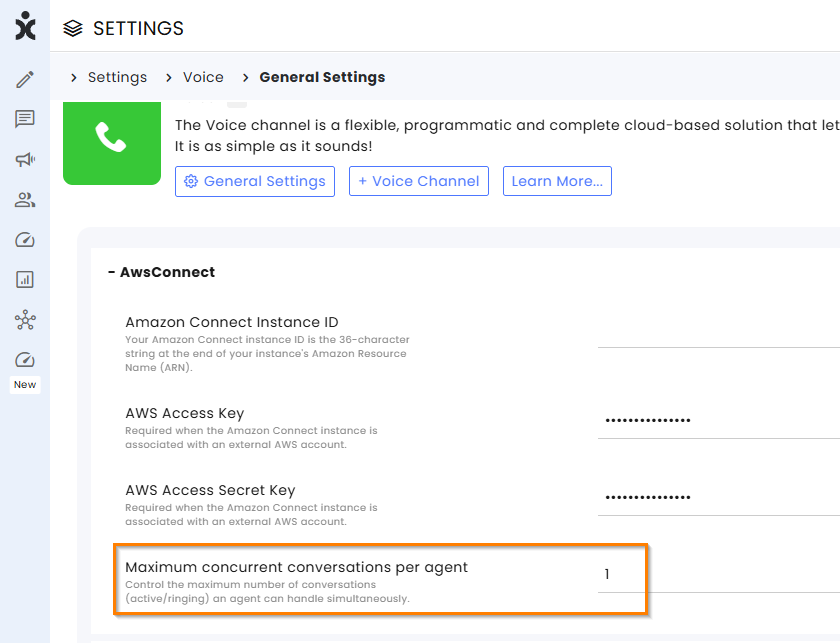
-
For AWS Connect only: Navigate to General Settings if you want to change the number of calls assigned to available agents (default is 1). Enter the desired number of calls in the Maximum concurrent conversations per agent field.
Channel Settings
Amazon Connect Settings
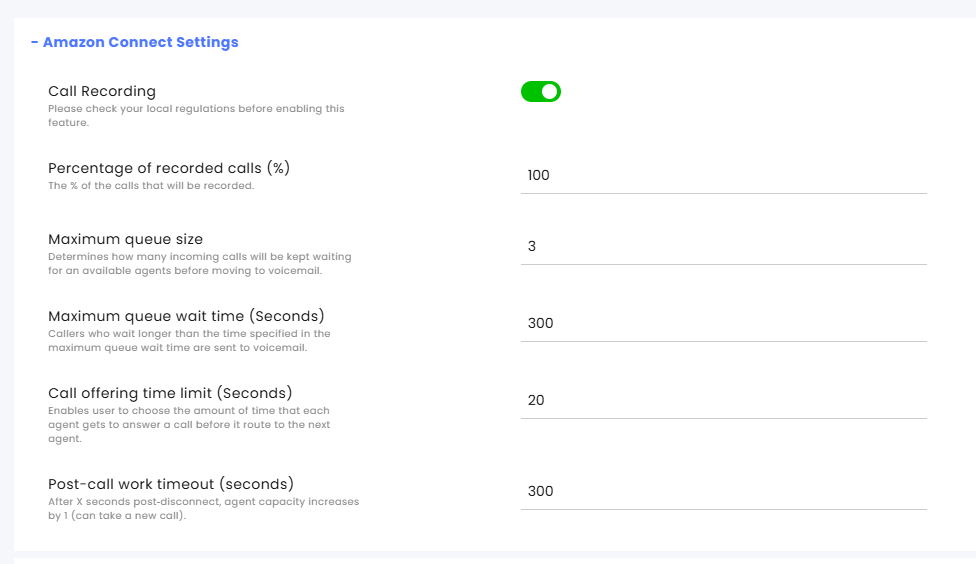
Call Recording – Automatically records the conversations. Please check local regulations before enabling this feature.
Percentage of recorded calls – Enter a numeric value without the % symbol.
A value of 100 records all calls. Any other value results in calls being recorded randomly based on the specified percentage.
Maximum queue size – Enter the maximum number of calls that can be handled concurrently by all agents before calls are diverted to voicemail. Note: The maximum assignment limit per agent is configured in the AWS Connect General Settings (by default: One call per agent at any time).
Maximum queue wait time (seconds) – Callers who wait longer than the specified time limit will be forwarded to voicemail.
Call offering time limit (seconds) – This limits the time the agent has to answer the call before it is routed to the next agent. This capability is only applicable when the auto-assign is activated.
In the example above, the call is transferred from agent to agent through the auto-assign mechanism (20 seconds per agent) for a total of 5 minutes (300 seconds). If no agent answers, the call goes to voicemail and disconnects.
Post-call work timeout (seconds) – Defines the amount of time an agent is allocated to complete post-call activities before becoming available for new calls. Once the configured timeout elapses, the agent’s capacity automatically increases by one, allowing additional calls to be assigned.
SLA

SLA target for first replies (In seconds) - Enter the number of seconds agents have to respond to a call after assignment.
Maintenance
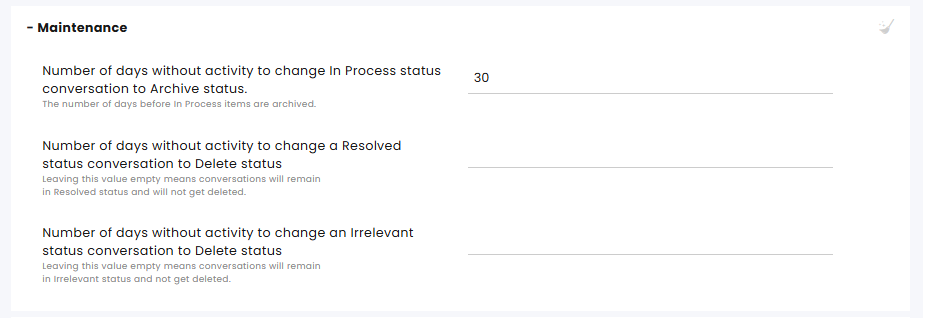
Number of days without activity to change In Process status conversation to Archive status - The number of days a conversation remains inactive in the 'In Process' status before it is automatically moved to the 'Archived' status.
Note: The deletion of conversations in the 'Archived' status is configured in the Maintenance module.
Number of days without activity to change a Resolved status conversation to Delete status - The number of days a conversation remains inactive in the 'Resolved' status before it is automatically moved to the 'Delete' status.
Note: Leaving this value empty means conversations will remain in 'Resolved' status and will not get deleted.
Number of days without activity to change an Irrelevant status conversation to Delete status - The number of days a conversation remains inactive in the 'Irrelevant' status before it is automatically moved to the 'Delete' status.
Note: Leaving this value empty means conversations will remain in 'Irrelevant' status and will not get deleted.
Twilio Settings
Not relevant to AWS Voice channel.
Click here for more information about Voice bots.
SIP Settings
Not relevant to AWS Voice channel.
Click here for more information about Voice bots.
CRM Integrations
See information in the relevant guides.