Overview
Connect SAP Emarsys with WhatsApp messaging through CommBox's integration solution. This connection enables you to send approved WhatsApp templates to your customers based on automation triggers in Emarsys.
The integration works by using Emarsys' Automation Programs and Webhook Node Presets to send data to CommBox, which then handles the WhatsApp message delivery. This approach solves the limitation of Emarsys not having direct WhatsApp connectivity via CommBox.
This solution provides a practical way to extend your Emarsys communication channels to include WhatsApp messages via CommBox.
Prerequisites
● SAP Emarsys account with Automation Center access
● Admin permissions to the CommBox account with an active WhatsApp Business API integration
● Approved WhatsApp message templates
● JWT authentication credentials
Implementation Steps
Step 1: Enable the Emarsys Module in CommBox
Before configuring SAP Emarsys, enable the integration in CommBox and obtain the Secret Key:
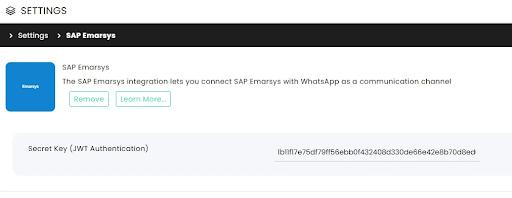
- At the CommBox platform, navigate to Settings (the gear icon) and select the SAP Emarsys module from the integration section.
- Click the Install button at the top in the event the integration has not already been installed.
- Copy the Secret Key (JWT Authentication) provided on that page - This key will be used to authenticate the connection between Emarsys and CommBox
Step 2: Configure a Webhook Node Preset in SAP Emarsys
-
At the SAP Emarsys platform, navigate to the Automation Center and select Webhook Node Presets.
-
At the top corner, click Create Preset.
-
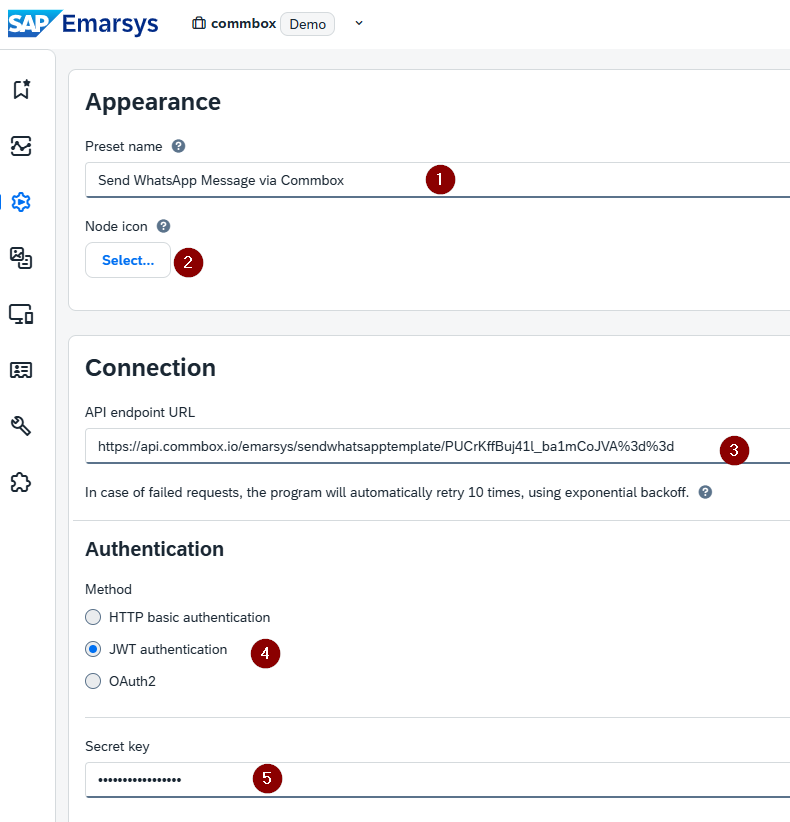
Under Appearance:
a. Preset name: Enter a descriptive name (e.g., "Send WA Marketing Template via CommBox")
b. Node icon: Click "Select..." to choose an appropriate icon (optional) -
Under Connection:
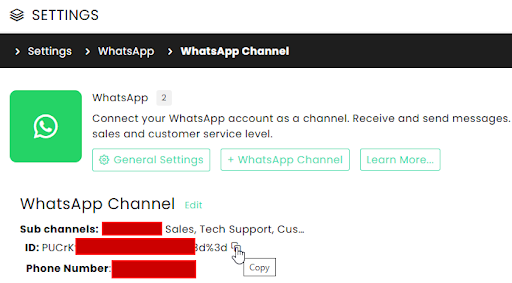
API endpoint URL: Enter the WhatsApp API endpoint: https://api.commbox.io/emarsys/sendwhatsapptemplate/{ENCRYPTED_STREAM_ID} - The {ENCRYPTED_STREAM_ID} is the encrypted identifier (ID) of your WhatsApp channel in CommBox:
-
Under Authentication settings:
a. For the Method, select "JWT authentication."
b. Paste the JWT secret key copied from CommBox in the Secret key section.
-
Under Data settings:
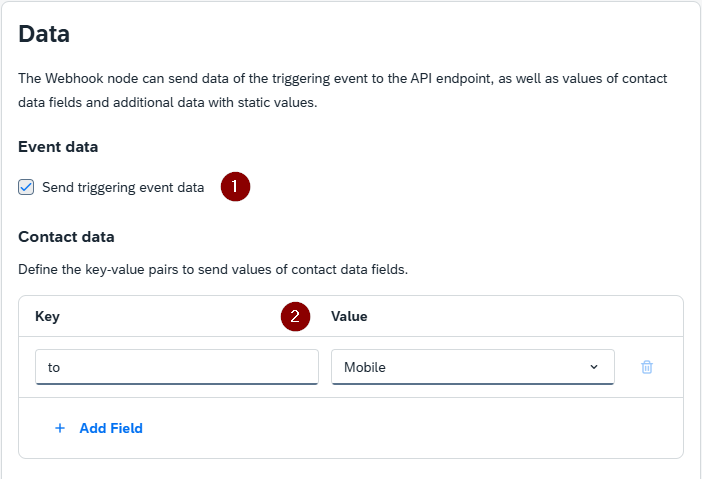
a. To include event information on the webhook, check the "Send triggering event data" box in the Event data section.
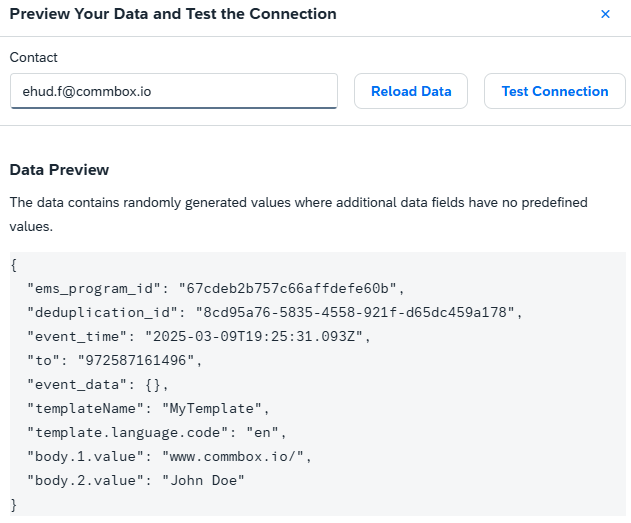
b. At the Contact data: Define key-value pairs for contact information:
Add a key "to" with the value set to "Mobile". This ensures the WhatsApp message is sent to the correct phone number (assuming the WhatsApp number is stored in this field).
c. The Additional Data section will be used to transfer all the WhatsApp template-related data as key-value pairs. You’ll need the approved template’s official name, language code, and required parameters.
To obtain this information from the CommBox platform, navigate to Settings > WhatsApp > General Settings > WhatsApp Message Template, OR in Meta WhatsApp Manager > Message Templates.
Configure the following template parameters as key-value pairs:- templateName:
Key: templateName
Data Type: text
Value: Enter your approved WhatsApp template name (e.g., "MyTemplate") - Template Language:
(Related: Supported Languages - WhatsApp Business Management API)
Key: template.language.code
Data Type: text
Value: Enter language code (e.g., "en" for English) - Template Body Parameters:
For each parameter in your WhatsApp template, add a separate field:
○ Key: body.1.value
Data Type: text
Value: First parameter value (e.g., your website URL)
○ Key: body.2.value
Data Type: text
Value: Second parameter value (e.g., customer name or other dynamic content)
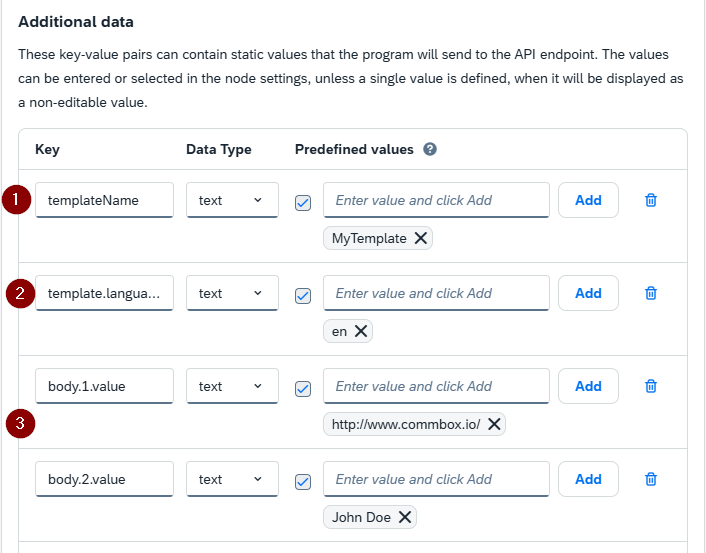
Note: In this example, we added all the parameters in the Additional Data section, but they could have been added in the previous Data section if, for example, one of the parameters should obtain contact data such as First Name or any other Contact Data that needs to be pulled Dynamically.
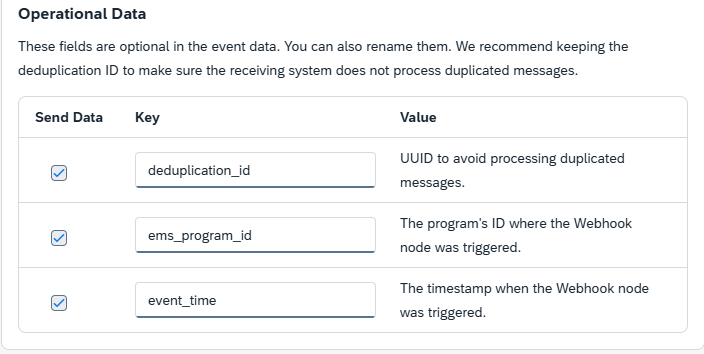
d. In the Operational Data section, keep the default operational fields to ensure proper tracking:
○ deduplication_id: Prevents duplicate message processing
○ ems_program_id: Identifies which program triggered the webhook
○ event_time: Captures the timestamp of the webhook trigger
- templateName:
-
Click Save at the upper corner of the screen to save the Webhook preset node configuration. The new Webhook Node Preset should appear at the top of the list.
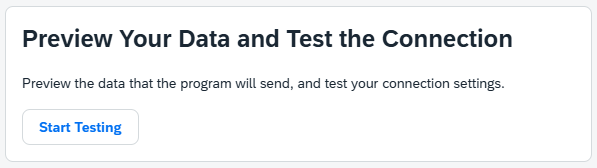
Step 3: Testing Connection
-
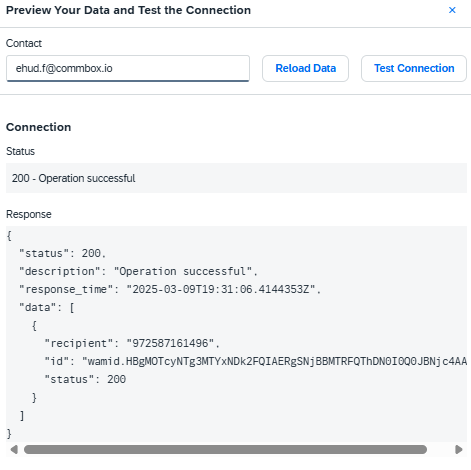
To test the webhook connection and preview the data sent, navigate back to the list of webhooks and click the Edit icon next to the relevant webhook.
-
As you scroll down, look for the preview box at the side and click Start Testing.
-
In the opened dialog box, select a Contact and click Preview Data.
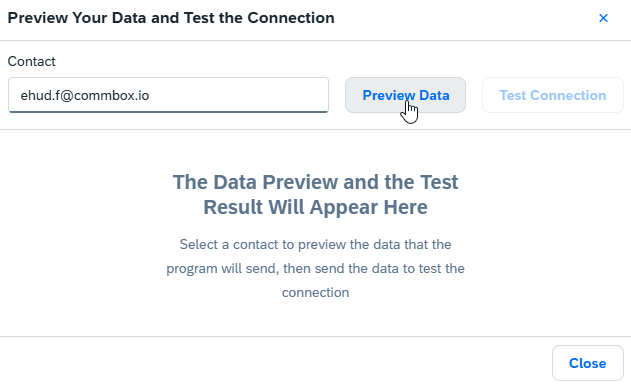
-
In the next screen, click Test Connection.
If everything is in order, you will get a Status 200 (OK), and the WhatsApp message will be sent to the contact you chose for testing.
Step 4: Creating an Automation Program
Create an Audience-focused (executed on a contact segment) or a Behavior-focused (triggered by events) automation program:
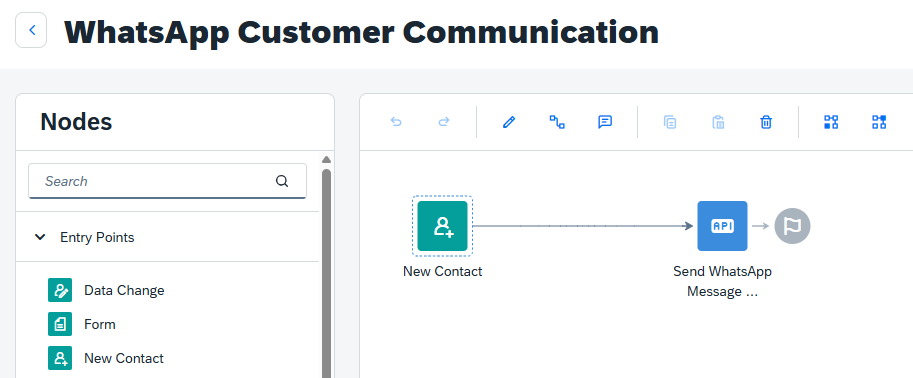
For Audience-focused Journey:
- At the SAP Emarsys platform, navigate to Automation > Automation Programs and click Create Program to start a new automation.
- Select the Audience-focused Journeys option.
- Name your automation (e.g., "WhatsApp Customer Communication")
- Add an entry point like "New Contact" or "Target Segment," and configure the entry point with the appropriate settings.
- Add the "Send WhatsApp to CommBox" webhook node after the entry point.
- Connect the nodes with an arrow.
- Save and activate your automation.
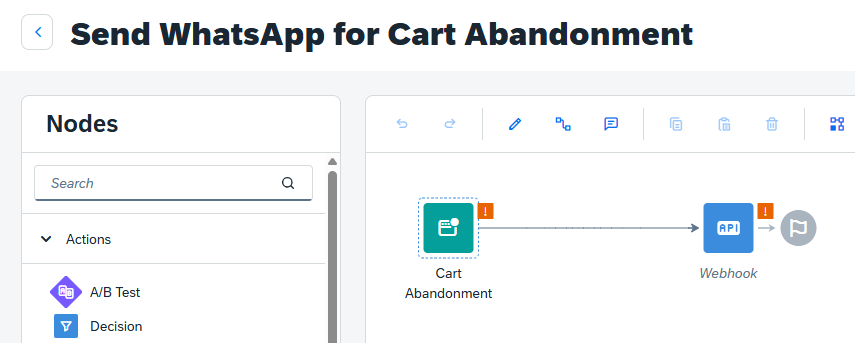
For Behavior-focused Journey:
- At the SAP Emarsys platform, navigate to Automation > Automation Programs and click Create Program to start a new automation.
- Select the Behavior-focused Journeys option.
- Name your automation
- Add event triggers as the entry point and configure the event that will trigger the WhatsApp message (e.g., "Cart Abandonment").
- Connect the nodes with an arrow.
- Save and activate your automation.
Step 5: Testing the Integration
- Create a test contact or segment that meets your automation criteria.
- Trigger the automation manually or through the defined event.
- Check if the WhatsApp message is sent via CommBox.
- Verify that any response from the contact is captured correctly in CommBox and reflected in Emarsys if configured.
Use Case Example
A complete example of a WhatsApp messaging flow might look like this:
- A new contact is created in Emarsys, or the Target Segment is updated.
- Automation Program triggers the Webhook Event.
- CommBox launches a WhatsApp message to the contact.
- Contact resumes shopping cart on the website.
- Agent gets notified in Emarsys and continues the Business Process
- Conversation details, including tags, documents, output, and ratings, are saved in CommBox.
Troubleshooting
If messages are not being sent or the integration is not working properly, check the following:
-
Authentication Issues:
○ Verify that the Secret Key is correctly copied from CommBox to Emarsys
○ Confirm that you've selected "JWT authentication" as the method -
Endpoint Configuration:
○ Ensure the Webhook endpoint URL is correct and includes your specific endpoint ID
○ Check that the endpoint is accessible from Emarsys' servers -
Template Parameters:
○ Verify that the templateName exactly matches your approved WhatsApp template name
○ Ensure the language code matches the approved template language
○ Check that the number of body parameters matches your template's requirements
○ Confirm parameter values don't exceed character limits -
Contact Data:
○ Verify that the "to" field contains a valid mobile number with the correct international format
○ Check that the contact field mapping is correctly pulling phone numbers from your database -
Operational Checks:
○ Review Emarsys logs for webhook execution errors
○ Check CommBox logs for message delivery status
○ Verify the deduplication_id is properly set to avoid duplicate messages -
Common Error Scenarios:
○ 403 Errors: Usually indicate authentication problems with the JWT token
○ 404 Errors: Typically mean the endpoint URL is incorrect
○ 400 Errors: Often related to malformed template parameters or missing required fields