Overview
The CommBox Forms module allows agents to create and send fillable forms to customers. Agents can pre-fill some or all fields on behalf of the customer and may require the customer to complete the remaining fields or simply sign the form. Customers can easily fill out, sign, and submit forms, streamlining the overall communication process.This guide covers Forms management, the creation process, and best practices.
Key Considerations
a. Once submitted, a form can no longer be edited.b. When a form is sent, a form icon appears in the conversation summary box.
c. When the customer submits the form, a new conversation is automatically opened in the Forms channel. This new conversation contains a link to the completed form and is meant for agent remarks. It also includes a reference to the original conversation.
d. Form links can be generated via an API. Learn more at our Developer Center.
Post /forms/createlink/{FORM_ID}
Post /forms/createpredefinedlink/{FORM_ID}
Forms Channel
The Forms Channel presets communication settings before and after the customer submits their form.
-
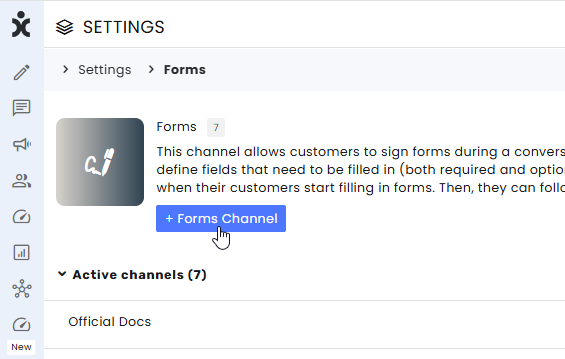
At the CommBox Settings page, select the Forms module (in the Settings & Tools section), and click the +Forms Channel button.
-
Name the new channel and click Create Channel.
-
Modify (optional) the new channel settings:
a. Language of instruction
b. Legal message before signature. Consult with your legal adviser as to the content of this message.
c. The confirmation message the customer receives after submitting the signed form.
d. Confirmation icon 
e. Limit the time (in hours) the link with the form will be available.
f. Enable customers to download their completed form.
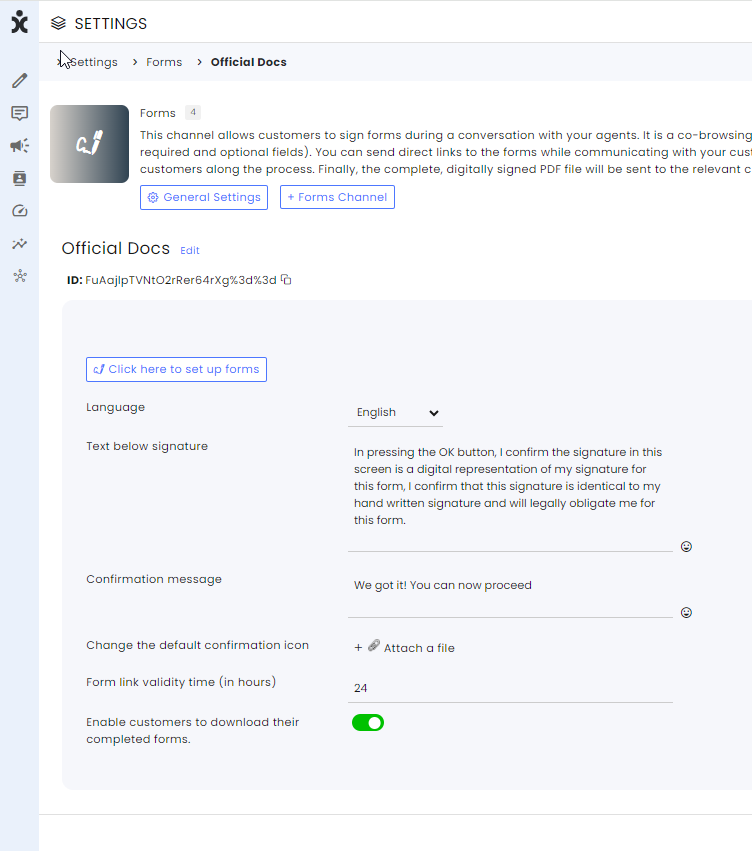
If you change the default settings, click Save at the top of the page.
Granting Agent Permissions
Once you set up the form channel, create or edit a permission profile for the form channel, or navigate to the Agents page (in the Settings sidebar) and grant permissions to specific agents.
Note that “Viewing only” rights will not allow the agents to use forms with that channel or subchannel.
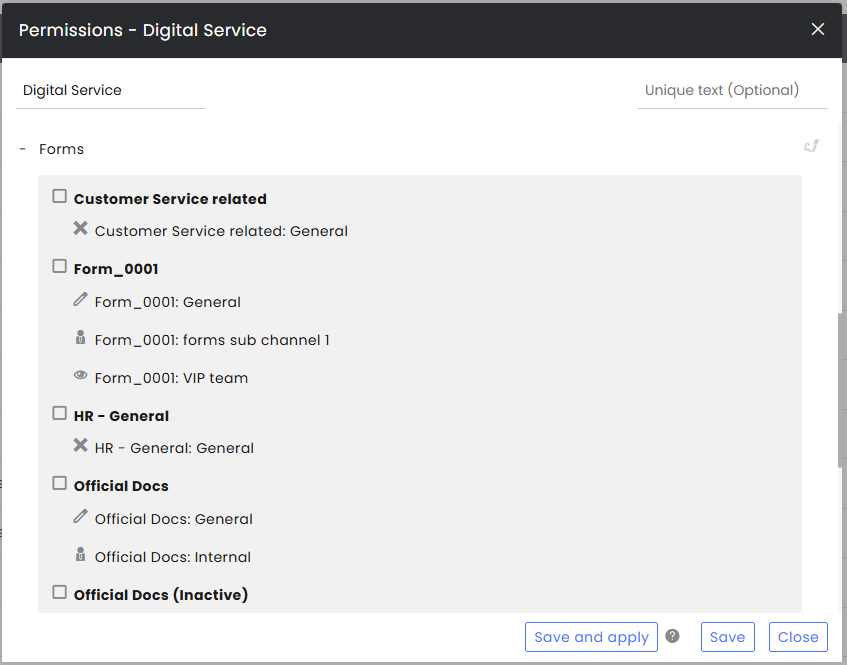
Managing Forms
Forms Listing
The Forms Listing allows you to edit a form’s content and channel, as well as manage its access settings. You can navigate to the Forms List from any Forms channel by clicking the button in the top corner.
Available options:

-
Form name - Click on the form’s name to edit its content.
-
Form ID - Required for related APIs
-
Number of pages - Displays the total number of pages in the form.
-
Channel Name
-
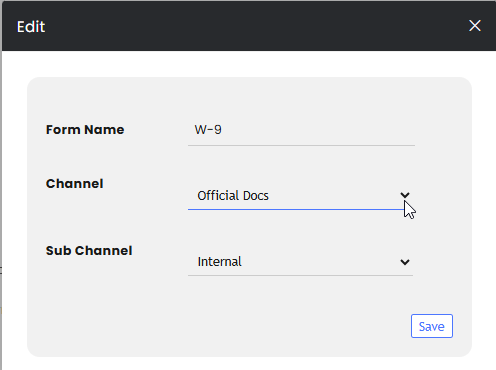
Edit channel - Change the channel associated with this form.
-
Delete form - Permanently deletes the form.
-
Active - Only active forms can be viewed and filled out by customers.
Inactive forms do not appear in the list of available forms when clicking the Forms icon in the Reply Box or Compose screen. -
Allow access to signed forms - When enabled, customers can view their signed forms by clicking the link they received.
This option is not available for publicly accessible forms that use a generic link. -
Public – When the Public option is selected, a Copy link option appears. Click it to copy the link and paste it into a message to the customer.
Clients can also embed this link into their product, allowing customers to fill out the form independently, without an active conversation. Forms must be Active to be used in any manner.
Organizing Forms into Folders
You can group multiple forms into folders for easy sharing and organization.
To create a folder:
- Select a Form channel and click the +New Folder at the top of the page.
- Name the folder.
- Add forms and click Save.
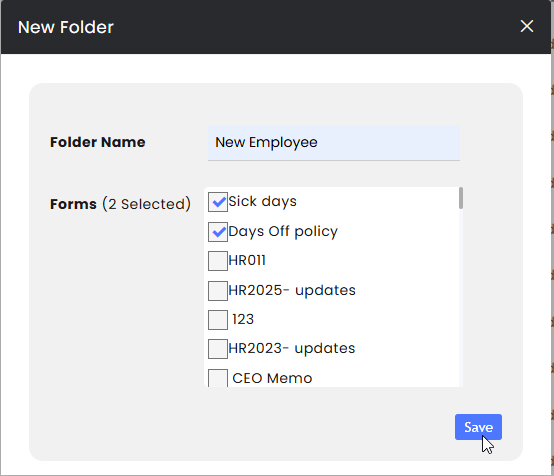
The folders are listed after the single forms.

Sending Forms and Folders to Customers
From the Forms list
At the Forms list, click the copy link and paste it into the message for the customer.
If you don’t see the copy link, check the Public box to make the link appear.

Note: Each Form has a dedicated channel, and agents must have permission for that channel for the Form to work.
From the Inbox
In the inbox, click the Forms icon.
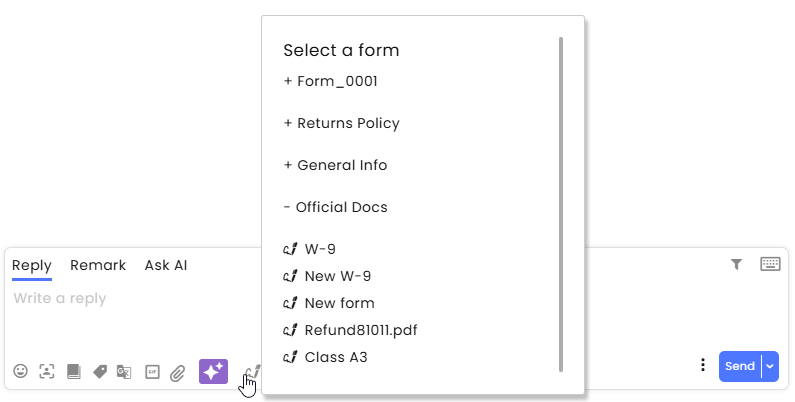
Click on the form name to add the form to the inbox message without editing.
- The inserted form will appear as a link on most communication channels, such as WhatsApp, SMS, Instagram, etc.
- In Email conversations, you can click the inserted form to view it in a new tab.
- In Chat conversations, you can’t click on the inserted form as it becomes a link only for the recipient.
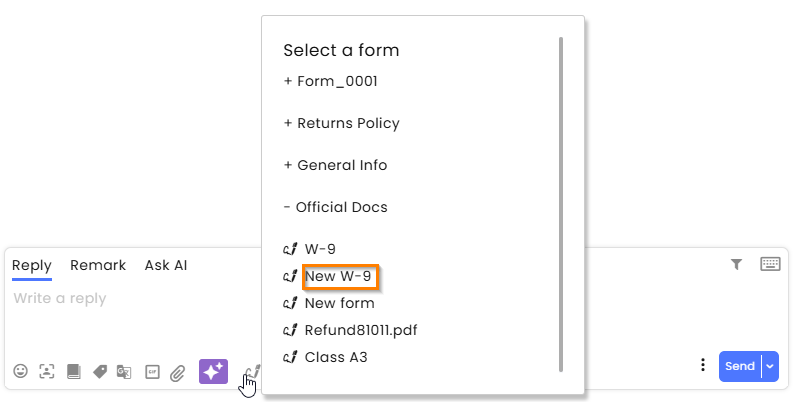
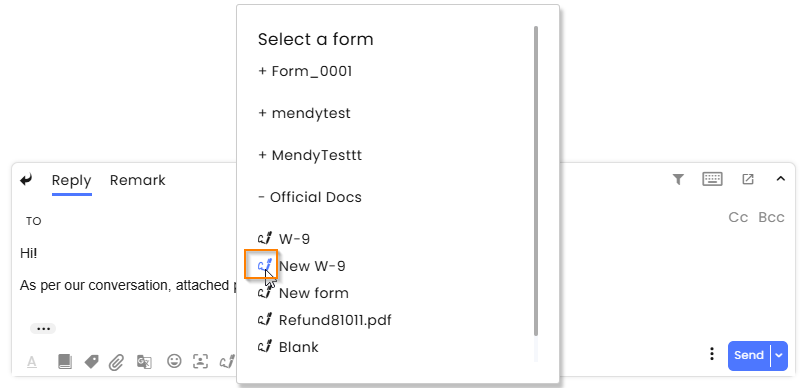
To edit the form, click the form icon next to the form's name to prefill the form you want to send. Click Insert when done.
In email channels, you can double-click on the form link to view the prefilled form.
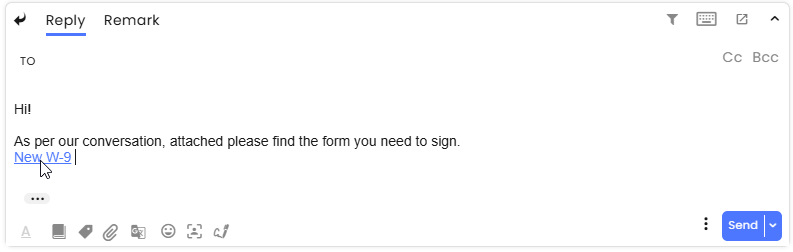
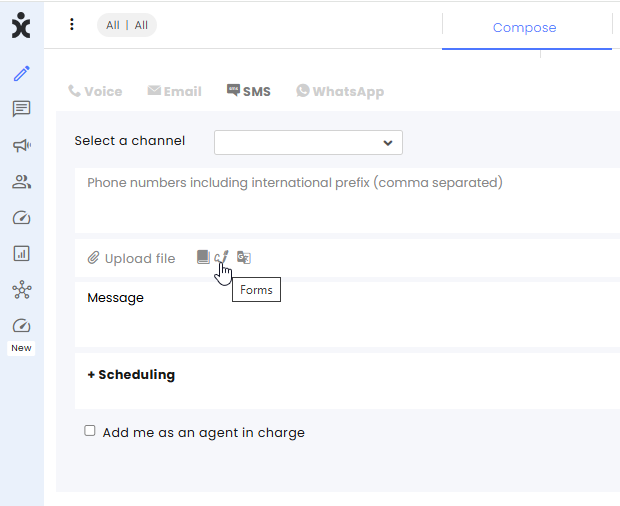
From the Compose Screen:
At the Compose screen, click the Forms icon to add the form to the message you want to send.
Submission of Forms
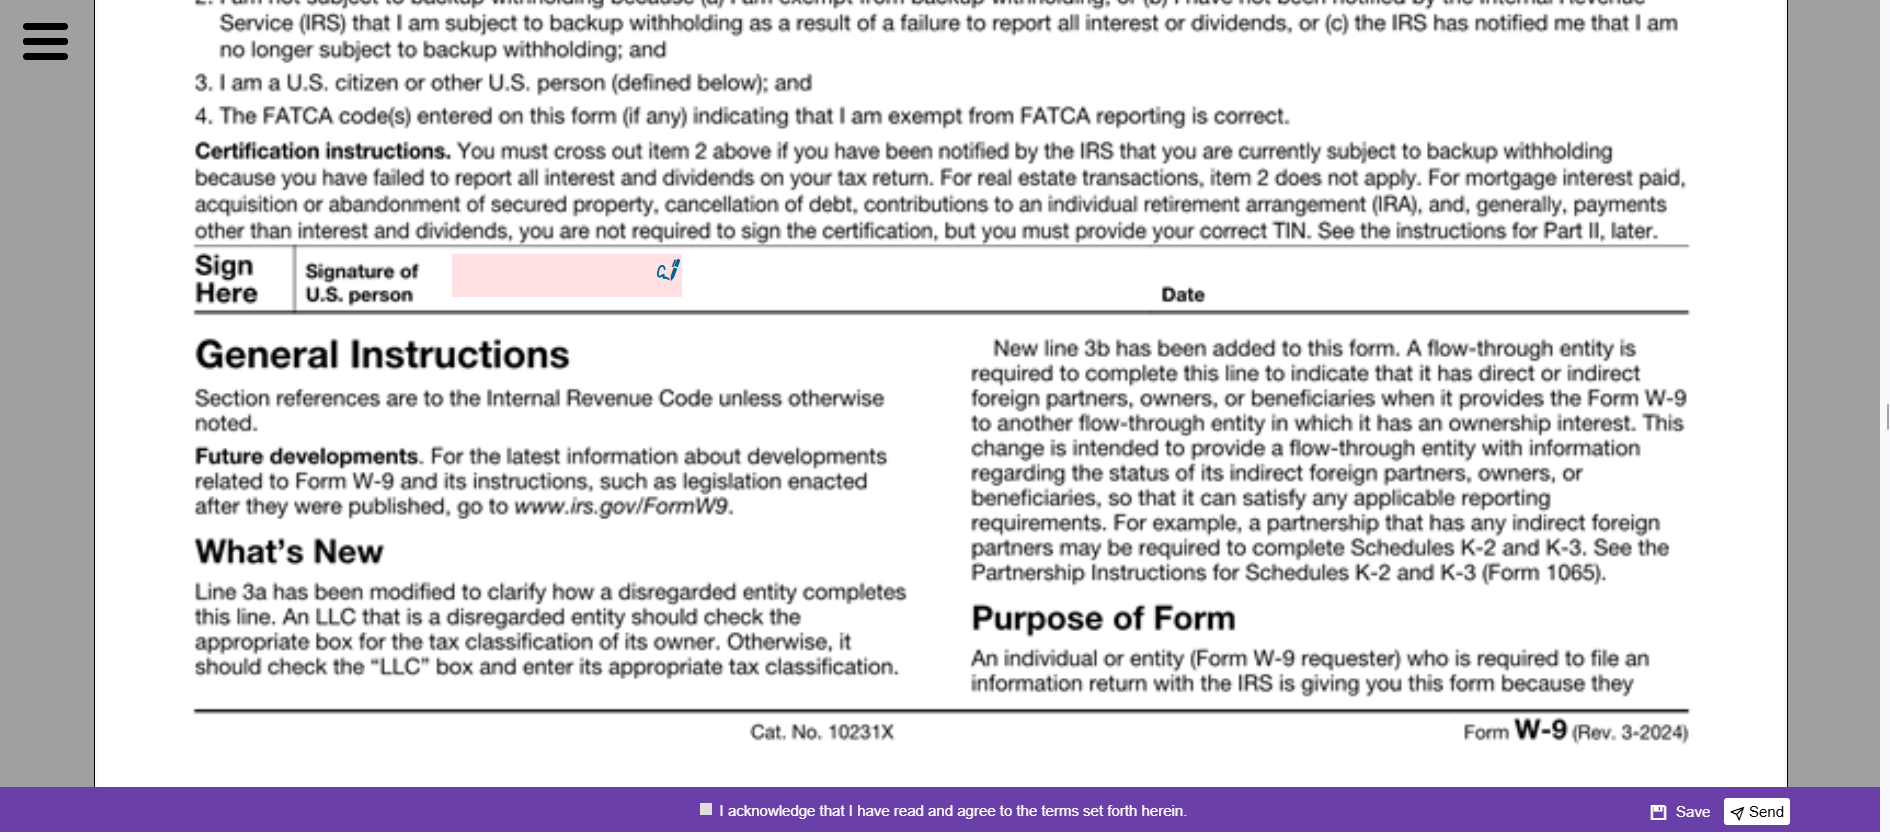
Customers who receive the form can complete and sign it, then either send it back or save a copy on their device.
After Submission
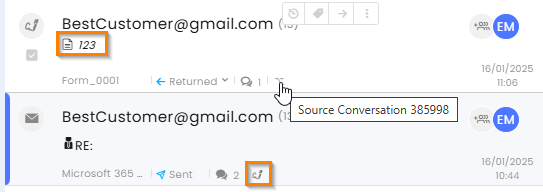
After the customer sends the form (clicking SEND at the bottom of their screen), they receive the following message with a direct link to their form.
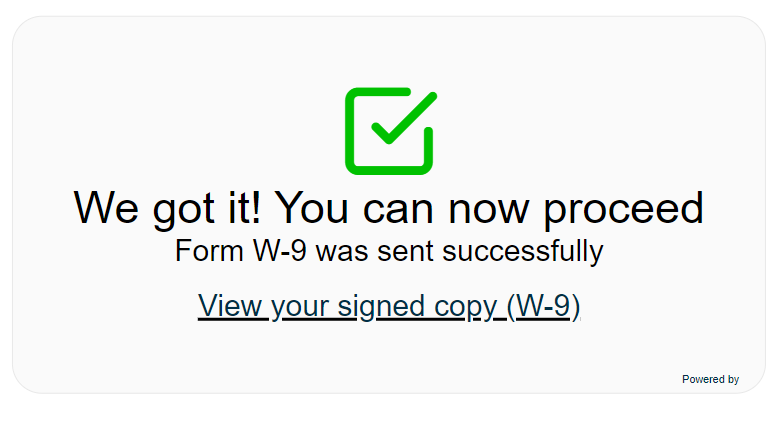
The signed/returned form is directed to a form channel. Clicking on the link provided enables the customer to view the submitted form - but not to edit it.
If you assign this customer to yourself, the conversation will be added to your assigned conversations. Click on the link in the conversation list to view the signed form.
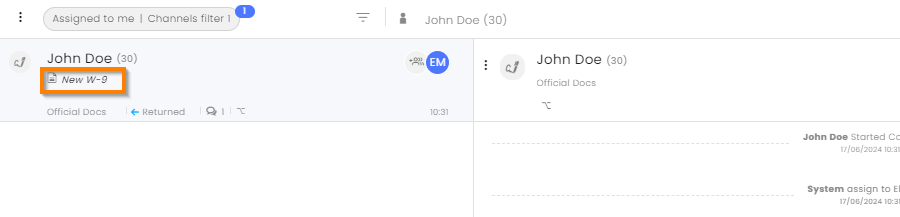
Agents can also follow which forms were signed by the customer by clicking the form icon at the top of the Inbox. Each signed document listed is linked to the actual document with the date it was received.

Creating New Forms
Creating and managing forms requires an admin status or an agent with granted admin permissions for forms (found in the General section of the permission list).
Forms have fillable fields that are created on top of a PDF image or on a blank page. In our example, we will download an existing PDF and create the fields for filling it out and signing it.
-
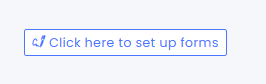
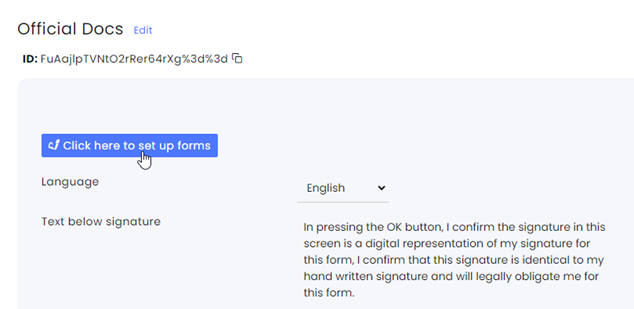
At the selected Forms channel, click on Click here to set up forms which will open a list of all existing forms.
-
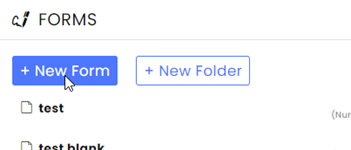
Click on +New Form at the top of the page to create a new form.
-
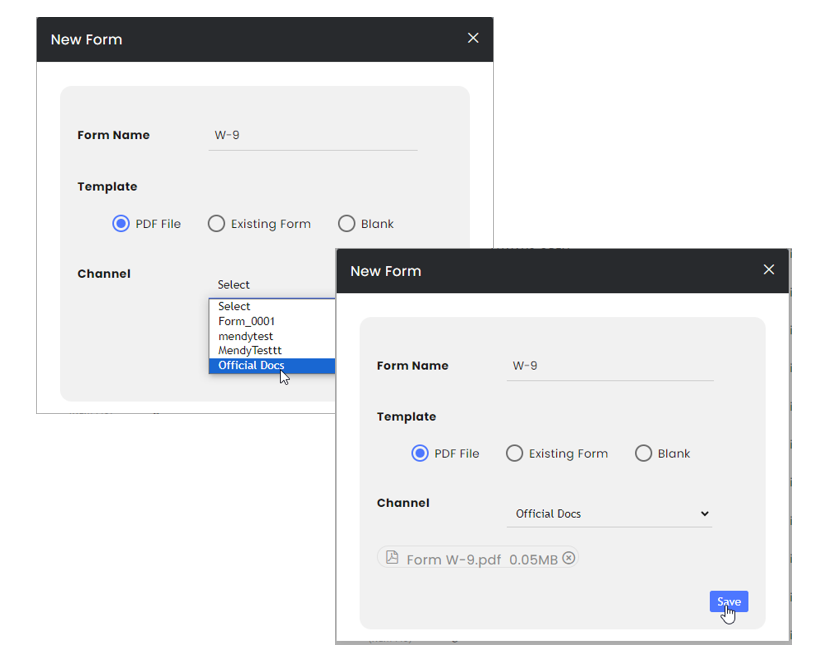
In the dialog box, fill in the general information about your form:
a. Enter the form’s name
b. Select the type of template that will be sent to the customer (in our example, a PDF we preloaded).
c. Select the Form channel for the new form. The above sections explain how to create and set up Form channels.
d. Once you select a channel, you can upload files. Click the button and upload the form you want the customer to fill in.
e. Click Save.
-
As the form opens, move your mouse to the location where you want the customer to fill in information and double click at that spot.
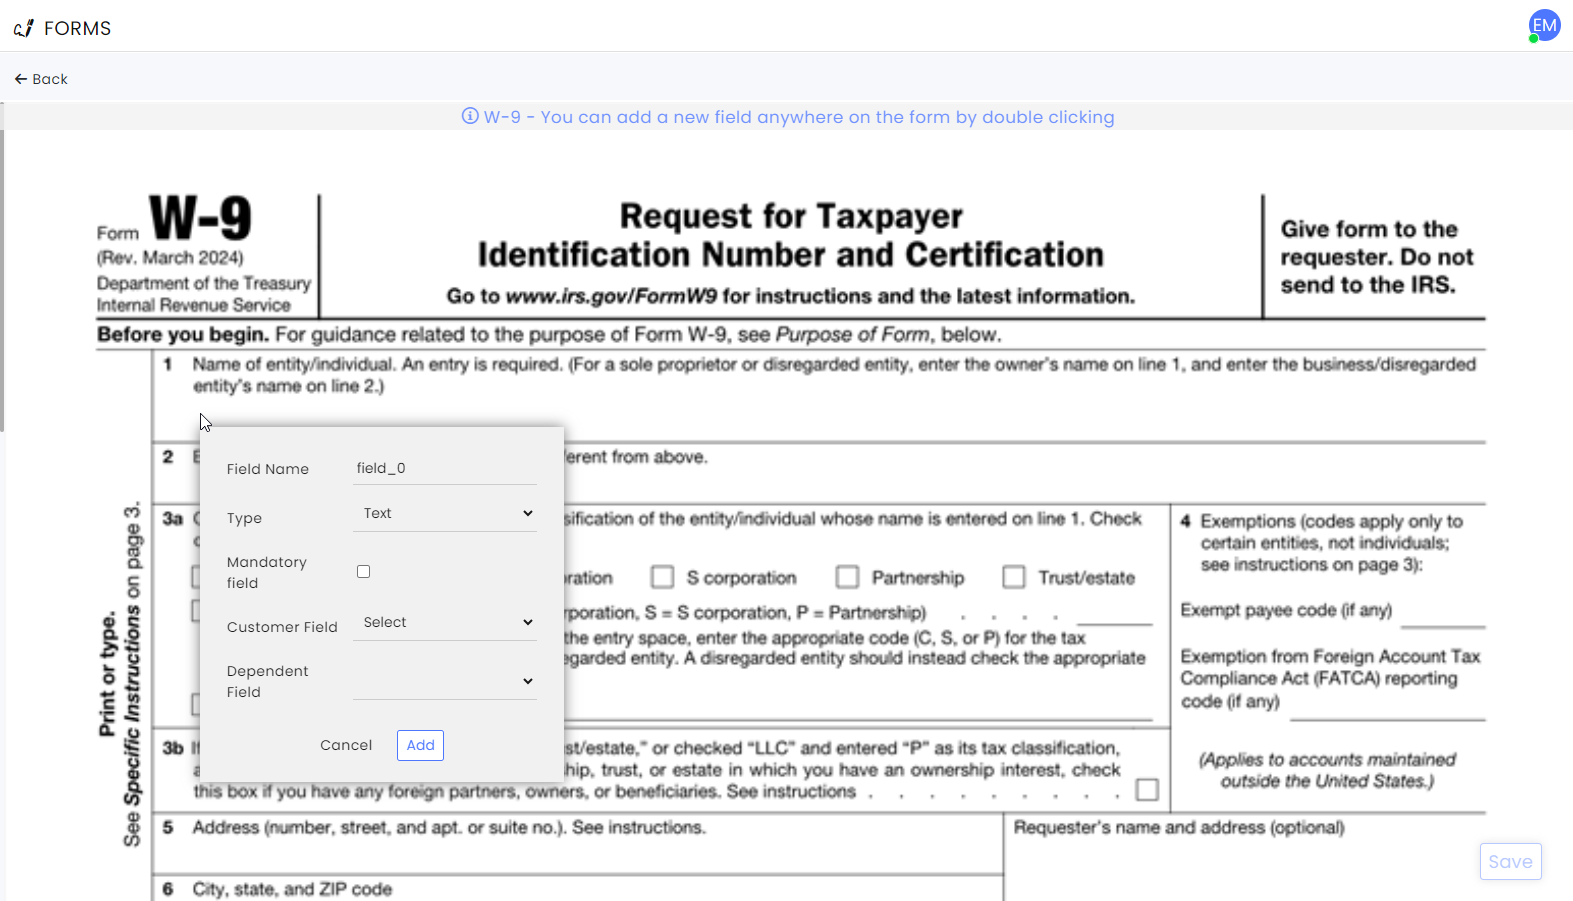
a. Name the field (no spaces)
b. Select the Type of data the field will contain based on the expected answers of the customer.

-
Text – General information entered by the customer
-
Label– Creates a visual field used as pretext information
-
Number – Limits the customer to entering only numbers
-
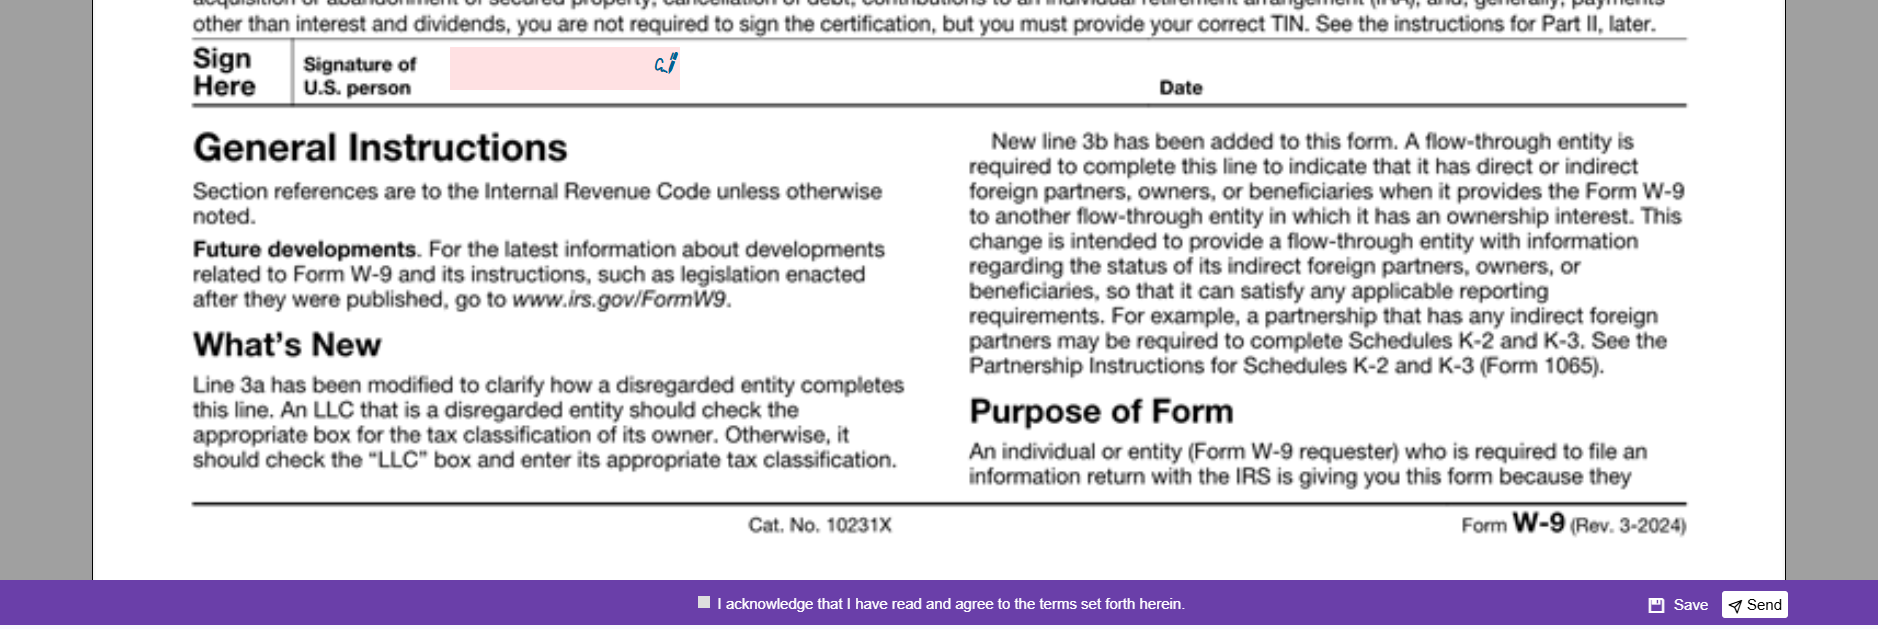
Signature – This field opens a dialog box for the customer to enter a signature. The Digital Signature Declaration (text beneath the signature) is entered in the form channel settings.
-
Email – Enables customers to enter a valid email address
-
Date – Enable customers to enter a valid date
-
Checkbox – This field creates a check box at that spot
-
Approval – This field adds a check box on the sending bar of the form for a legal declaration. Enter the Text for the declaration at the line below (We recommend limiting the text to 130 characters) and click Add. Note: This field option will only appear on the last page of the document.
.png)
-
Design – Will add visual elements to the form
- Line – Add a line to the document
- Picture – Upload a picture
- Region Definition – Box in an area
c. Mandatory field – Checking this box will prevent the customer from returning the form with this field empty.
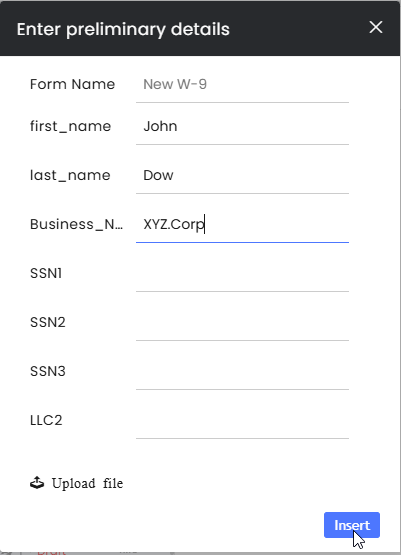
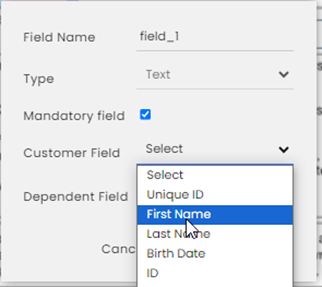
d. Custom Fields – If the information in this field matches a specific field in the Customer Information pane, you may select this custom field to be populated automatically when the customer submits the form. For example, when setting the field for the First name, select the First name form the custom field list.
Note: The menu will only include fields that match the type of data of the custom field. For example, when choosing a field restricted to numeric inputs, you will be able to select only Customer Fields designated for numerical data, such as phone numbers.
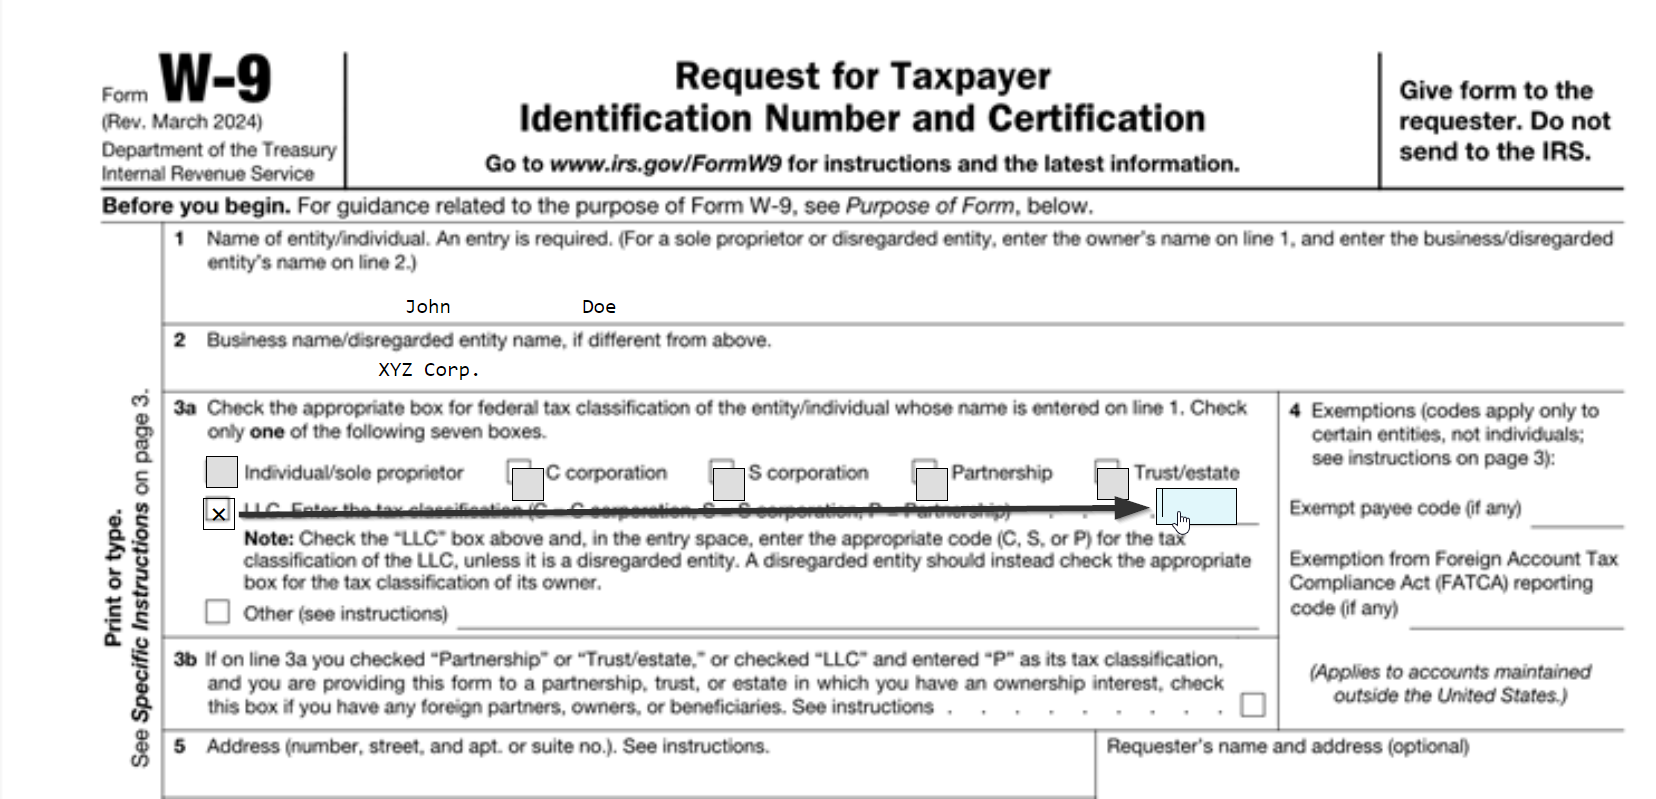
e. Dependent field – This field will appear only if another field (selected from the menu) has content. For example, if the customer checks a checkbox field A, field x and field y will appear. When setting up Field X in the form, select Field A from the Dependent Field menu.
f. Click Add to save the field.
Note that sometimes the field will “miss the target”. If that happens, click and drag the box to the correct location in the form
- Add additional fields as needed (repeat step 4) and click Save when done.
Note:- Note that sometimes the field will “miss the target”. If that happens, click and drag the box to the correct location in the form.
- When customers fill out forms, many tend to click the Tab key to jump to the next field. Keep this in mind when creating a form since the order the Tabs when filling out the fields follows the order they were created.
Best Practice
- Custom Fields: Use auto-filled fields to save time (e.g., first name, phone number).
- Dependent Fields: Make forms dynamic by showing fields only when needed.
- Adjust Field Sizes: Ensure field sizes match the form's layout.
- Conditional Signatures: Set up fields that must be completed before the signature field appears.
Some of the features we used in our example:
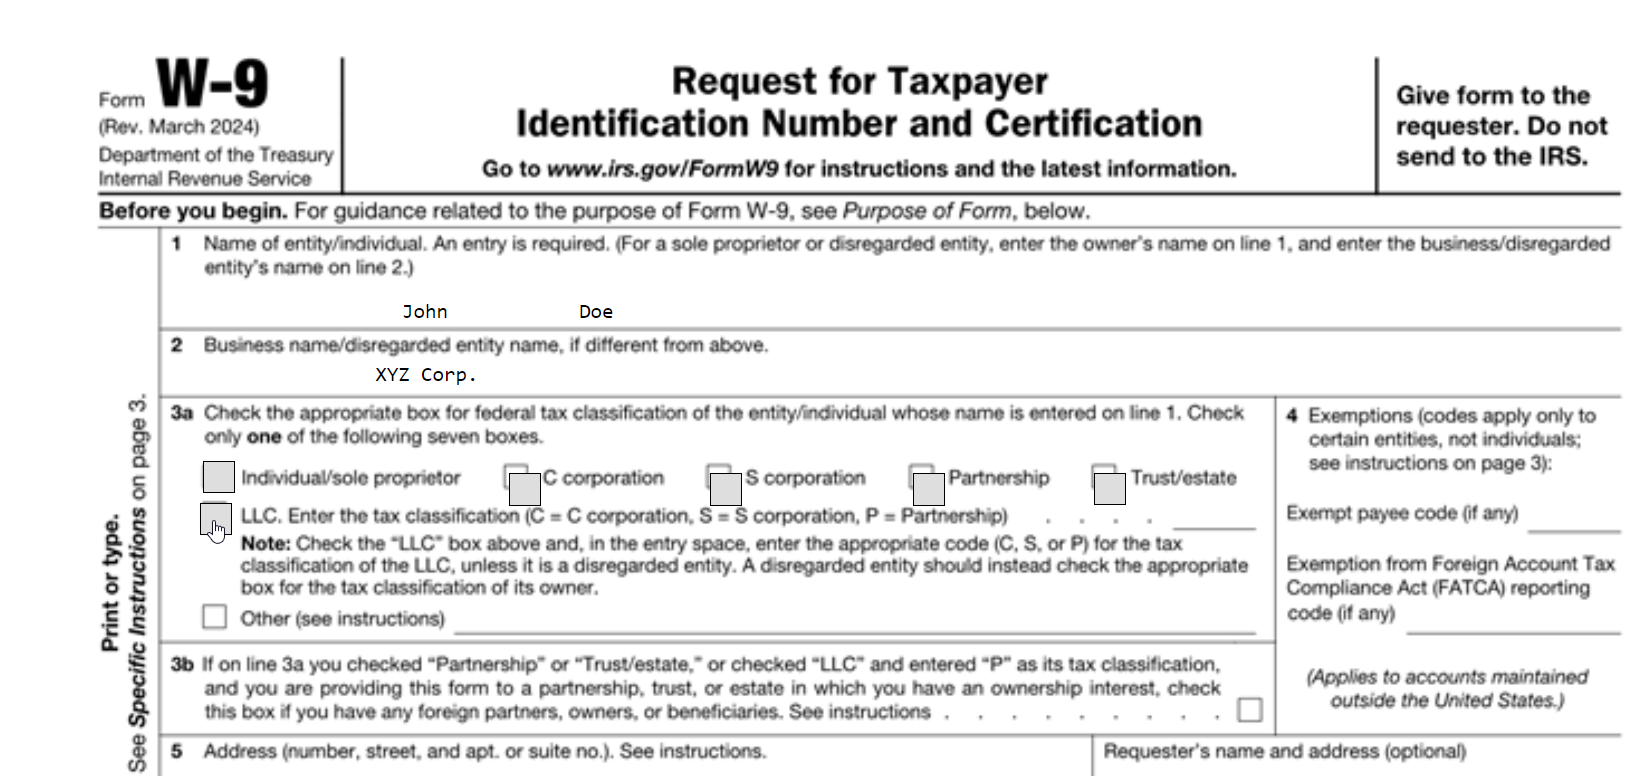
• The first and last name were entered automatically by the custom fields.
• The business name was entered by the agent before sending the document.
• In section 3a, the box for entering the Corp type’s letter was dependent on the LLC checkbox.
• Changing the field size, changes the size of the information entered. Adjust the size to fit the provided form spaces.
• The signature was dependent on completing another field and appeared only after the customer filled it that other field.