Overview
SAP Service Cloud is a customer relationship management (CRM) platform that enables users to manage their customers, sales, and marketing requirements from a central, cloud-based location. With this integration, agents using the SAP platform communicate with their customers via CommBox, which is integrated as an iFrame into the SAP console.
Included in this guide are the steps to integrate SAP and CommBox and the use case scenarios.
Key considerations:
A. Supported Modules for SAP integration:
Email, Facebook Messenger, Facebook Page, WhatsApp, SMS/Text, Chat, Audio Chat, Video Chat, Instagram, Telegram, Voice. Agents must log in to all relevant systems besides the SAP platform for the integration to work.
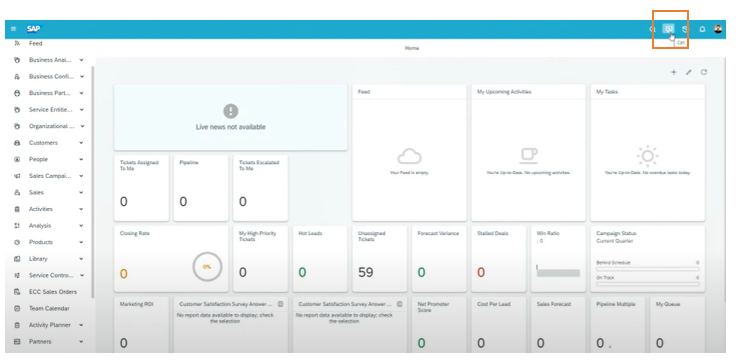
B. Once the integration is complete, agents can click the “Live Activity” ![]() button to open the CommBox App. Agents must be logged in to CommBox’s applicable channels to benefit from the integration.
button to open the CommBox App. Agents must be logged in to CommBox’s applicable channels to benefit from the integration.
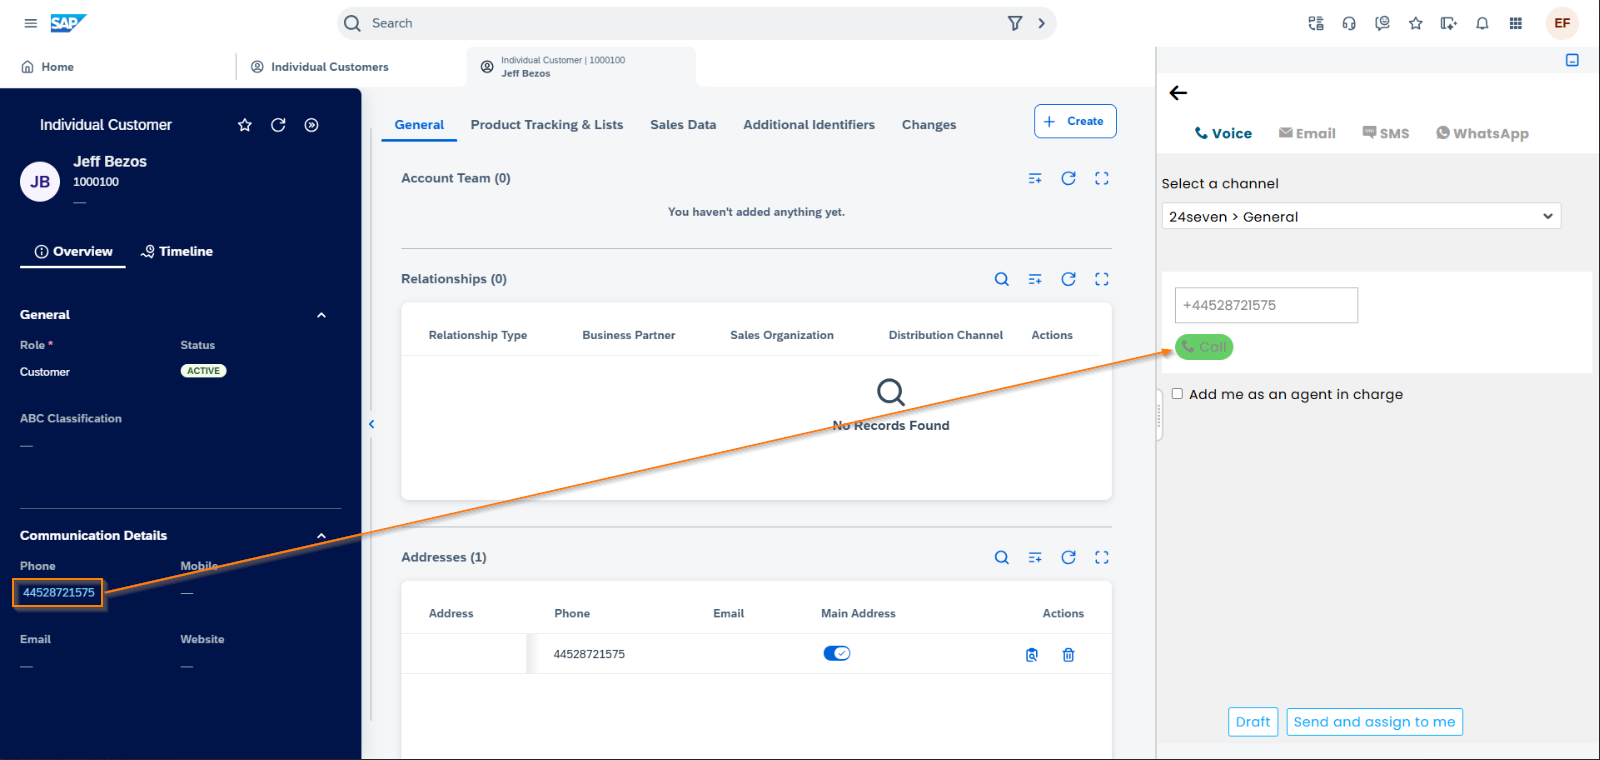
C. Outbound Calls from SAP CRM activate CommBox Compose:
When agents click on a phone number in the SAP, the CommBox iFrame automatically appears with the compose section pre-filled. This allows agents to seamlessly proceed with making a call or sending an SMS/WhatsApp message with enhances efficiency and minimizes errors. (works in both V1 and V2 of the SAP platform)
D. The SAP integration components include open JSON files within the connector for each communication channel setting. This open architecture allows developers to customize the retrievable fields of the API used to trigger calls to the CRM. For every new channel or subchannel, default content is automatically provided at the time of creation.
Activation
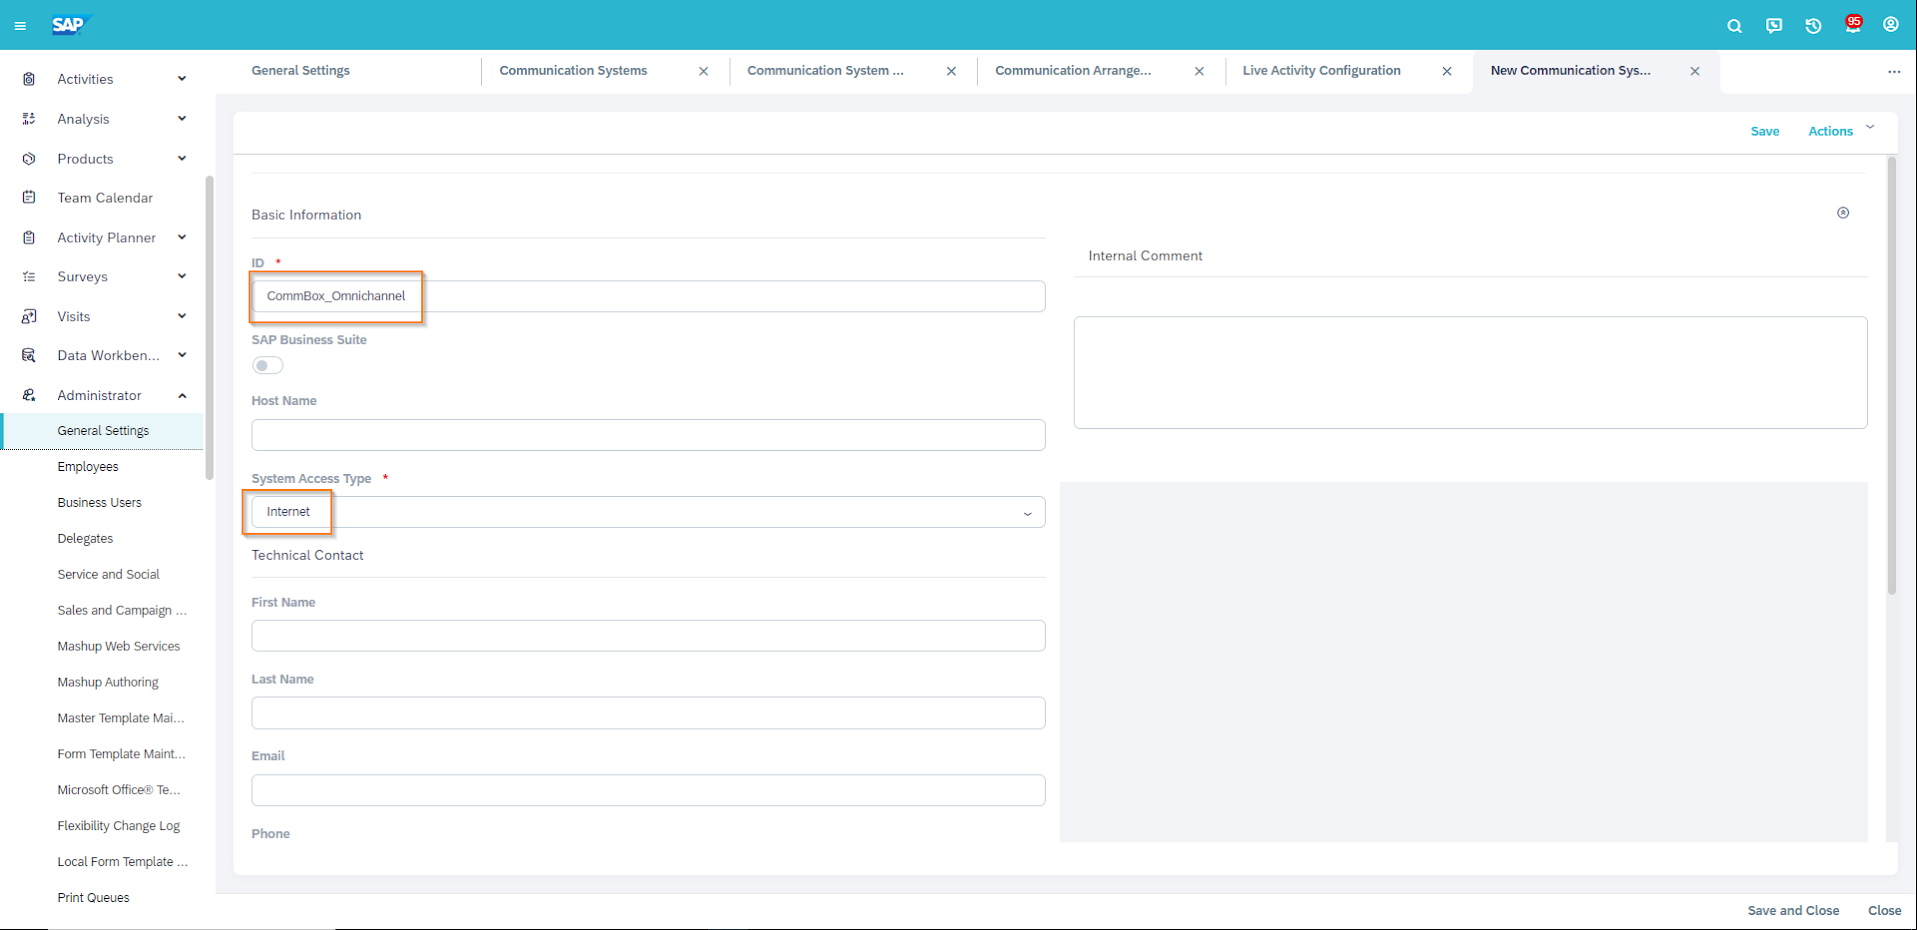
Step 1: Create a New System for CommBox Access
- At the SAP console, navigate to Administrator > General Settings > Communication System, and click the New tab at the top to create a new system for the CommBox Odata Integration.
- Enter “CommBox_Omnichannel“ in the ID section and “Internet” in the System Access Type field.
- Save and Close
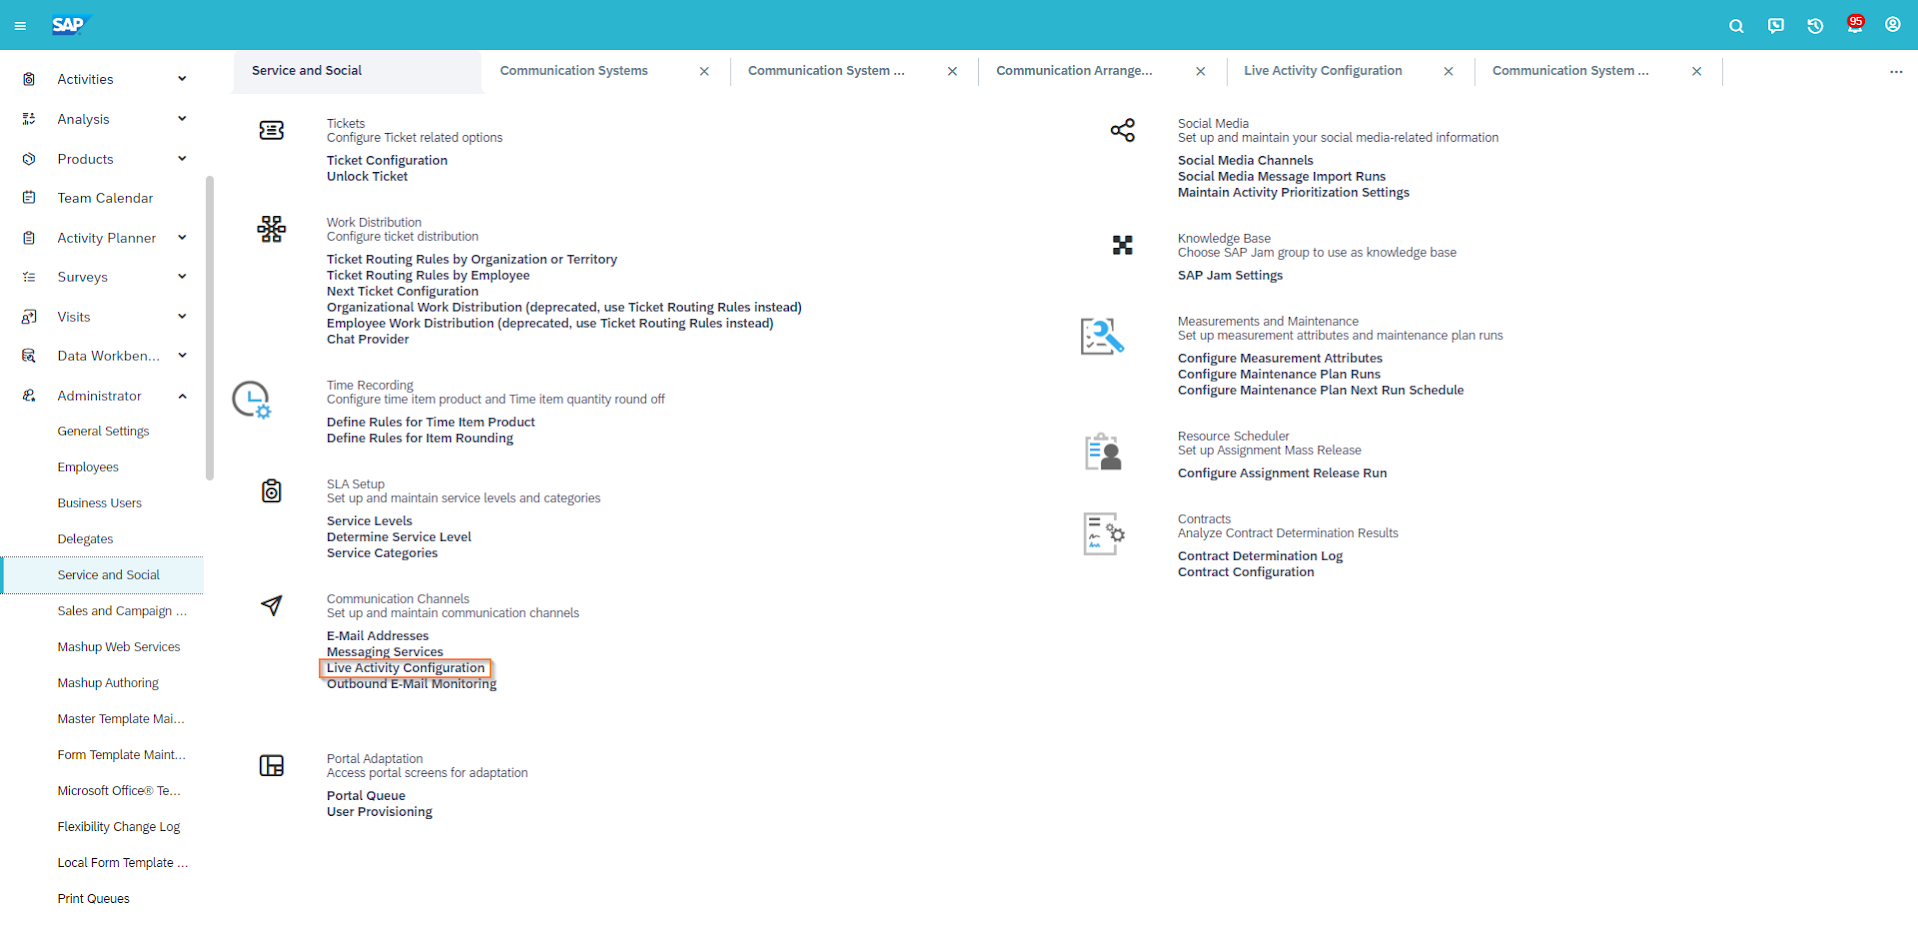
Step 2: Set up SAP Service Cloud to Enable CommBox iFrame
- At the SAP console, navigate to Administrator > Service and Social > Live Activity Configuration.
- Enter the following information:
- Provider: External Provider
- CTI Vender: CommBox
- Provider Id: COMMBOX
- At the Provider URL section, enter your CommBox account URL. Example: https://XYZCorp.commbox.io
- At the bottom left, set the widget size: Height: 638 Width: 371
- At the right pane, set the Comm_System_ID field by entering "CommBox_Omnichannel". Note: This field is case-sensitive. keep the same format used for the ID in step 1.
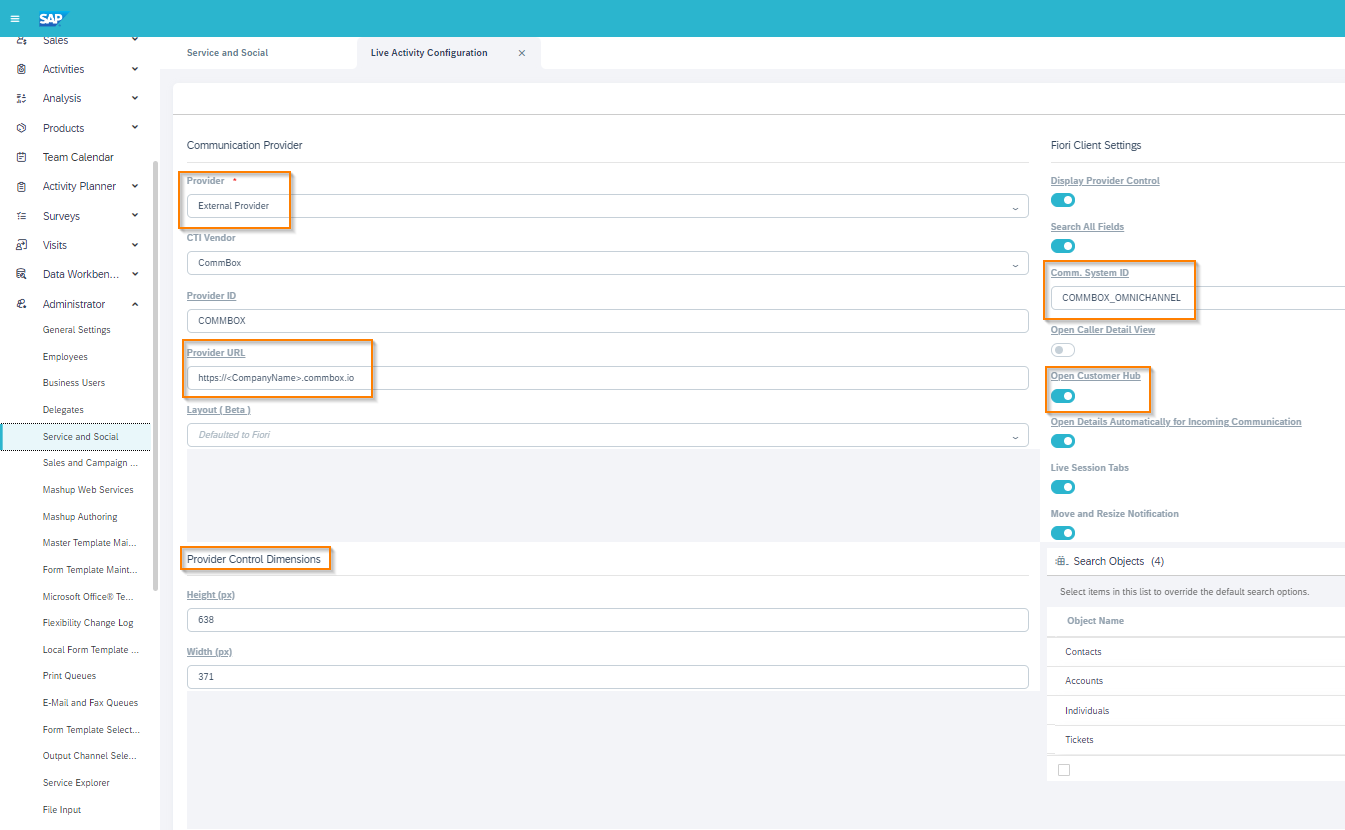
- Click Save and Close.
Note: At the bottom right are the fields that the system will look to populate with the information from CommBox.
Step 3: General Activation
- At the CommBox console, navigate to Settings > SAP C4C and click Install.
- Enter the SAP ODATA API endpoint URL of your Cloud for Customer (C4C) system.
Example: https://myXYZCorp.crm.ondemand.com/sap/c4c/odata/v1
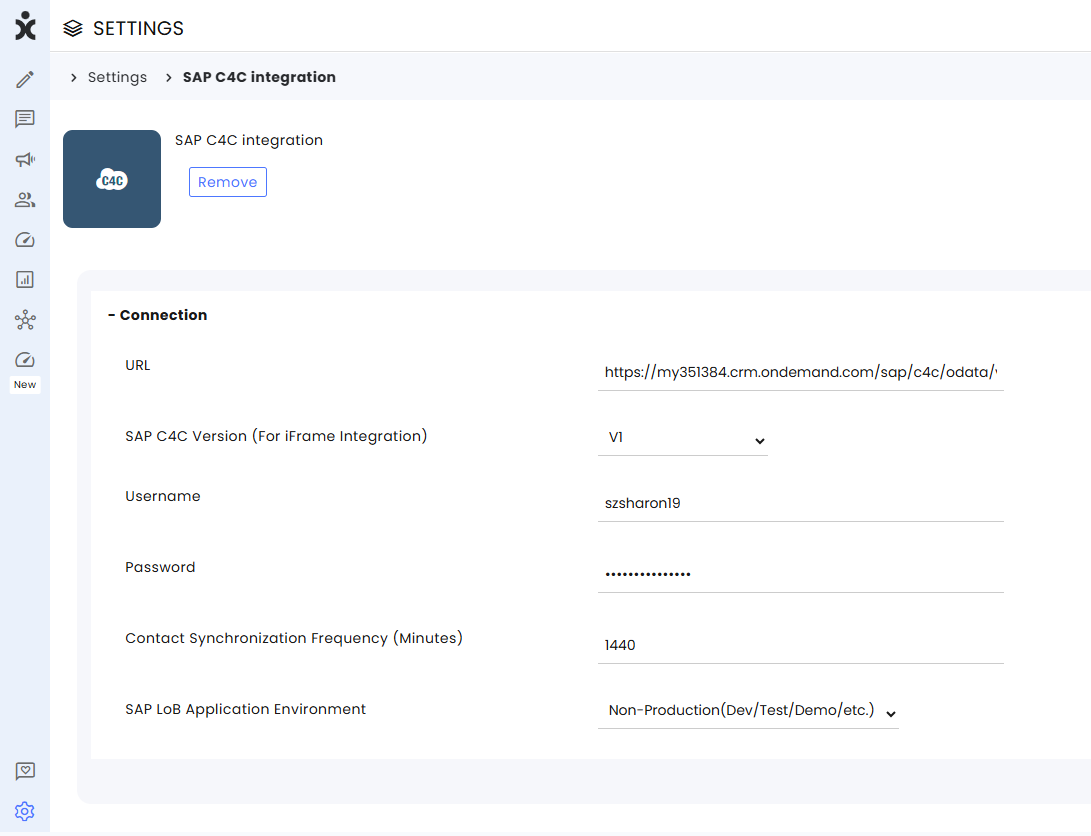
3. Select the version you are using.
4. Enter the user's credentials (the Admin’s username and password used in the SAP console with permission to invoke ODATA API calls to SAP).
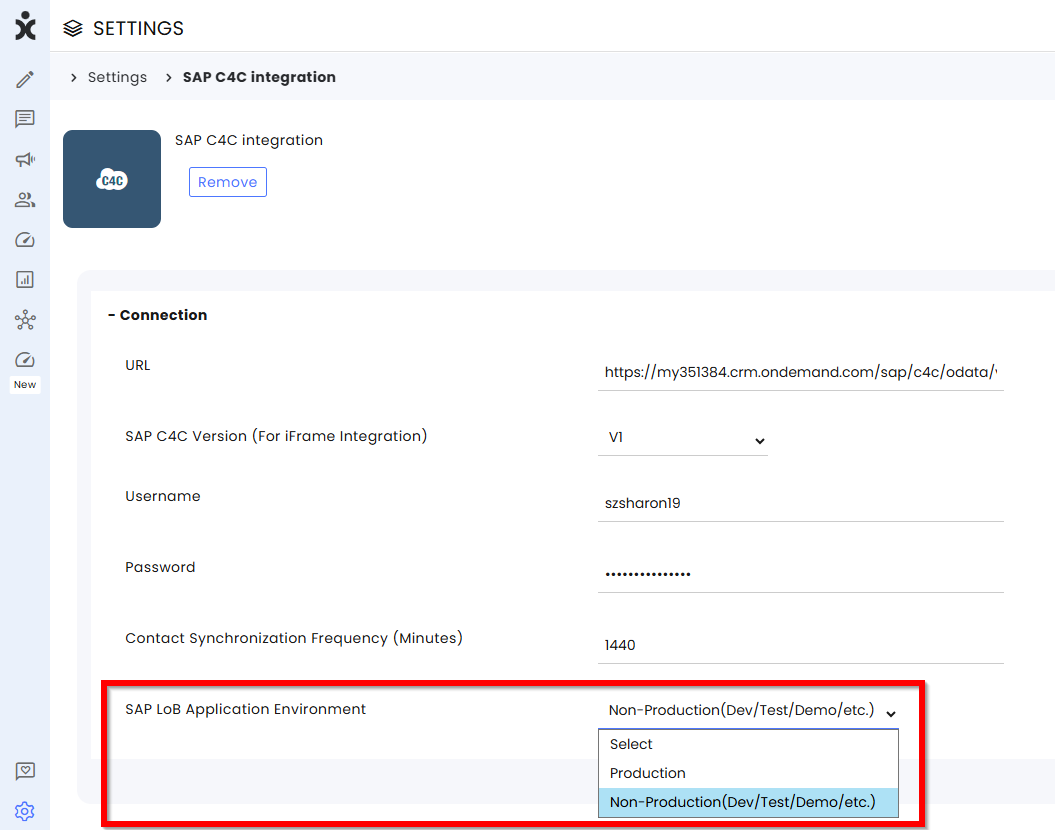
5. For data security, select the type of environment you are using (production or non-production), and CommBox will then supply the proper AIR Key to SAP.
6. Click Save.
Tip: Test the URL and credentials in the browser or use a Postman tool to validate the URL and credentials.
Note: In the event the credentials are incorrect, an error message will appear. 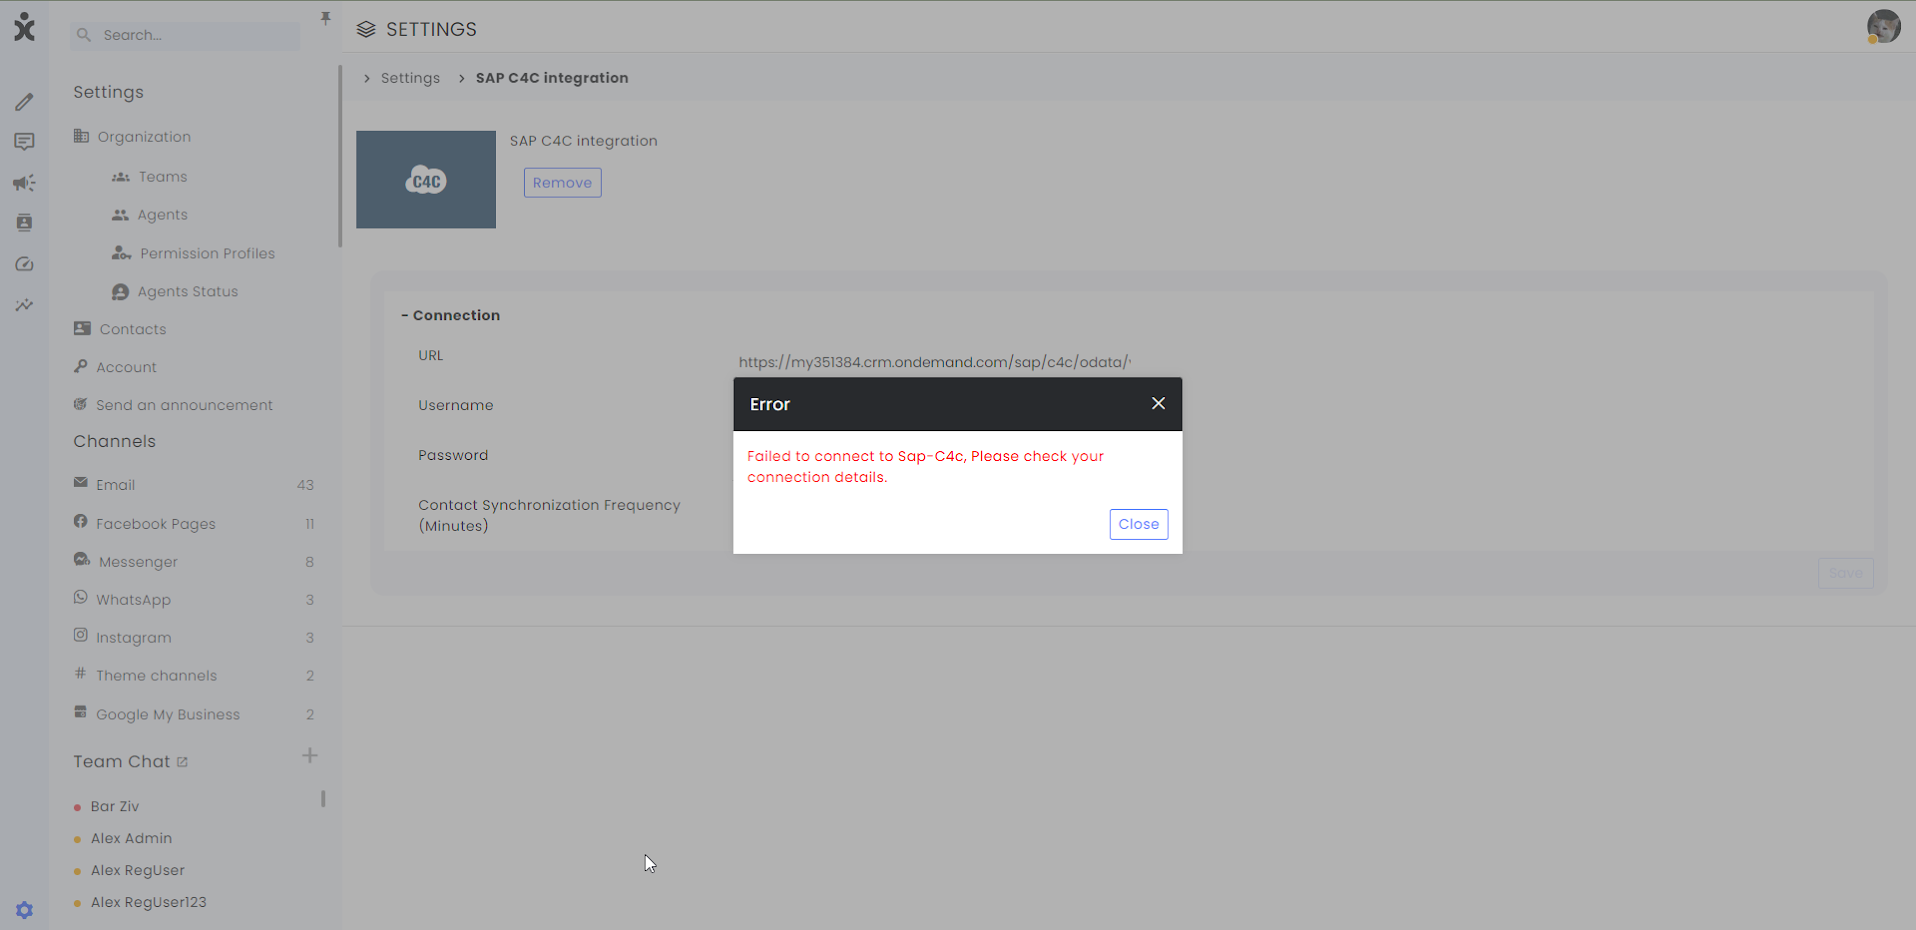
6. Go back to the Settings page, select the Privacy and Security module from the Settings & Tools section, and click on General.
7. Enable the iFrame for the agents by switching the toggle on.
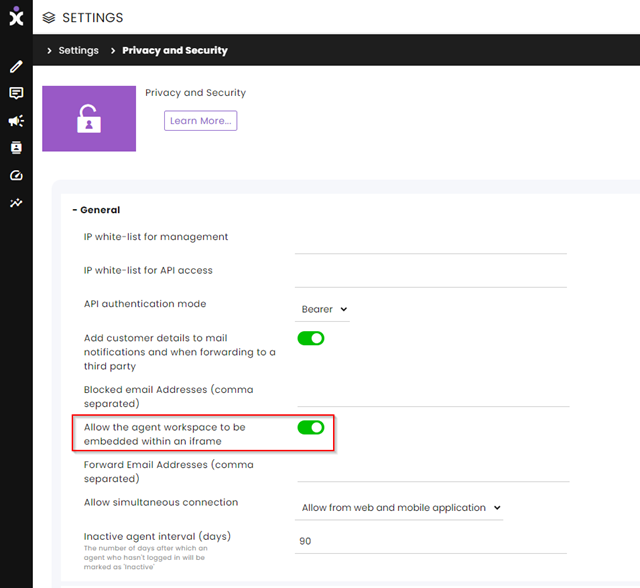
8. Click Save at the bottom corner of the screen.
Step 4: Activation of Communication Channels
The integration can be customized for each channel or subchannel, catering to the unique needs of different teams within the organization. Additionally, each toggle includes a viewable JSON file, allowing for the customization of CRM fields to seamlessly work with CommBox.
- At the CommBox console, navigate to Settings, click the desired communication type, and select a specific channel for the SAP integration.
- At the Channel Settings of the specific channel or subchannel, select the SAP C4C integration section, and activate the integration for that channel. End by clicking Save at the bottom of the screen. Learn about the Server-side / Client-side options in the Use-case Scenarios section below.
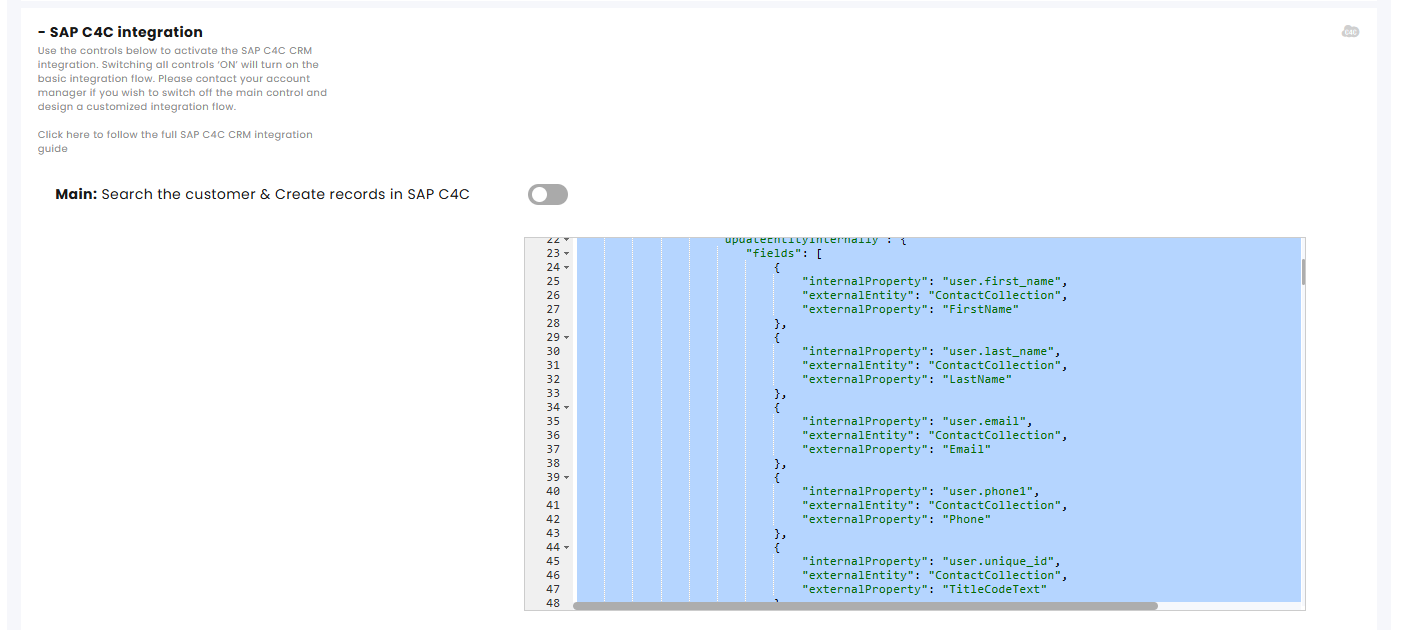
Server Side:
a. Main: Search the customer & Create records in SAP C4C – The main server side of the integration. Contact us if you want to have it turned off while other toggles remain on.
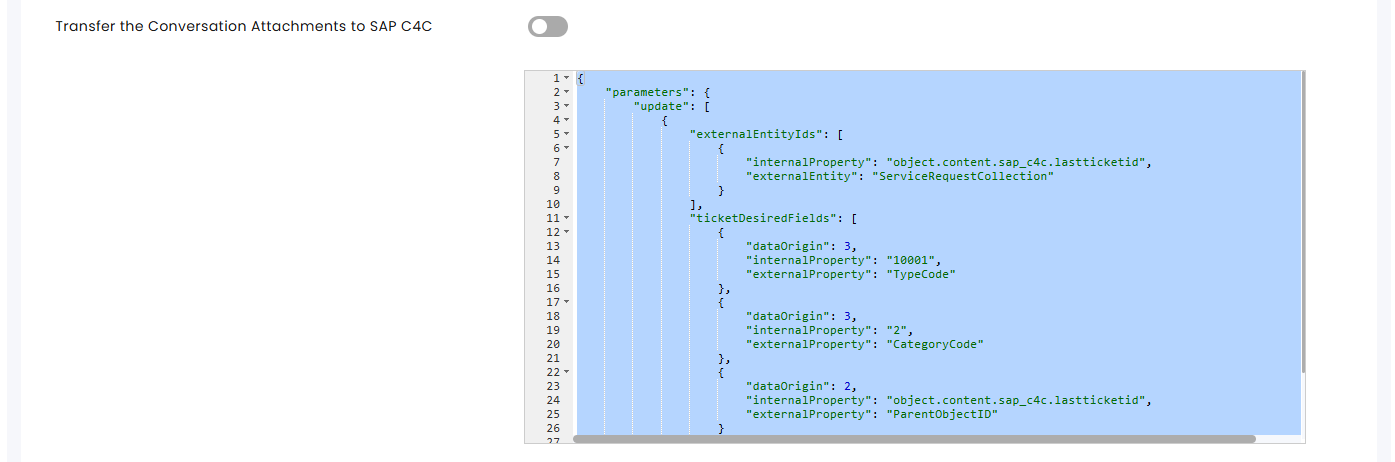
b. Transfer the Conversation Attachments to SAP C4C – Note that the remarks in CommBox are clickable links.
c. Transfer the Transcript to SAP C4C upon conversation resolution – Note that the remarks in CommBox are clickable links.
![]()
d. Transfer the Conversation AI Summary to SAP C4C upon conversation resolution – AI summary requires toggling on that feature in the AI Assistant section. Note that the remarks in CommBox are clickable links.

Activate the AI Assistance for this channel.
.png)
Voice Channels have the capability to transfer call recordings to SAP.
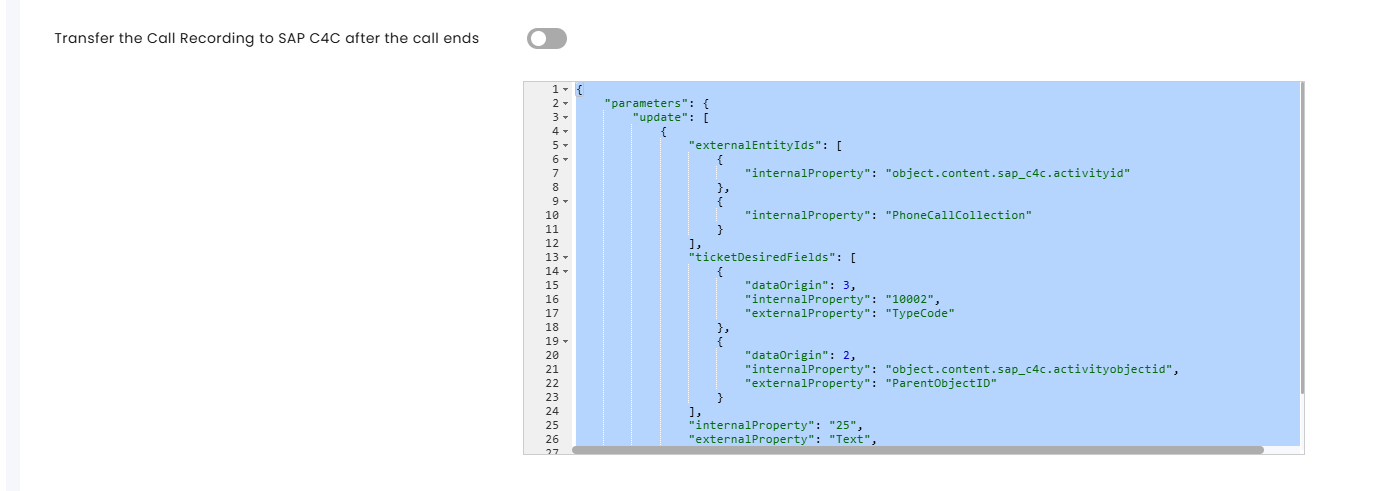
The call recoding is listed in SAP under My Phone Calls like this:

Client Side:

- Activate embedded integration – Enables the CommBox iFrame to be seen in Dynamics CRM and activate items within it.
- Transfer the Conversation Attachments to Chat Activity Timeline in SAP C4C - Only supported in V1
- Transfer the Conversation's transcript to Chat Activity Timeline in SAP C4C
- Transfer the Conversation's AI Summary to Chat Activity Timeline in SAP C4C
3. Repeat this process for all relevant channels.
Use-Case Scenarios
The channel activations with the SAP integration provide a few options for the user from both the server side and the client side.
The Server-side processes are executed on the web server before the web application is delivered to the user's device, while the Client-side processes (usually via JavaScript) are executed on the user's device after the web application is delivered.
Use Case Scenario 1 - Client Side Only (Only the bottom two toggles are On)
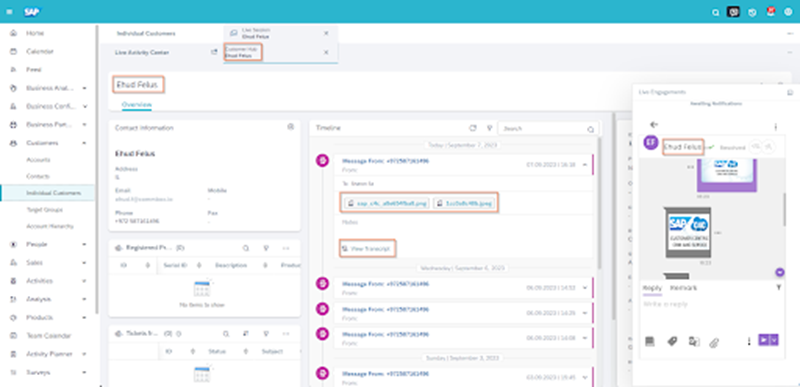
A Customer initiated a conversation with the agent, and the conversation is visible on the CommBox iFrame within the SAP CRM windows. Once the agent clicks on the conversation, a reference list of all windows that contain the same phone number will pop up.
The last toggle enables attachments to be transferred from the CommBox window to the Chat activity at the CRM (within the transcript). This will happen automatically once the conversation is closed (Resolved status).
Use Case Scenario 2 - Server-Side with the CommBox iFrame (Top 4 toggles On)
In the Server-side integration (with or without the iFrame), the bot is running the operation, searching for the customer within the CRM, and then creating a new ticket if not found.
Of the 3 Server-side capabilities, the 1st one (Search & Create) is mandatory, and the other two are optional. To customize the system further to enable the optional server-side capabilities while keeping the search and create Off, contact your CS.
The 2nd toggle enables the transferring of attachments to the created fields.
In the System activity for the creation of a new Service Request (a Ticket), there is a clickable link that opens up the ticket in a new tab.

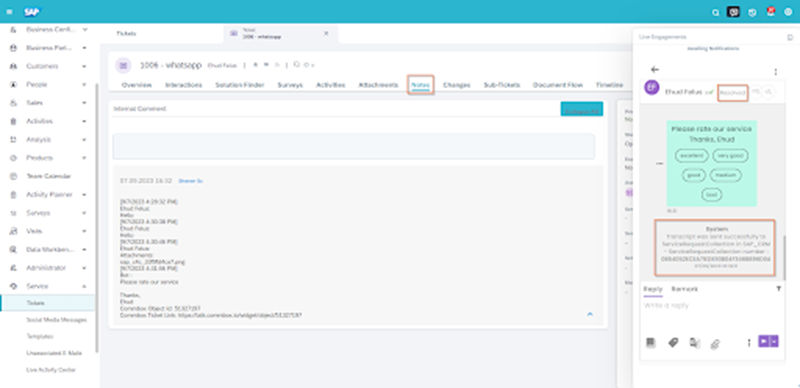
The 3rd toggle enables the transcripts to be transferred to SAP.
Once the conversation is resolved, the transcript is sent to the 'Notes' area of the created Ticket (Service Request).