Overview
CommBox enables organizations to deliver omnichannel customer service through AI voice communication. Customers speak to the voice AI agent, which transcribes the conversation into text for the human agent.
This guide describes the onboarding process and configuration of the voice bot.
Option 1: Twilio as the provider. See the step-by-step integration guide below, including instructions for obtaining a number from Twilio.
Option 2: SIP as the provider. See below the step-by-step integration guide.
Terminology
Speech To Text (STT) - Algorithm to translate voice into text
Text To Speech (TTS) - Algorithm to translate text into voice
TwilML - Twilio Markup Language
STT Error message - The text displayed to the agent when the system can’t accurately convert speech to text due to audio or processing issues.
Automation Requirements
In general, every flow can work with the voice AI agent. However, we advise the following considerations that may improve the customer’s experience:
- Flows should use straightforward text.
- The flow should avoid visual cues such as emojis, charts, and graphs.
- Avoid calls to action such as 'click here' or 'press this button to continue’.
- For clarity, it is better to use a few short sentences instead of one long one.
Twilio Integration
Step I: Obtaining a Twilio Number and Authentication Key
-
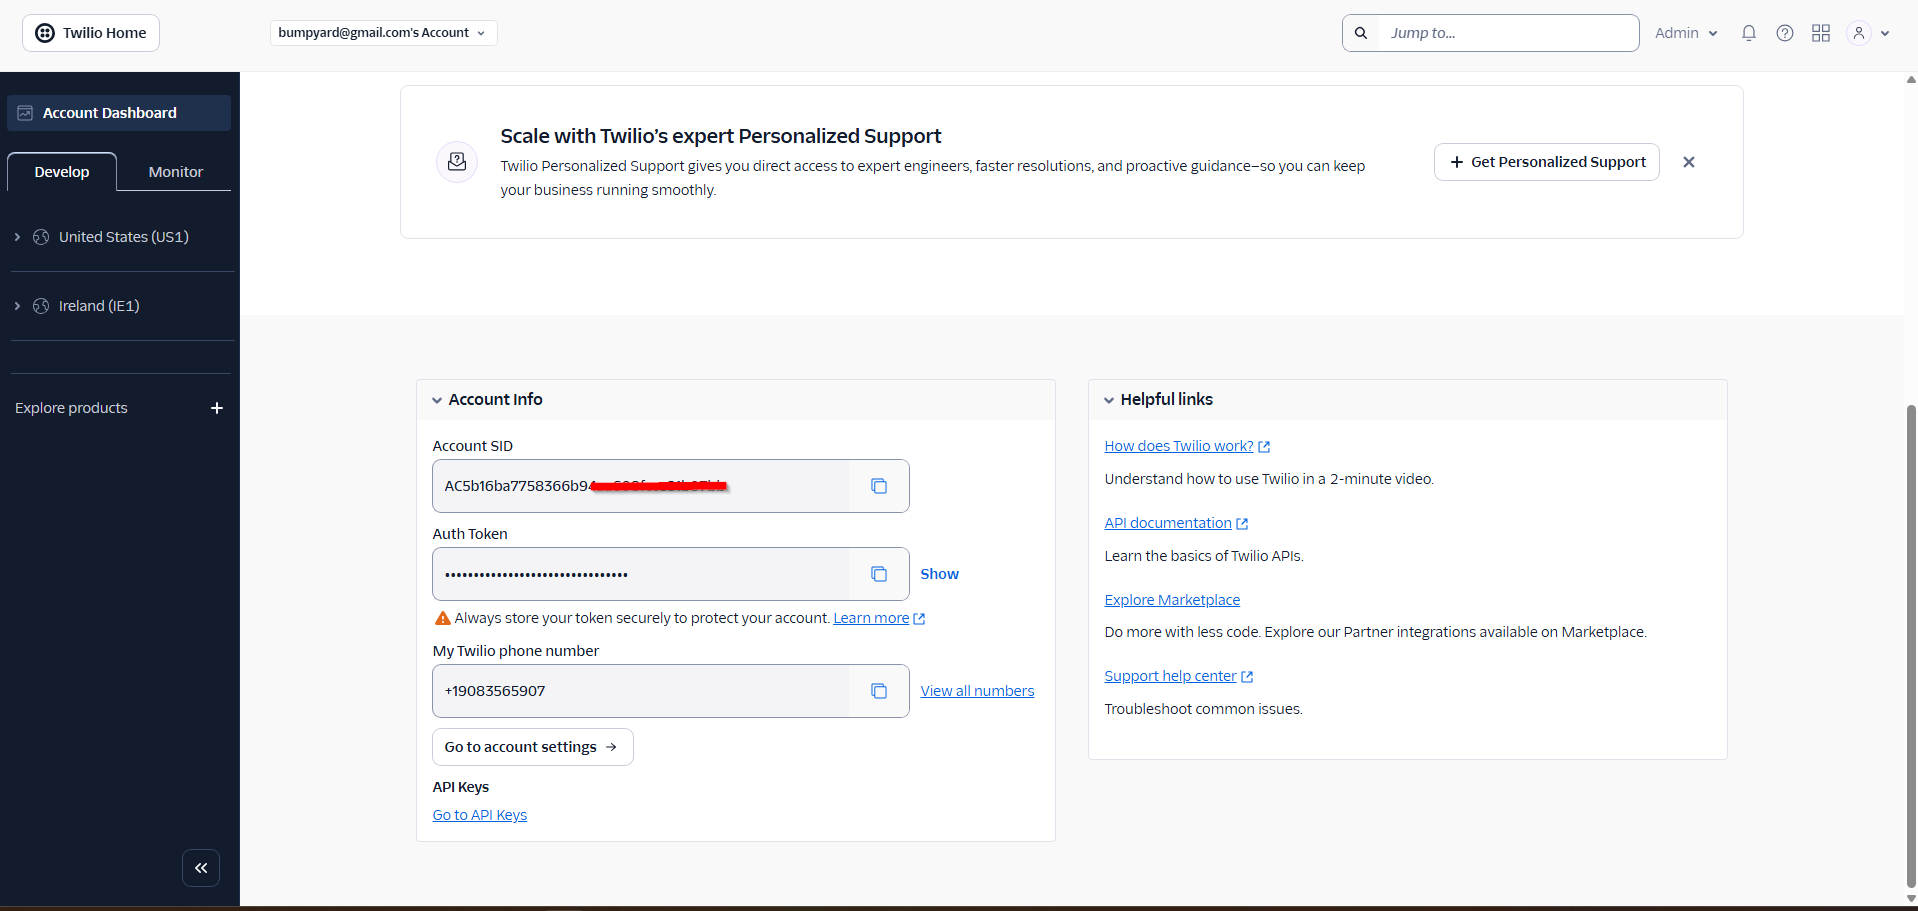
Navigate to the Twilio console and log in to your account or create a new one.
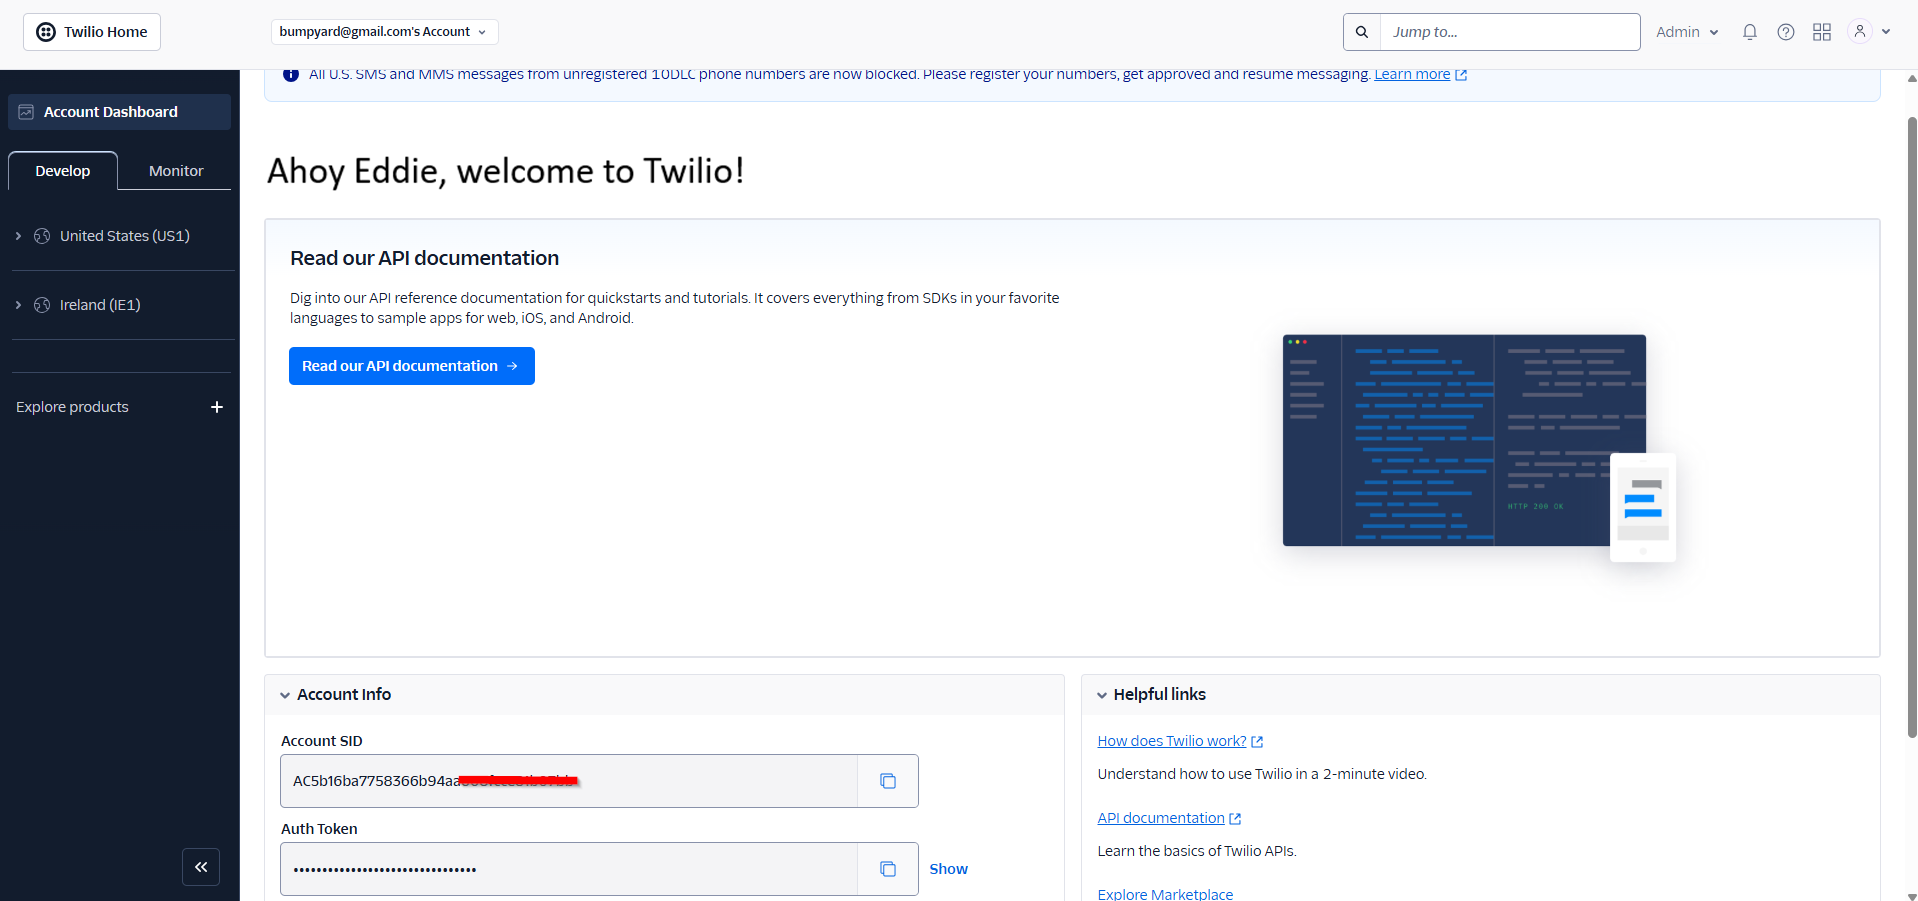
-
On the main page, go to the Account Info section (scroll down a bit), click the Show button, and then click the Copy icon to copy the authentication token to your device.
Step II: Obtaining a Twilio Number
-
In the sidebar, navigate to Phone Numbers > Manage > Active numbers and click Buy a number at the top corner of the screen.
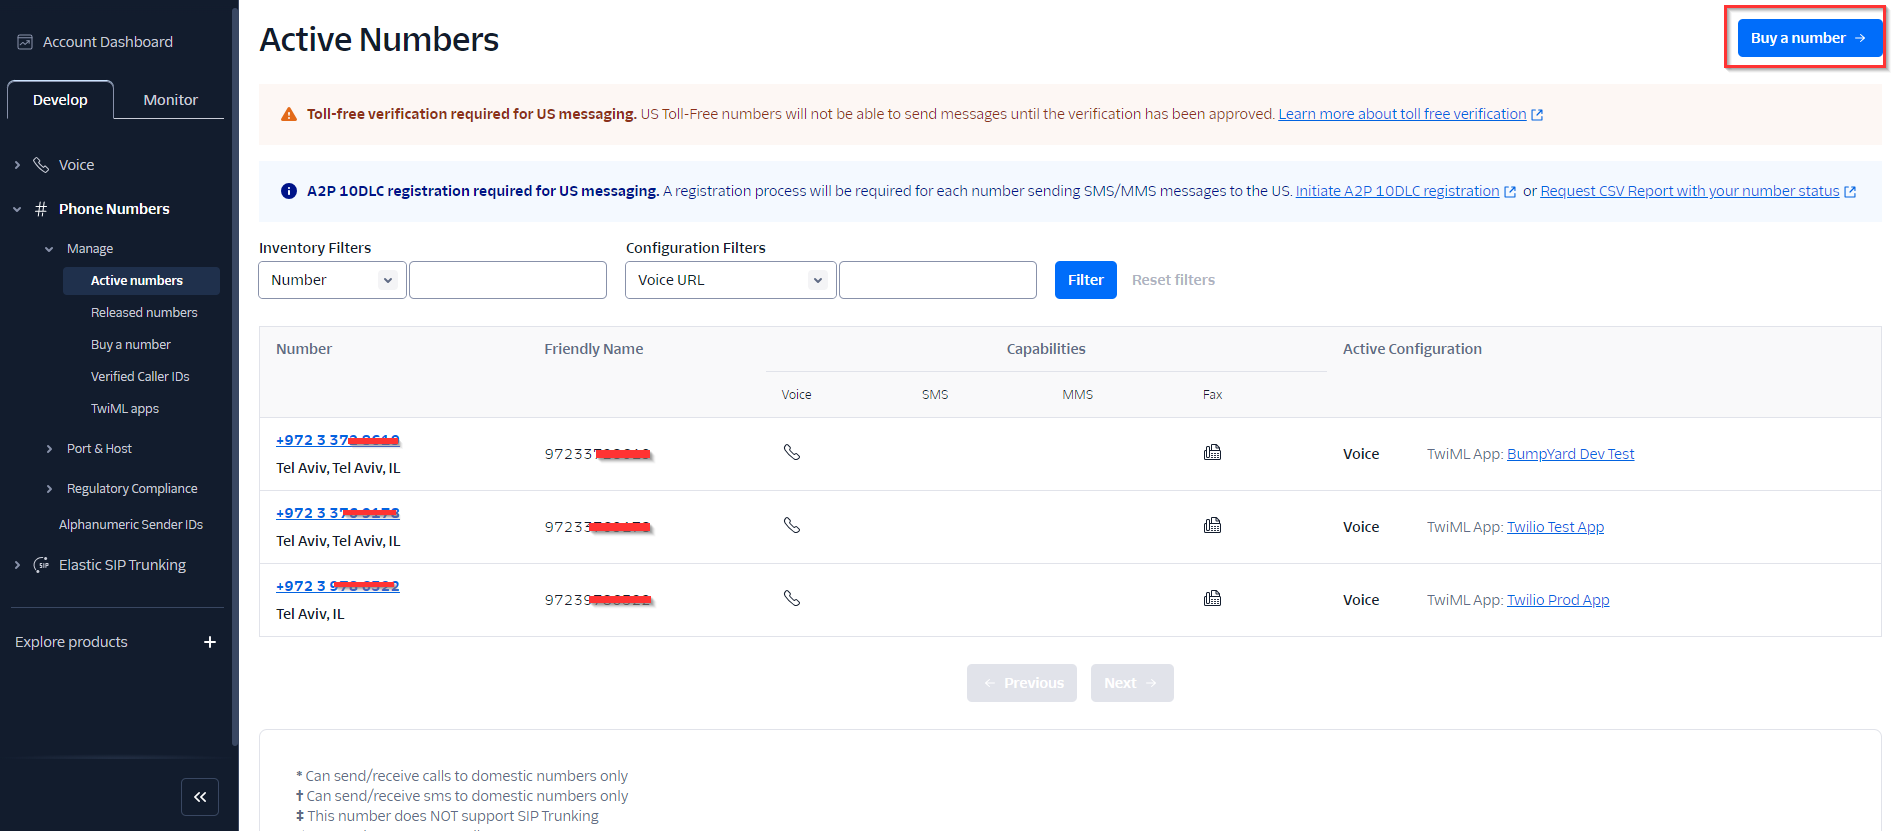
-
Select a phone number for your organization by clicking the Buy button at the selected line.

Step III: Create a Voice Channel in CommBox
-
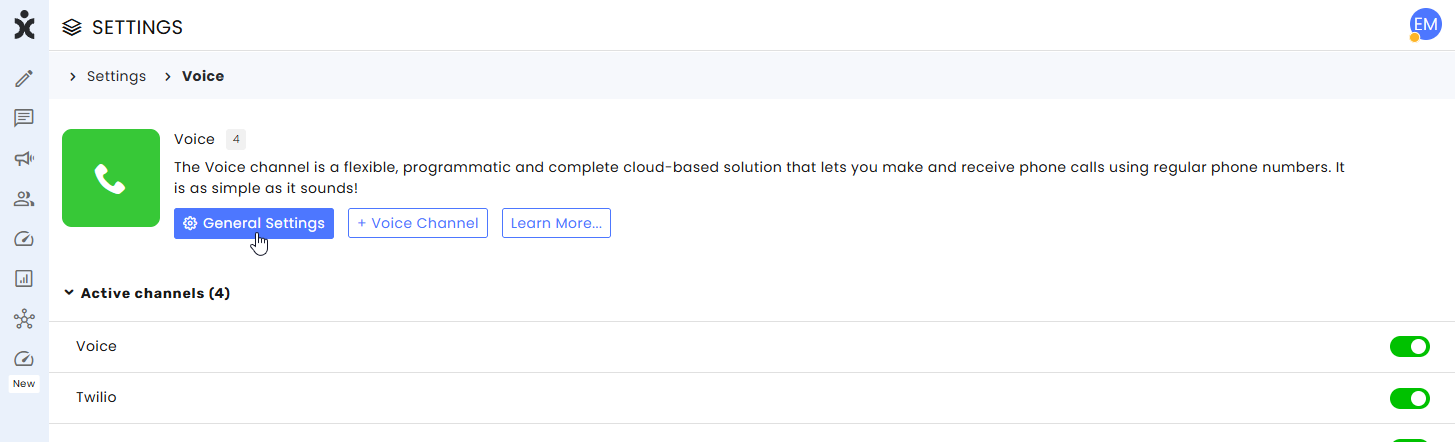
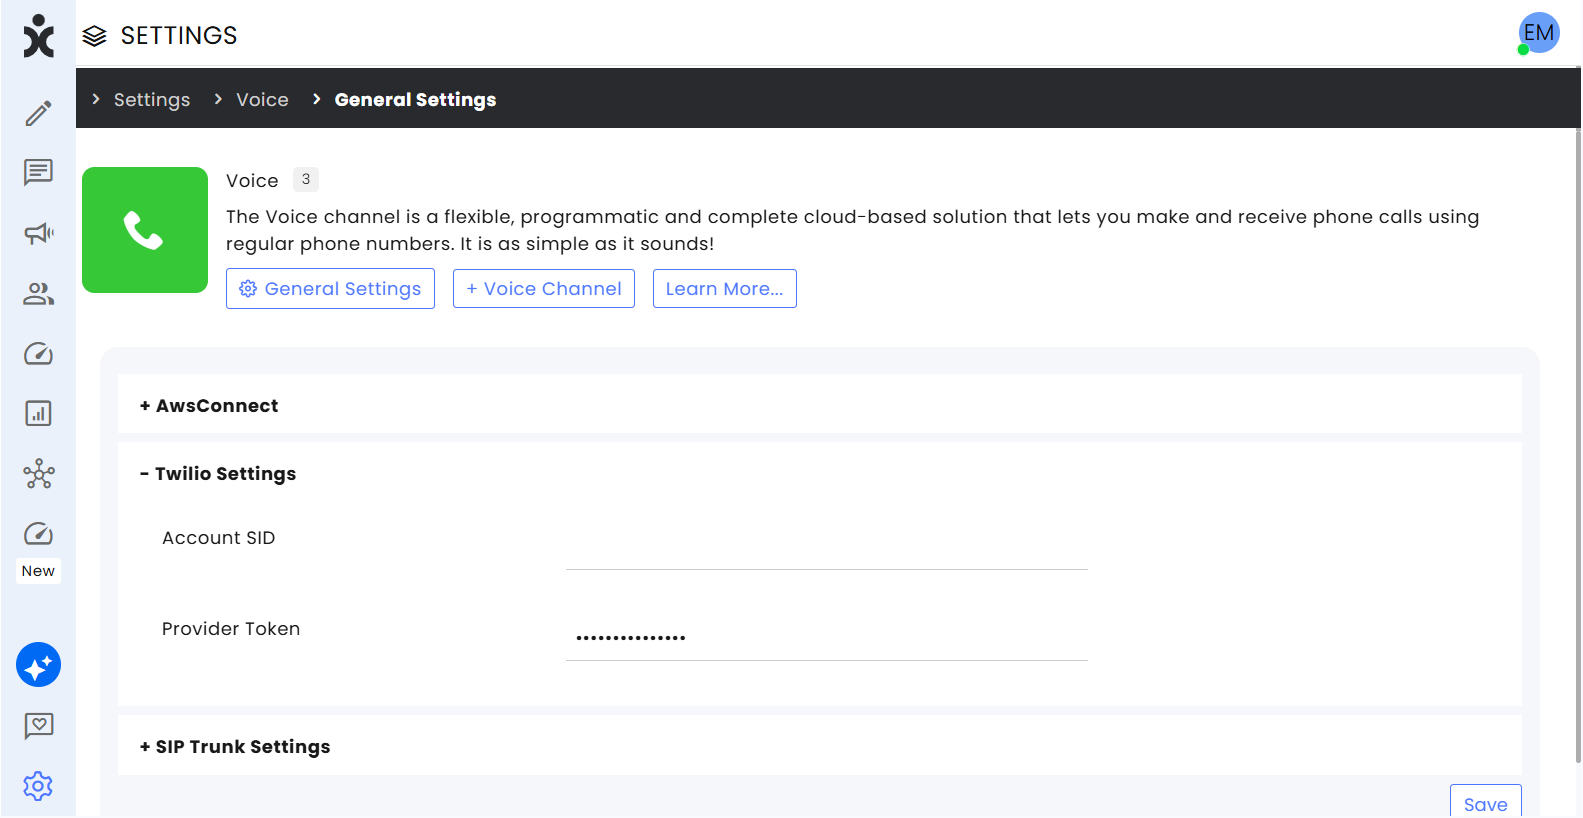
Open a new tab in your browser for the CommBox platform, navigate to Settings > Voice, and click the General Settings button at the top.
-
Expand the Twilio Settings section and paste the Auth token you got from Twilio in the Provider Token line and click Save.
-
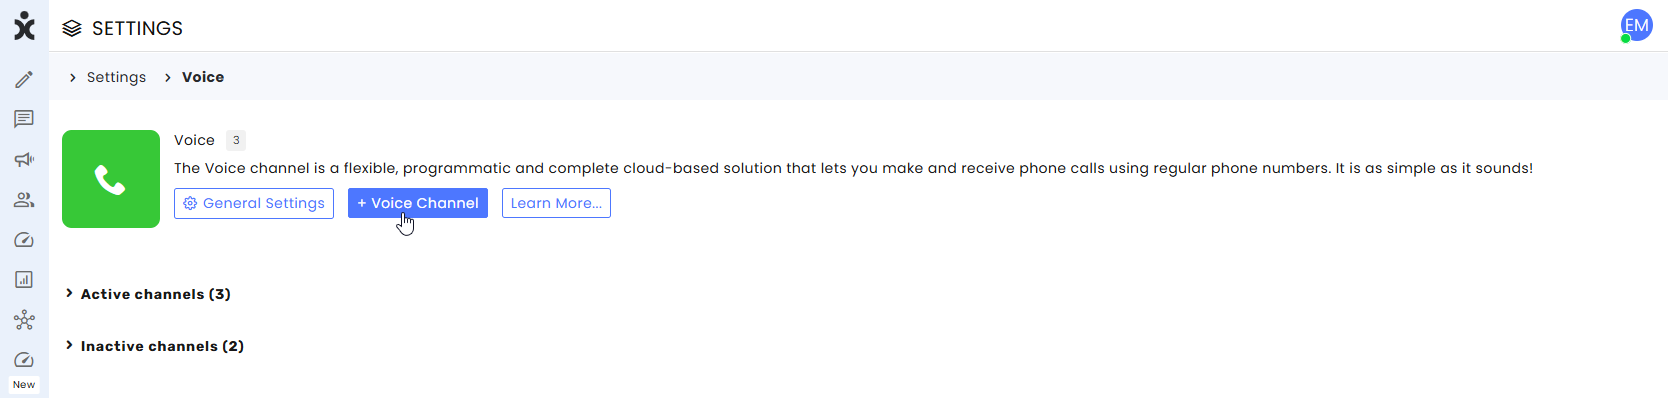
At the top of the screen, click the +Voice Channel button.
-
At the new window, enter the following:
.png)
a. Enter the name of the new channel.
b. Enter the phone number you purchased from Twilio.
c. Add Subchannels (optional).
d. Select Team ownership (optional).
e. For the Provider, select Twilio.
f. Click Create Channel. -
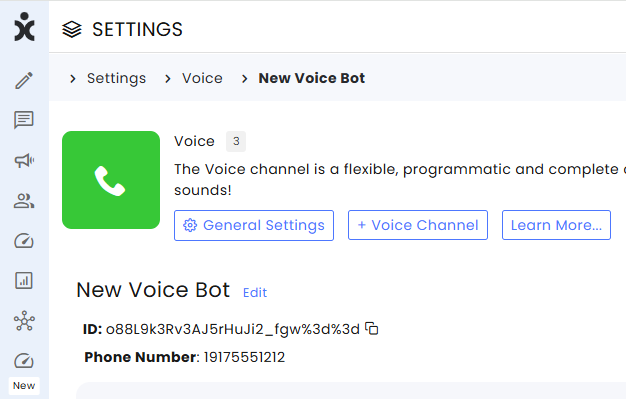
Copy the Channel ID of the new voice channel to your device.
Step IV: Create a TwiML App in Twilio
-
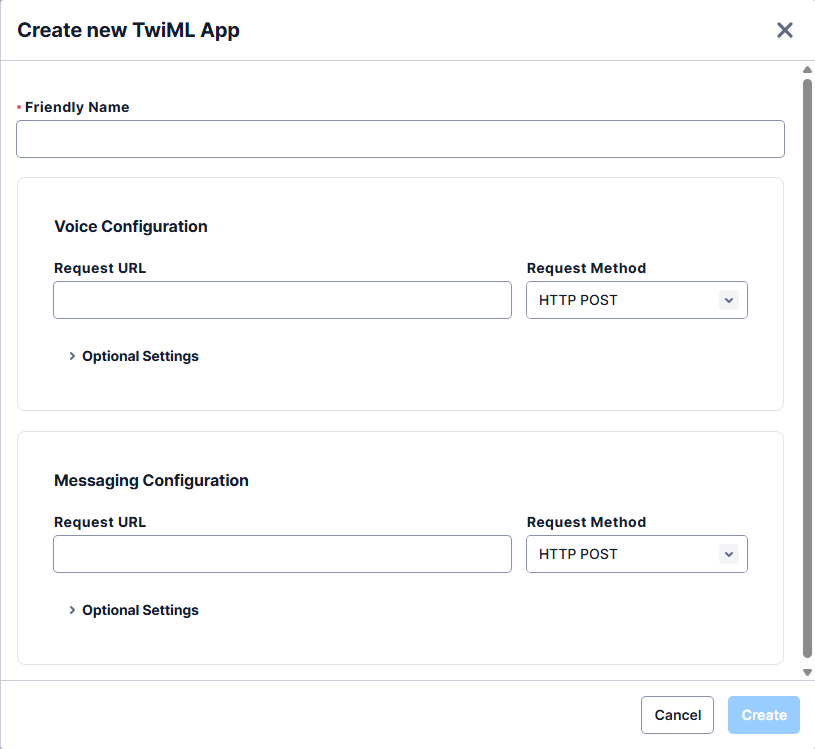
At the Twilio platform, on the sidebar menu, select TwiML apps and click on Create new TwiML app.
-
In the new dialog box, enter a friendly name for the app. (Use the same name you used in the CommBox voice channel for easier reference.)
-
In the Voice Configuration section, enter the following:
https://api.commbox.io/voice/twilio/newcall/{STREAM_ID}, where you paste the channel ID you copied in step 3-3 instead of the {STREAM_ID} placeholder. -
Expand the Optional Settings and enter the following:
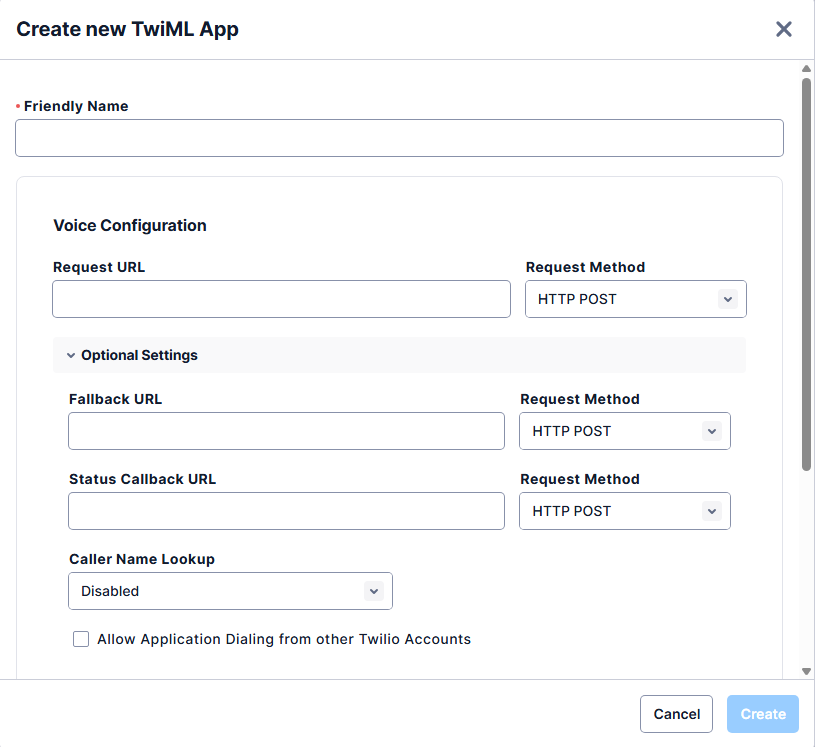
a. In the Fallback URL section, enter https://api.commbox.io/voice/twilio/fallback/{STREAM_ID} pasting the channel ID instead of the {STREAM_ID} place holder.
b. In the Endcall URL section, enter https://api.commbox.io/voice/twilio/endcall/{STREAM_ID} pasting the channel ID instead of the {STREAM_ID} place holder. -
Click Create.
-
Navigate back to Phone Numbers > Manage > Active numbers and click on the number you just purchased.
-
Select the Configure tab.
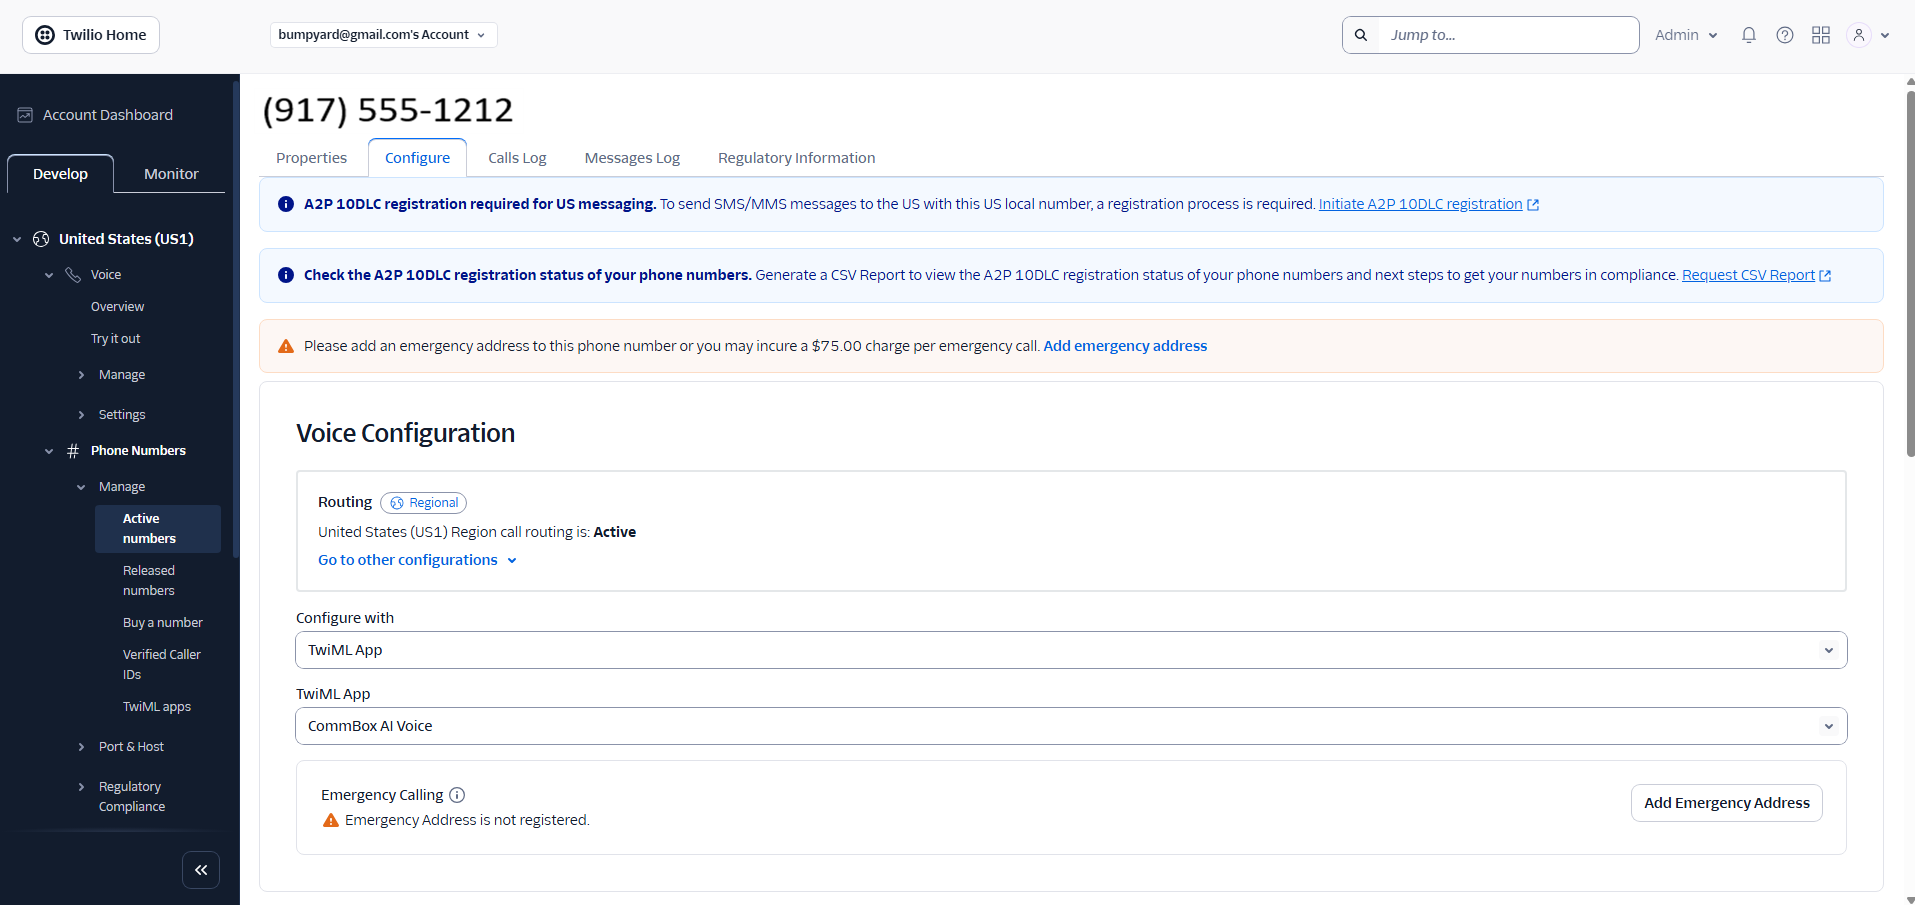
a. For Configure with, enter TwiML app
b. For TwiML App, select the app’s name you just created. (CommBox AI Voice in the example above).
c. Click Save configuration.
Step V: Set CommBox Channel Settings
The voice channel settings include settings for all types of providers. All Twilio’s settings are in the Twilio section—ignore all others.
Enter the settings listed below and click Save at the bottom of the page.
Note: Twilio Channel Settings are visible only for Twilio channels.
.png)
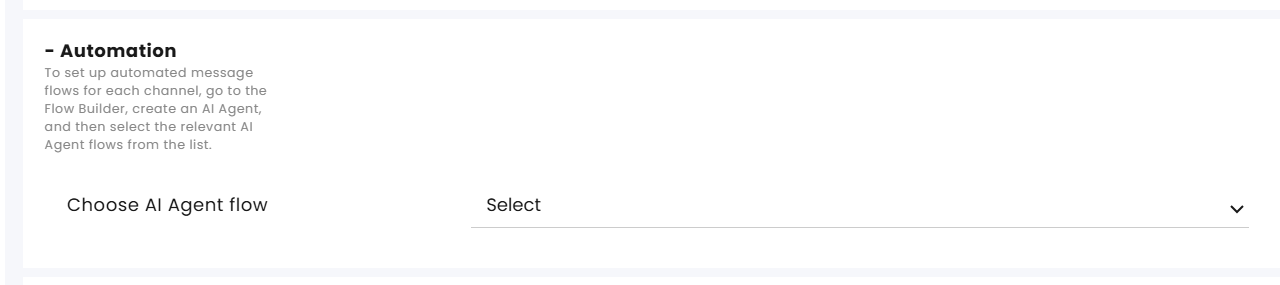
-
In the **Automation **section, select the desired flow (AI Agent) that will run with this channel. Clicking on the studio icon will open the actual flow.

-
Set the Twilio settings:
.png)
a) TTS Model - Select the voice for the AI Agent. The name reflects the Language (en), country (US), and model name.
b) Twilio Speech Model - Select the speech-to-text model for the AI Agent.
c) STT Error Message - Enter the text that will indicate to the agent that the system did not understand the customer.
d) Caller wait timeout (seconds) - Enter the number of seconds of silence that will indicate to the AI agent that the customer finished talking.
e) Input type - Determines how callers interact with the AI agent: by speaking directly to the AI agent (speech) or by entering selections using the phone keypad (DTMF – Dual-Tone Multi-Frequency). -
Click Save at the bottom of the screen.
SIP Integration
Step I: Provide Your SIP Trunk Information
-
Navigate to Settings > Voice > General Settings and expand the SIP Trunk Settings section.
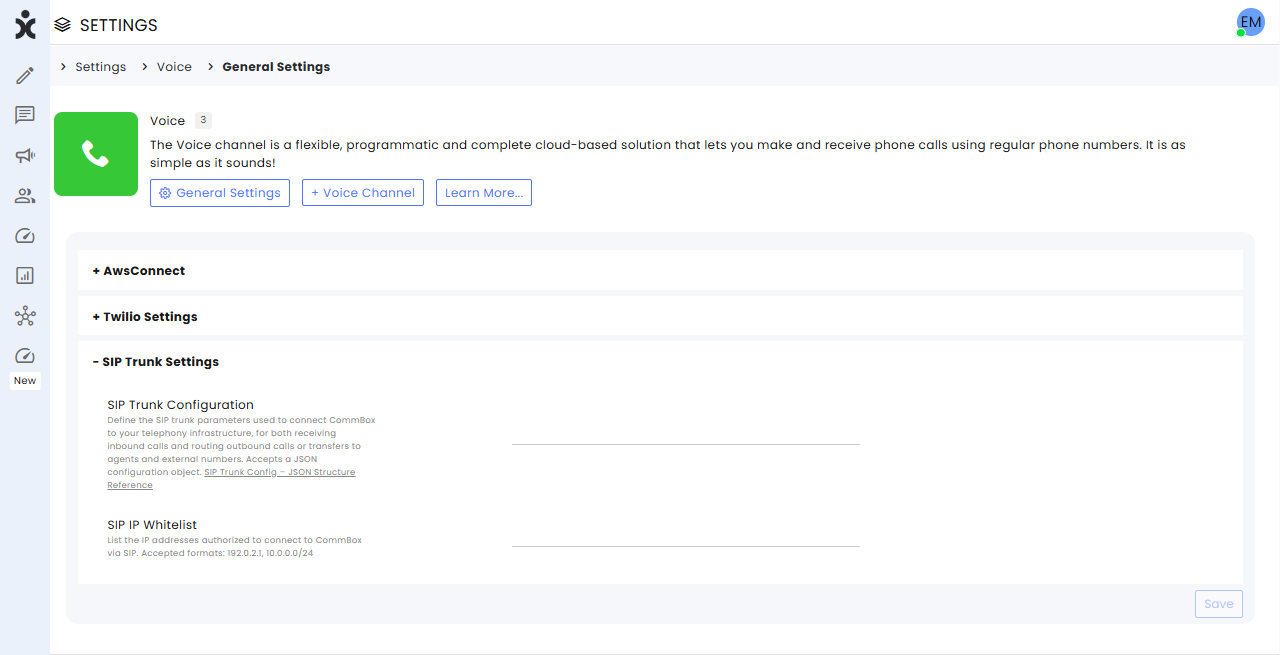
-
Enter the SIP Trunk (JSON) Configuration and click Save.
Use this reference for help. Contact your CS for assistance if needed.
JSON example:
   {
    "domain": "sip.twilio.com",
    "display_name": "Support",
    "transport": "udp",
    "port": 5060,
    "uri_params": ";user=phone",
    "from_uri_template": "sip:{caller}@sip.twilio.com",
    "to_uri_template": "sip:{destination}@sip.twilio.com",
    "ruri_template": "sip:{destination}@sip.twilio.com",
    "socket_template": "udp:sip.twilio.com:5060"
  }
- Enter allowable SIP IP addresses authorized to connect to CommBox via SIP. (Optional)
Step II: Create a new Channel
-
Navigate to Settings > Voice and click the + Voice Channel button at the top.
-
Enter a unique name for the channel and a valid SIP phone number, including the country code.
.png)
-
Add Subchannels (optional)
-
Select an ownership team (optional)
-
Select SIP as the Provider.
-
Click Create Channel.
Step III: Set the Channel Settings
-
Set the Channel settings as needed and click Save.

Speech Language - The language the AI agent will understand and speak. Examples include English (US), Spanish (Mexico), among others.
Text-to-Speech Provider (TTS) - Select SIP as the provider. Contact your CS if it is not listed.
Voice - Enter a recognized Text-to-Speech model with the specific persona/character, gender, dialect, and tone the AI Agent uses when speaking. Click here for available choices.
Speech Speed - Enter how fast the AI agent speaks.
Range: 0.5 (slow) to 2.0 (fast)
Speech Pitch - Select the tone/pitch of the AI agent's voice.
Low pitch produces a deeper, more serious voice. Higher pitch - brighter, more energetic voice.
Speech Volume - Enter the loudness level of the agent.
Range: 0 (silent) to 100 (maximum)
Speech-to-Text Provider (STT)- Select among available providers. Contact your CS if you need a provider not listed.
SIP Trunk Server - The server address that handles your phone calls.
Format: provider.domain.com:port
Example: commbox-prod-ie.pstn.dublin.twilio.com:5060
Conversation Memory - Specifies the number of prior messages included in the agent’s context. Higher values provide richer context but may increase response time.
LLM Fallback for Unknown (Step) - When enabled, the AI generates a response using the preset AI Agent persona and instructions if the intent detection fails and returns Unknown.
When disabled, the flow follows the Unknown steps as defined.
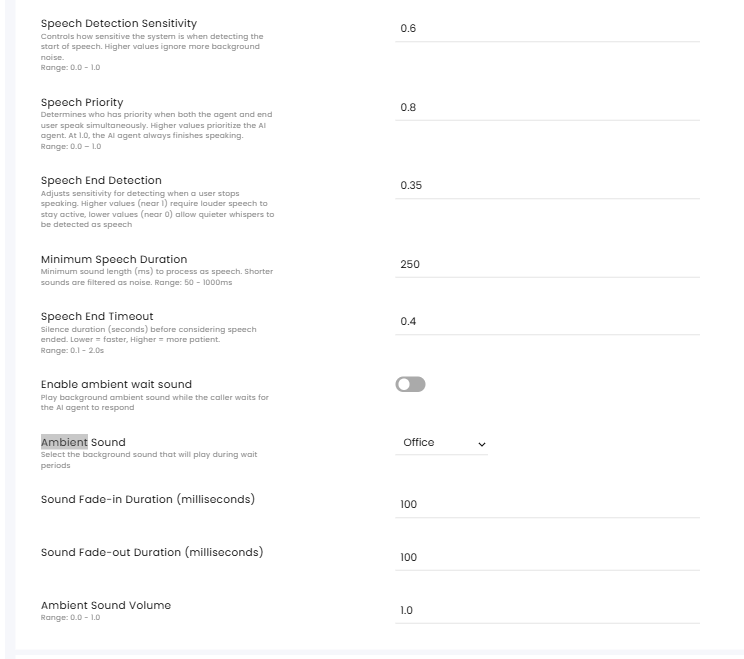
Speech Detection Sensitivity - Controls how much background noise is ignored during speech detection. Lower values are more tolerant of noise; higher values are more responsive to speech.
Range: 0.0 - 1.0
Speech Priority - Controls how easily end users can interrupt the AI while it's speaking. Set to 1.0 to disable the interruptions option completely.
Range: 0.0 - 1.0
Speech End Detection - Detects when the end user stops speaking. Higher values (near 1) require louder speech to stay active, lower values (near 0) allow quieter whispers to be detected as speech.
Range: 0.0 - 1.0
Minimum Speech Duration - Minimum sound length (milliseconds) to process as speech. Shorter sounds are filtered as noise.
Range: 50 - 1000ms
Speech End Timeout - Sets the silence duration (seconds) before considering speech ended. Lower = faster, Higher = more patient.
Range: 0.1 - 2.0 (seconds)
Enable ambient wait sound - When enabled, the system plays a background ambient sound while the caller waits for the AI agent to respond. When disabled, ignore the rest of the settings.
Ambient Sound - Select the background sounds that will play during wait periods
Sound Fade-in Duration (milliseconds) - Set how long it will take for the background sound to reach its full volume
Sound Fade-out Duration (milliseconds) - Set how long it will take for the background sound to fade out
Ambient Sound Volume - Volume range: 0.0 - 1.0 -
In the Automation section, select the voice AI agent that will operate in this channel.
-
Click Save at the top of the page.