Overview
This guide explains how to integrate CommBox with SAP Service Cloud Version 2 (Agent Desktop), enabling agents to access the CommBox CTI widget directly within SAP.
The integration requires configuration in both systems:
| Console | Configuration |
|---|---|
| CommBox | Configure the SAP Service Cloud V2 connector, establish the connection to the SAP tenant, and enable the integration for the relevant channels. |
| SAP V2 | Configure the CommBox CTI widget provider, assign channels, and update the Content Security Policy (CSP) allow-list. |
The configuration process is divided into three parts:
- CommBox Configuration – Configure the SAP C4C Integration module and channel settings.
- SAP Service Cloud V2 Configuration – Configure the CTI widget (Agent Desktop Settings) and security settings.
- Verification – Validate the integration and confirm that the CommBox widget loads successfully within SAP.
Prerequisites
- Administrator access to both CommBox and SAP Service Cloud V2.
- The SAP tenant base URL, in the form
https://my<id>.<dc>.crm.cloud.sap/ - The CommBox environment URL, in the form
https://[environment].commbox.io - A Technical User who is assigned API permissions for REST calls.
Part I – CommBox Configuration
CommBox configuration is performed at both the Module level and each relevant Channel.
Step 1.1 - Module Configuration
-
At the CommBox console, navigate to Settings > SAP C4C integration
.png)
-
Enter the following values:
Field Value URL https://my<id>.<dc>.crm.cloud.sap/(SAP tenant base URL)SAP C4C Version (For iFrame Integration) Select V2 (Agent Desktop) Username / Password SAP integration user credentials Contact Synchronization Frequency (Minutes) 1440(e.g. once per day)SAP LoB Application Environment Production, or Non-Production (Dev/Test/Demo/etc.) -
Click Save at the bottom of the screen.
-
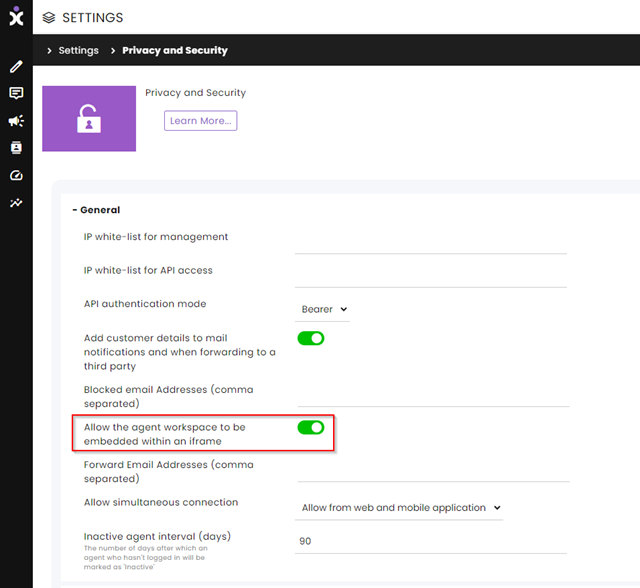
Go back to the Settings page, select the Privacy and Security module from the Settings & Tools section, and click on General.
-
Enable Allow the agent workspace to be embedded within an iframe.
-
Click Save at the bottom corner of the screen.
Step 1.2 - Channel Configuration
Step 1.2 - Channel Configuration
Repeat this step for each relevant communication channel that operates with SAP.
We are using the WhatsApp module as an example.
-
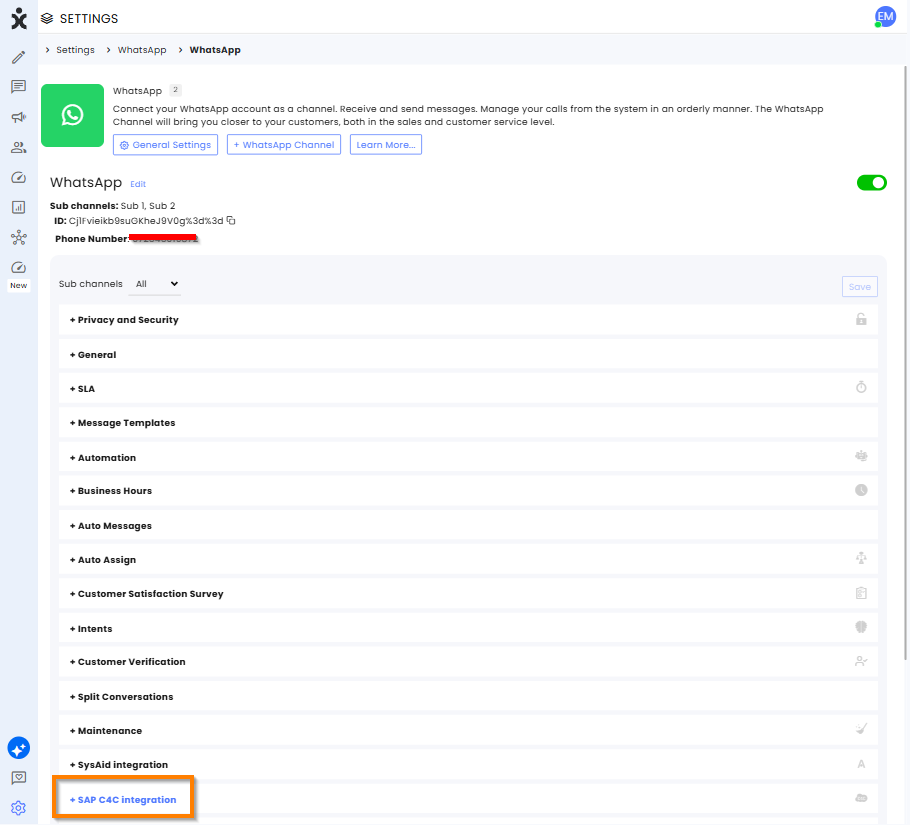
Navigate to Settings > WhatsApp module, select the desired channel, and expand the SAP C4C Integration section.
-
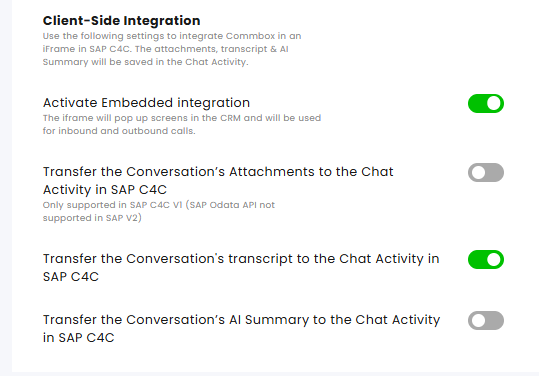
Set the Client-side Integration toggles (scroll down until you see it) as follows:
Field Toggle Behavior Activate Embedded integration Enable (required for iFrame pop-up screens for inbound & outbound calls) Transfer the Conversation’s Attachments to the Chat Activity in SAP C4C Disabled - not supported in V2 Transfer the Conversation's transcript to the Chat Activity in SAP C4C Enable Transfer the Conversation’s AI Summary to the Chat Activity in SAP C4C Optional
- Click Save at the bottom of the screen.
- Repeat for any other relevant channel.
Part II – SAP Service Cloud V2 Configuration
Step 2.1 – CTI Configuration
-
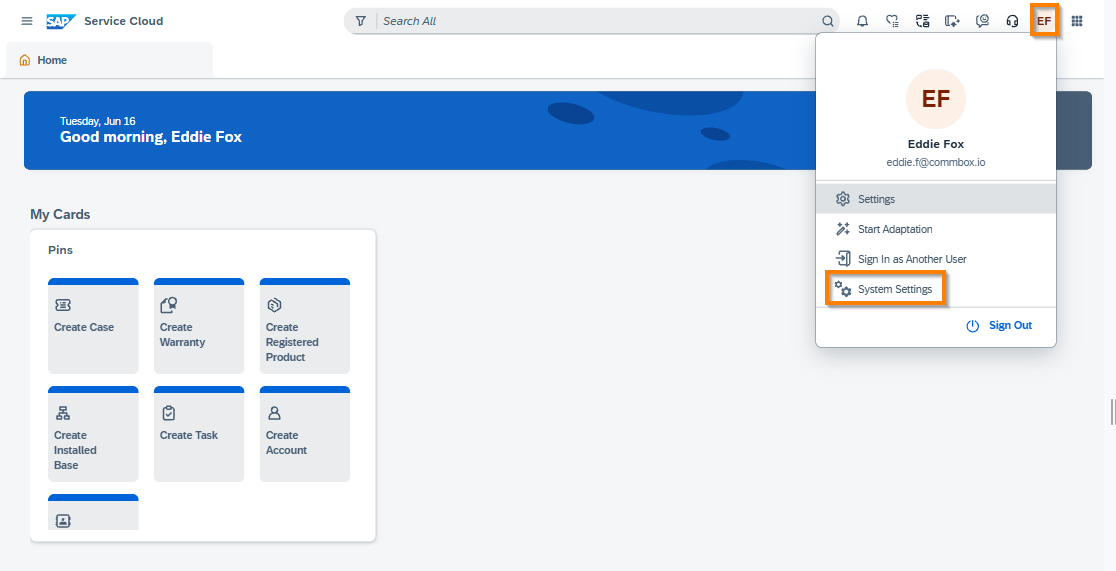
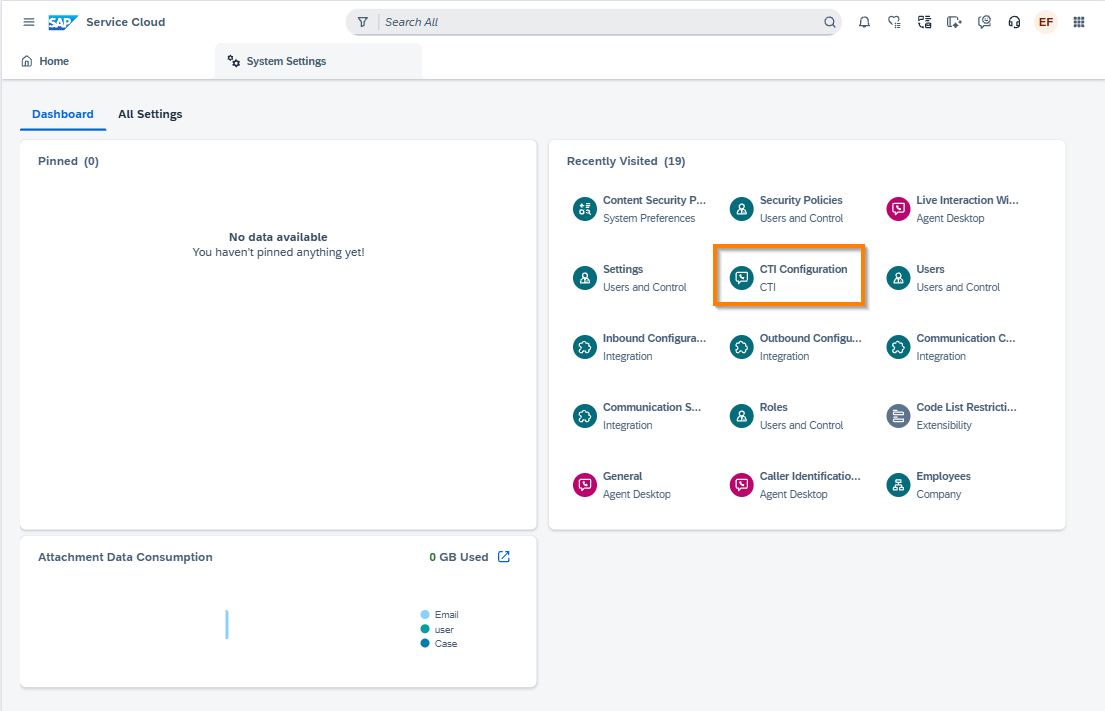
At the SAP console, click the user initials followed by System Settings.
-
Select CTI Configuration, and open the CTI Configuration tab.
-
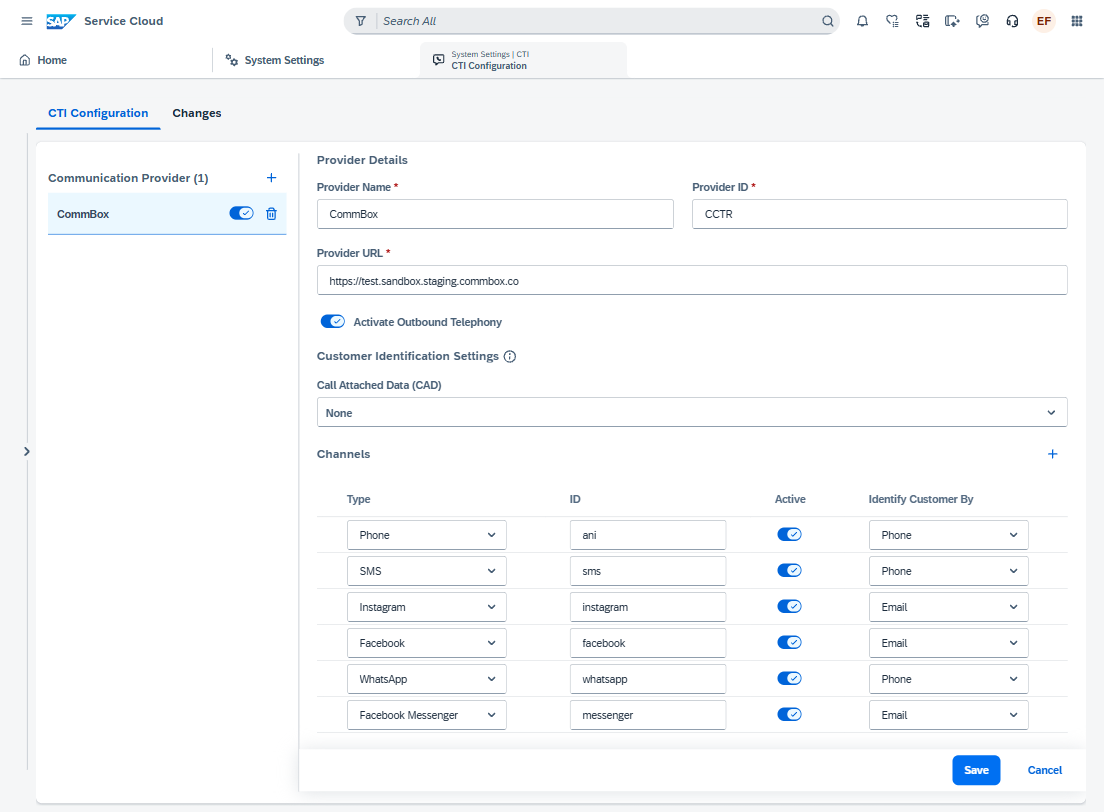
Under Communication Provider, add/select
CommBoxand enable its toggle. -
In Provider Details, set the values below:
Field Value Provider Name CommBoxProvider ID CCTRProvider URL https://[environment].commbox.io(CommBox environment) -
Enable Activate Outbound Telephony for click-to-call; set Call Attached Data (CAD) to
Noneunless mapping is needed. -
Under Channels, add a row per channel, set Active, and map Identify Customer By:
Type ID Active Identify Customer By Phone ani On Phone SMS sms On Phone Instagram instagram On Email Facebook facebook On Email WhatsApp whatsapp On Phone Facebook Messenger messenger On Email -
-
Click Save
Step 2.2 – Content Security Policy
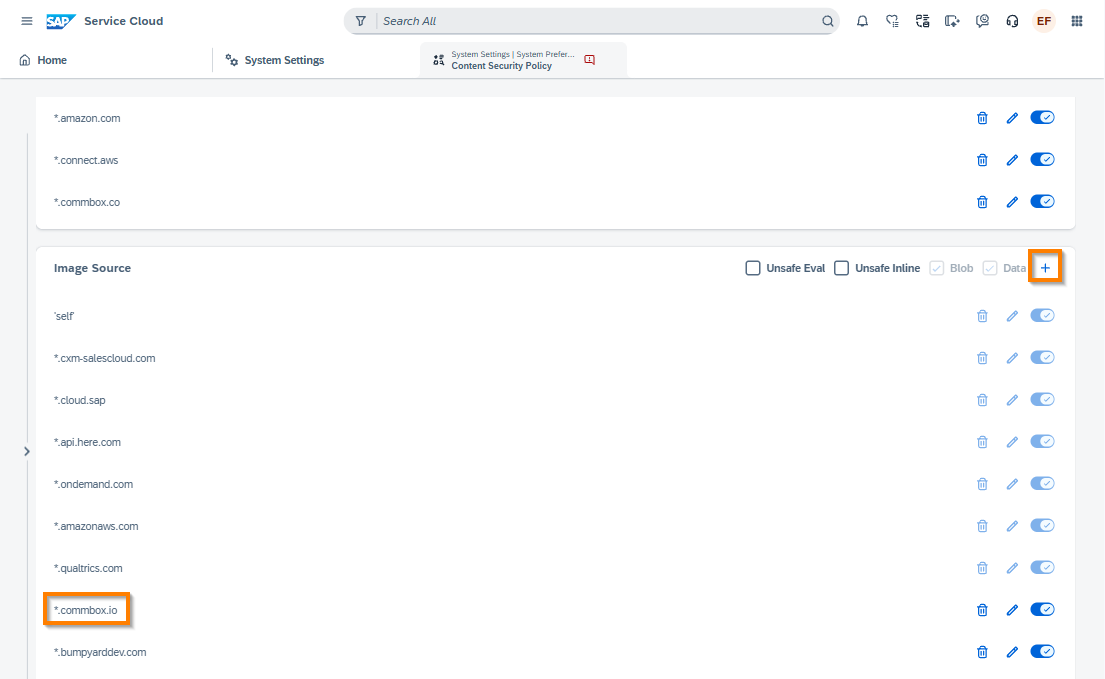
- Navigate to System Settings > Content Security Policy.
- In every section (Script Source, Style Source, Frame Source, Connect Source, Image Source, etc.), click + and add the rule:
*.commbox.io - Ensure each
*.commbox.ioentry is enabled. - Click Save.
Note:
Frame Source (frame-src) is what allows the widget iFrame to load. The other sources prevent related script/style/connection failures.
Part III – Verify the Widget
-
Log in to CommBox and make sure you are marked as an active Agent. The session has to be in the same account (environment) you previously configured in SAP.
-
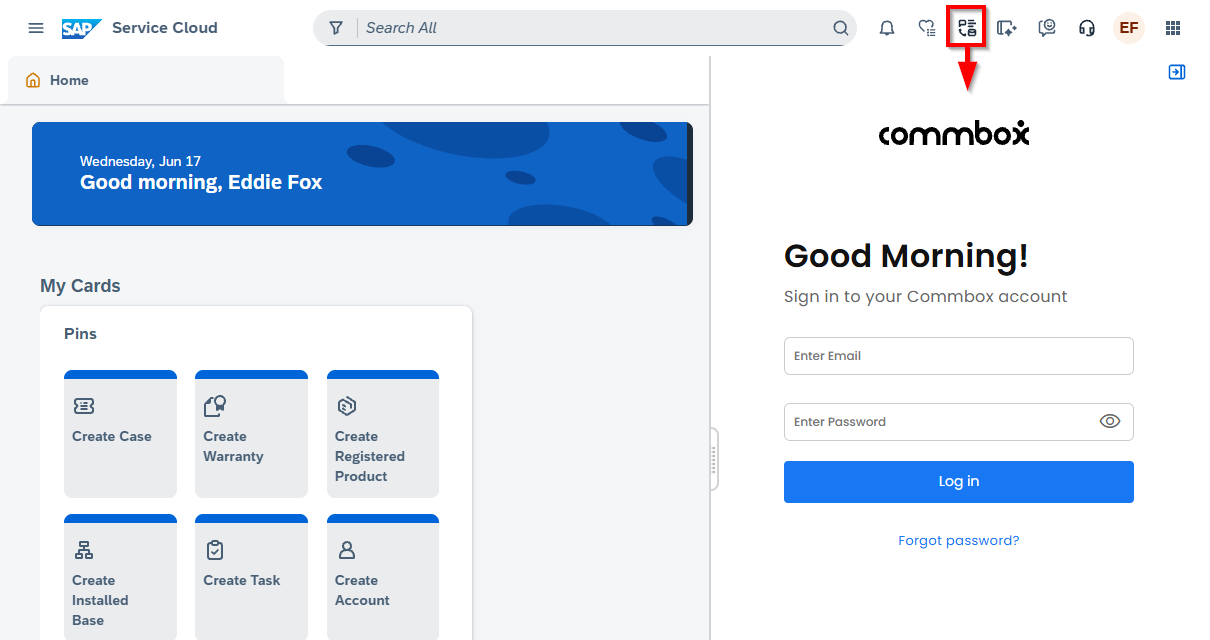
In SAP, open the CTI widget from the icon in the top toolbar (highlighted)
-
Confirm the embedded iFrame renders the CommBox conversation list / Live Activity with channel icons and agent controls.