Overview
CommBox’s new Flow Builder provides a streamlined way to craft powerful chatbots with ease. Its intuitive and user-friendly interface, combined with advanced AI capabilities, enables both technical and non-technical users to design impactful and automated customer interactions.
This beginner’s guide focuses on the fundamentals of building a flow without the AI Agent layer. Before getting started, we recommend reviewing the Flow Builder Overview to familiarize yourself with the platform and the available tools.
In this guide, the AI Agent will allow customers to select a service category, add tags, and route conversations to the appropriate destinations. Once you feel comfortable with your flow, you can connect your chatbot to the relevant communication channel within the Automation section under Channel Settings.
You can read more about advanced automation options in the Advanced Capabilities guide.
You can explore how to incorporate AI into your flow in the AI Agent Settings guide.
Prerequisites
A. CommBox Capabilities Used in This Guide
CommBox offers many powerful capabilities that can be integrated into your AI Agent. For this tutorial, we use:
If you're not familiar with these features, we recommend reading the guides linked above. Before continuing, ensure that you have configured your Business Hours and created a few tags — these are required for the demo flow to function properly.
B. Set Up a Chat Channel
A chat channel is necessary to preview your chatbot’s behavior. If you don’t already use chat for customer communication, create one by navigating to:
Settings > Chat, and click the + Chat Channel button.
Give the channel a name and activate the features you want the AI Agent to utilize.
Learn more about our chat communication channels in our guides.
Getting Started
We start with setting up a new environment and explaining its components.
**To create a new Flow: **
-
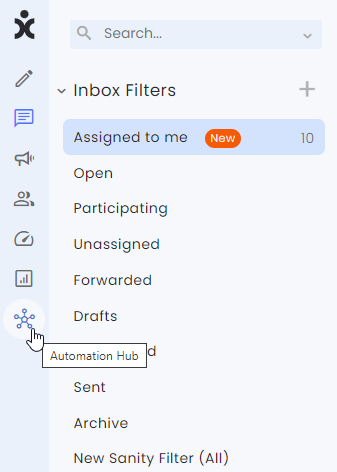
At the main menu sidebar, click the Automation Hub icon to open the AI Agents tab.
-
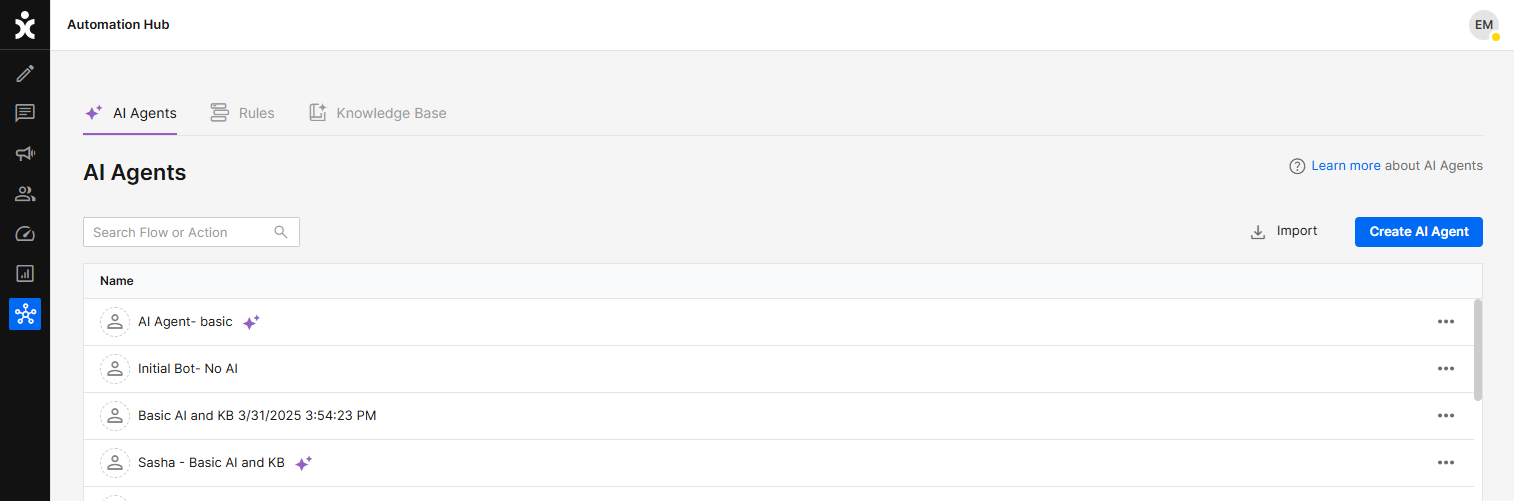
At the AI Agents tab, click the Create AI Agent button.
-
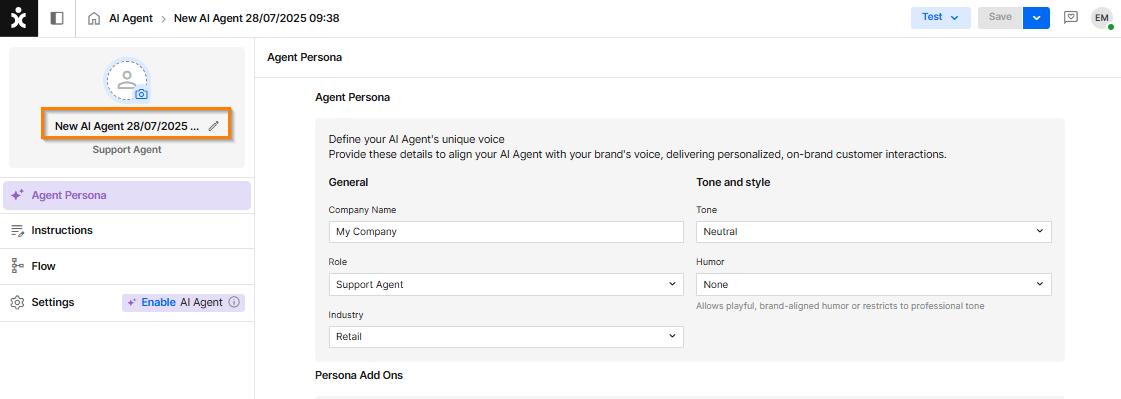
Name your new AI agent.
You can edit the name of the new flow by clicking the name. -
At the sidebar, click the Flow section.
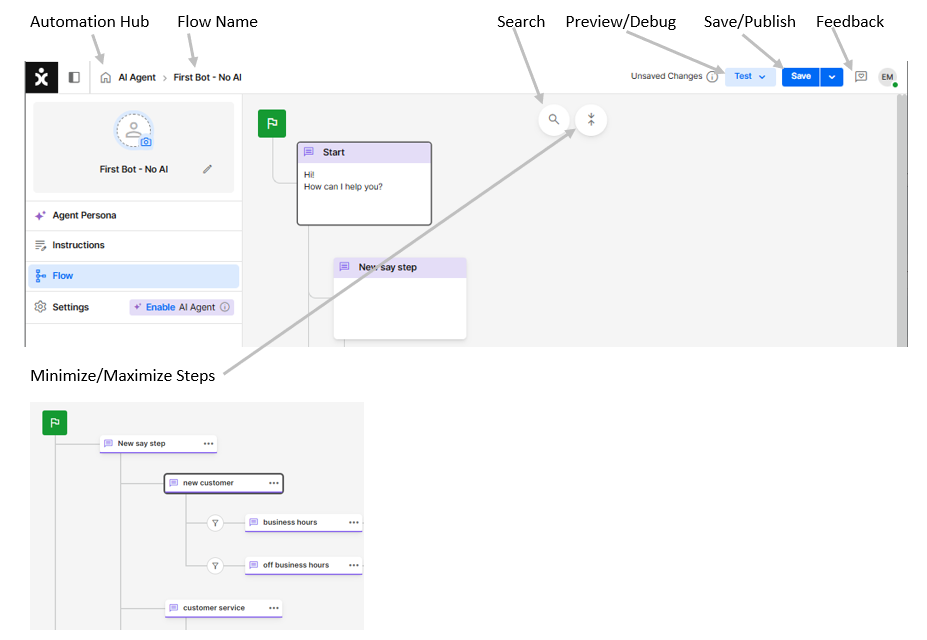
The Flow Builder Canvas
The conversation with a customer is built with different dialog Steps. Some Steps present the customer with choices (for example, buttons) or respond to free-text input. Other Steps work behind the scenes, enabling actions such as jumping to another Step or triggering an API, or use AI prompts to generate a response to the customer. Together, all these Steps form the Flow.
Building the Flow involves adding Steps to existing ones and modifying each additional Step using the Properties Panel at the side, which appears once you click on a specific step.
The steps
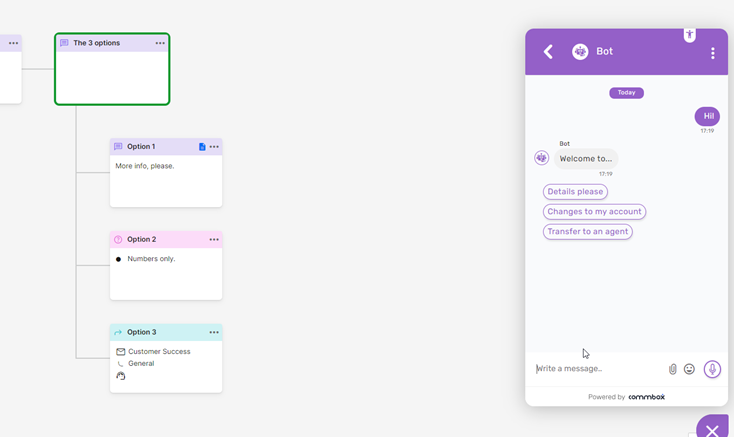
By default, Steps appear as choice buttons for the customers when the previous step has more than one “child”.
The content of the button is the title of the step, independently of its functionality. When selected, the step’s message will appear, and its action will be taken.
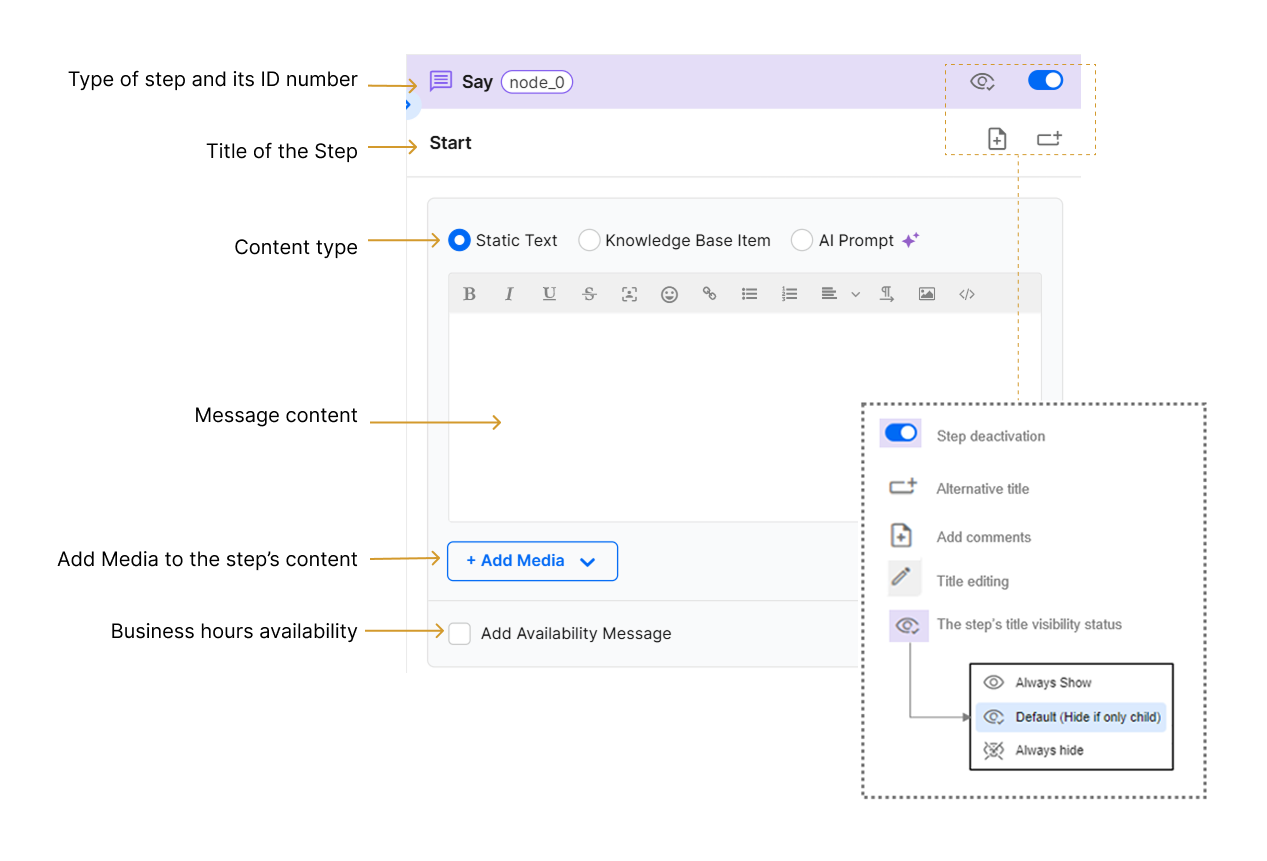
Step deactivation – Flow will ignore that step and any branch past it.
Alternative title – Flow will show those titles and not the step’s headings. See the example below where the customers do not see “Option 1” but rather “Details please,” etc.
Add comments – Add comments for yourself. Comments will not be shown to customers. Note the icon at step “Option 1”.
Title editing – Visible once you hover over the title. Edit it at any time.
Step Visibility – Enables the step’s title to appear as a sole button before the flow continues.
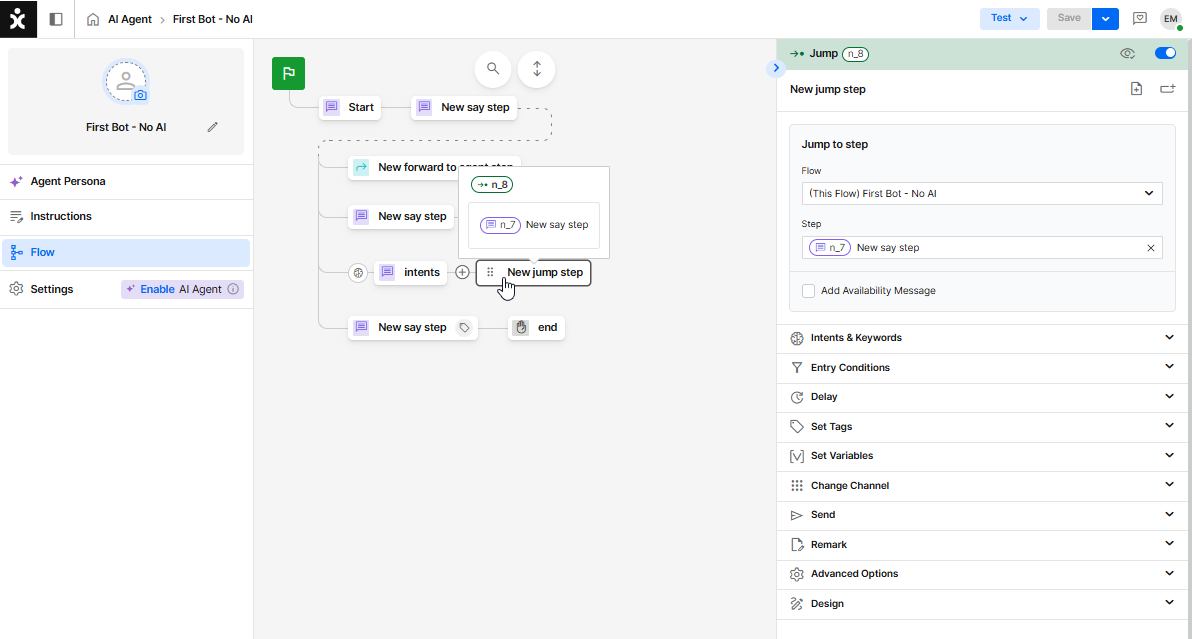
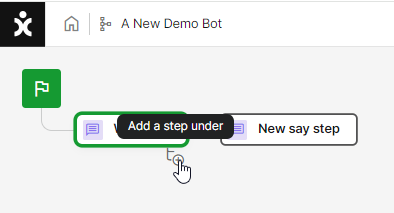
A new Step is created by hovering next to the desired step you want to build on, clicking the + sign, and selecting the type of Step from the pop-up menu.
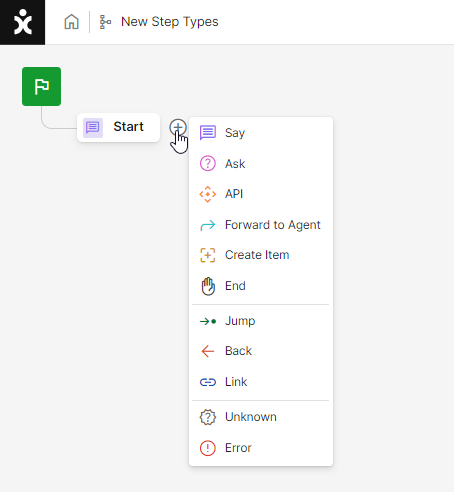
Types of Steps:
 Say – Used primarily to display information to the customer or to run behind-the-scenes processes, such as functions. Click here to learn more about this topic.
 Ask – Requests input from the customer. Click here to learn more about this topic.
 API – Makes an API call to an external service to retrieve or enter data. Click here to learn more about this topic.
 Forward to Agent – Transfers the conversation to an agent with an Open status and creates a new conversation (object). Click here to learn about implementing the best practice of this step.
 Create Item – The Bot creates a secondary conversation (Text/SMS or email only) for the customer.
 End – The flow ends, and the conversation’s status changes to Resolved or Irrelevant.
 Jump – This step advances the flow to another step in the current flow or to another flow.
 Back – Sends the flow a specified number of steps backward. This is not considered best practice; use the Jump step instead.
 Link – This step will present a link or hyperlink in the conversation. May not work with WhatsApp.
 Unknown – The flow will be diverted to this step when the bot receives unexpected information, such as a customer typing free text (which isn't an exact match of the button names) instead of selecting a button or entering unrelated information. If more than one Unknown step is used, the flow will be diverted to the closest one.
 Error– This step is triggered when API calls return an error or no response. It must be placed at a higher hierarchy than the associated API step. If multiple Error steps are used, the flow will be directed to the closest one.

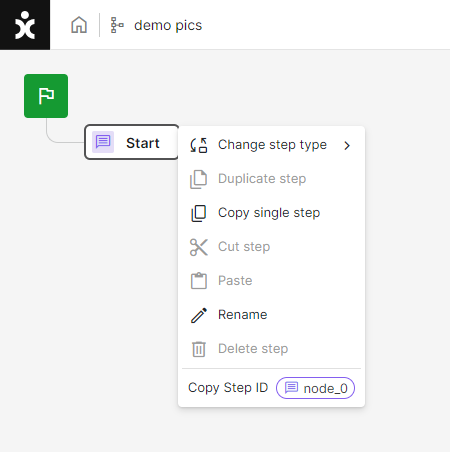
Note: by hovering over any step and right clicking the mouse, you can see available actions regarding the step.
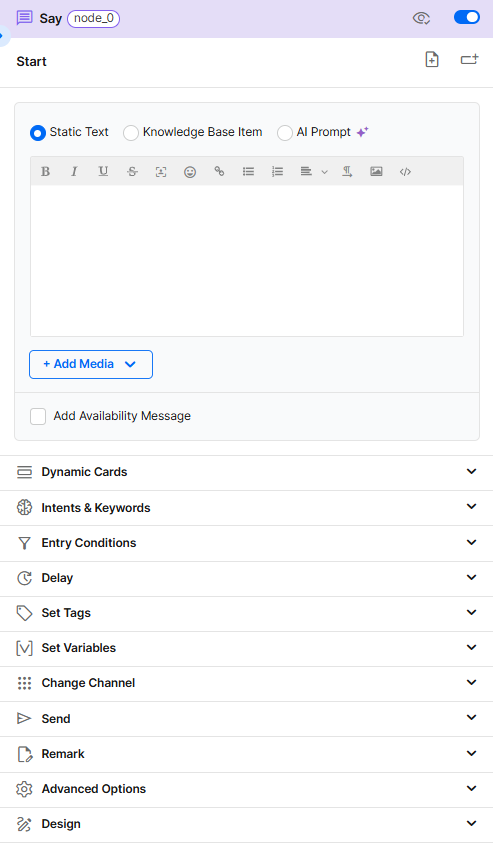
The Properties Panel
The top part of the Properties Panel includes the Step’s properties.
The lower part contains the steps’ settings and functionalities.
Top Bar
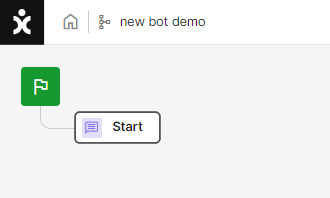
Let’s begin!
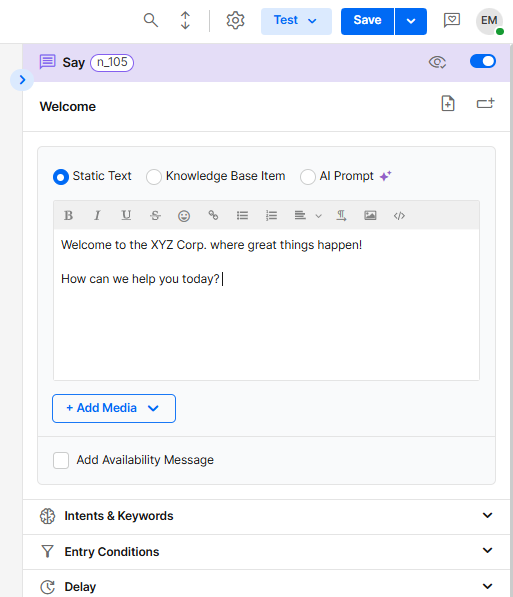
- The first new step when building a flow is a Say step titled “Start”.
At the step’s properties, name it “Welcome” and enter a welcoming message.
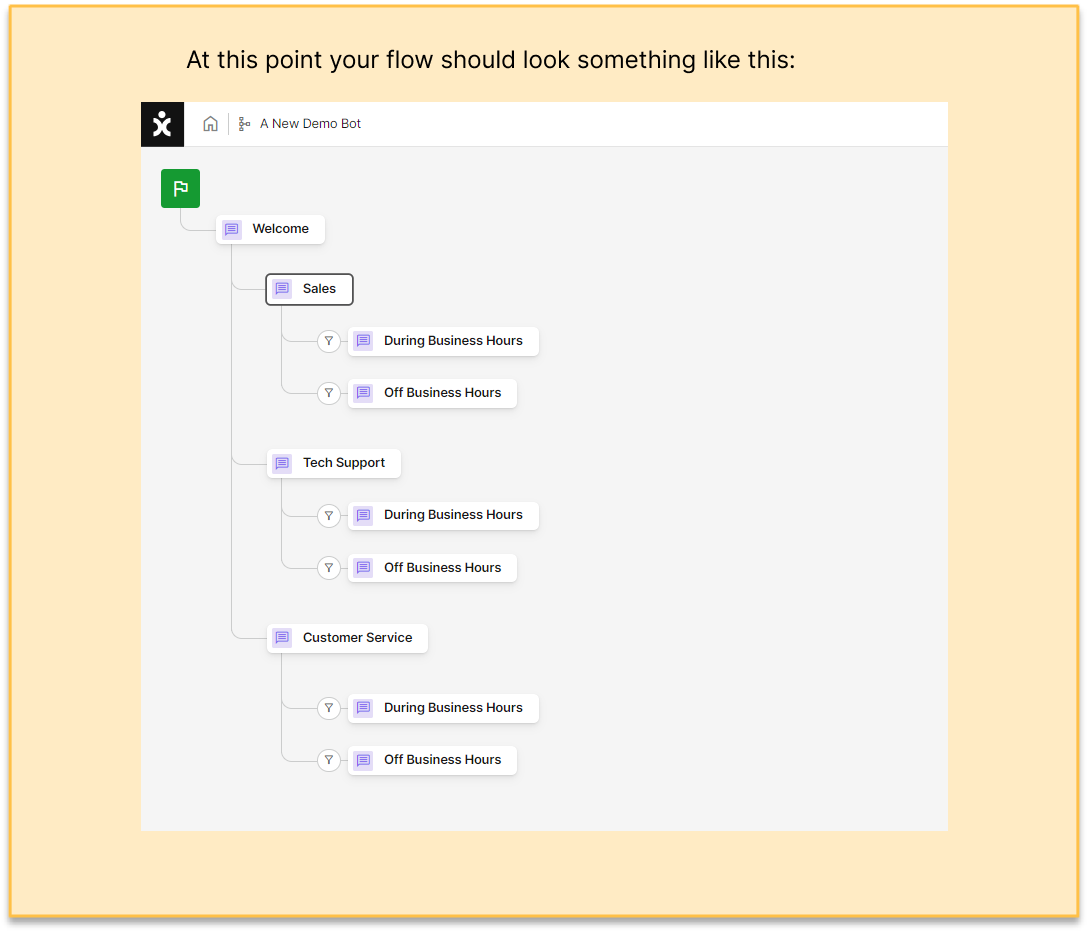
- Hover next to the “Welcome” step and click the + sign. Use it to create three (3) different Say steps.
Note that after the 2nd one, the new steps will move below the “Welcome” step to indicate them as “children”.
Name them “Sales”, “Tech support”, and “Customer service”.
-
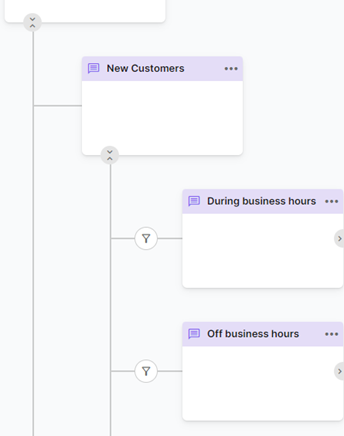
Availability check: Create two more Say steps for the “New customers” step, calling one “During business hours” and the other “Off business hours”.
The business hours module has 4 statuses- Active - The channel is active and has available agents ready to receive calls.
- Busy - The channel is active, but there are no available agents to receive calls.
- Inactive - The channel is inactive.
- Off business hours - There are no agents present.
We need to prepare the flow for all scenarios. In our tutorial, we will only deal with two possible situations: Agents are available to answer calls, and Agents are not available to answer calls (because they are busy, the channel is inactive, or they have left for the day). Obviously, your business can have different policies and a different response for each status.

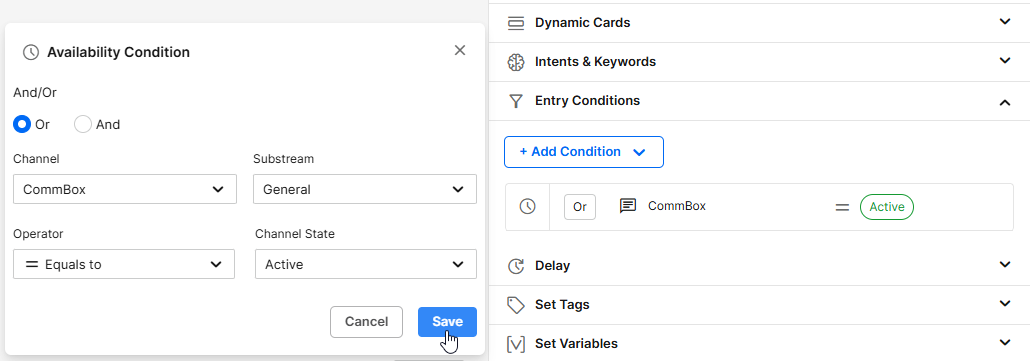
- At the “During business hours” step’s Properties Panel, select the Entry Conditions section, click +Add Condition, and then select Availability Condition from the dropdown menu.
Select the appropriate channel and subchannel (Sub-stream) for the relevant department (not necessarily the channel names you see in the examples below).
If you don’t have a dedicated subchannel for each department, use the same general channel for all options.
For the “During business hours” step, select Active as the Channel State, and click Save.
- We are going to add the rest of the statuses (busy, inactive, off hours) to the “Off business hours” step using the availability condition.
- Select the Entry Conditions section and click +Add Condition, and then select Availability Condition from the dropdown menu.
- Select the appropriate channel and subchannel (Sub-stream), select the busy status, and click Save.
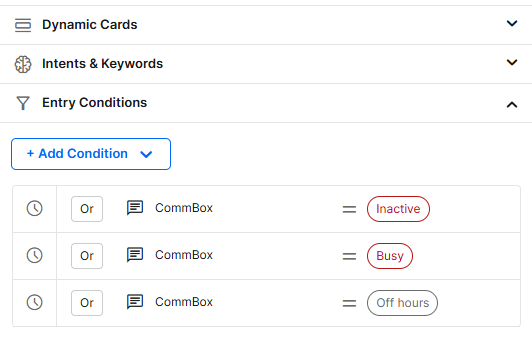
- Repeat this process in the same step for the inactive and off-hours statuses. Make sure that you select Or at the top (any one of these statuses will grant entry into this branch of the flow).
When done, the entry condition should look something like this:
Note: The And/Or selection makes a difference when more than one condition exists.
“Or” will proceed to the step if either Inactive or busy channel status is used.
“And” will require both statuses to be active simultaneously (impossible in this case) to go to the next step.
- Copy the above step for the other two departments so that after the customers select the desired department, the bot will notify them if the service in not currently available.
Instead of creating each step separately, right click on the step you want to duplicate and click on the Copy single step option.
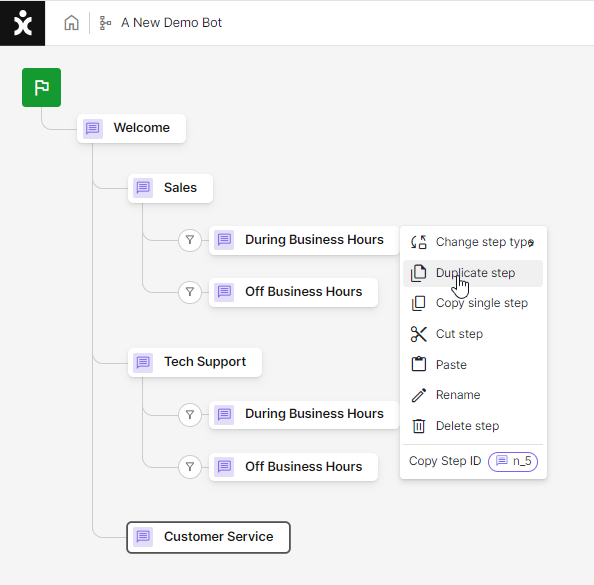
Navigate to the step you want to add to, right click on it, and select the Paste option.
Alternative Option:
If all three departments operate at the same business hours schedule, you can make one availability check on the general channel.
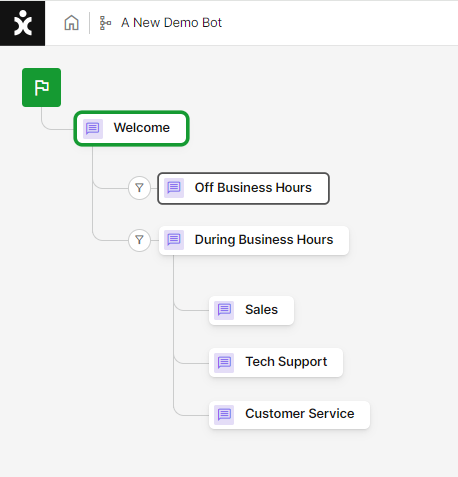
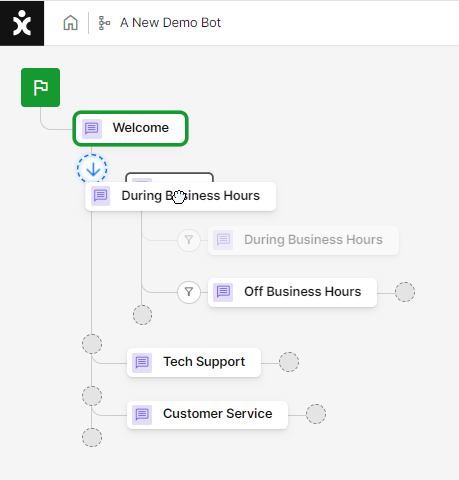
Note: You can drag the steps toward the “welcome” step.
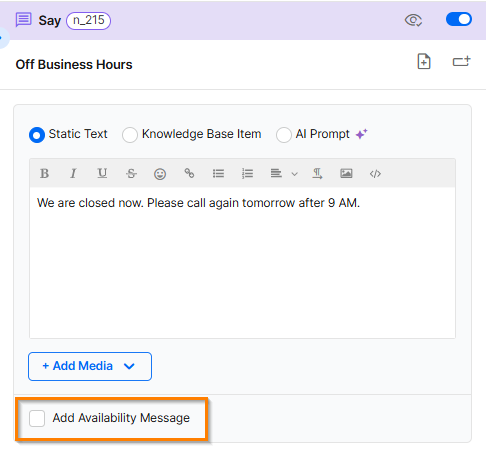
- Add the message for the Off hours step. For example: “We are not available now. Please call again tomorrow after 9 AM.”
Alternatively, if you set the Business Hours module for automatic responses, you can just check the Add Availability Message box.
- Added capability: Tags
We want to tag the customers based on which division they selected.
a. Go back to the “Sales” step (the first level of steps).
b. Open the Set Tags section in the panel and click +Add Tag.
c. Select the Customer tag option.
d. Click on the desired tag(s) followed by OK.
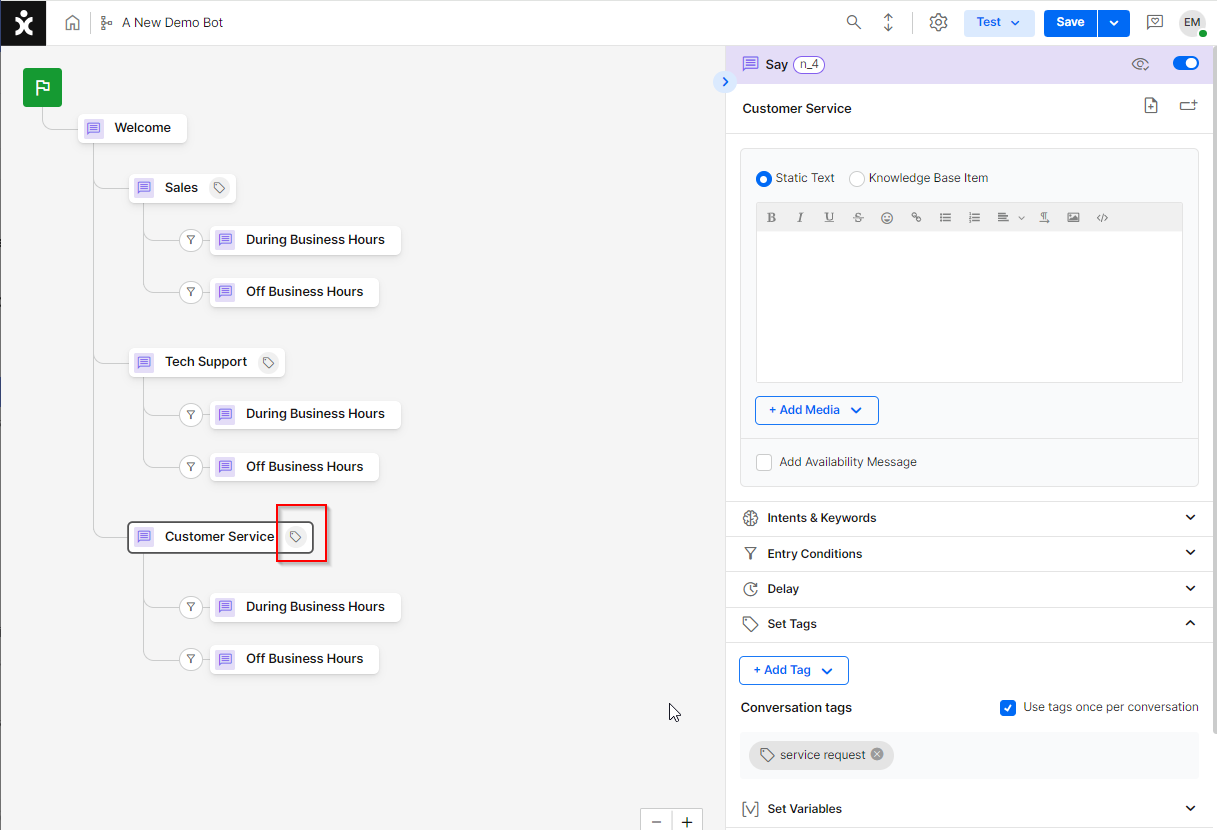
e. Repeat this process at the “Tech Support” and “Customer Support” steps as well.
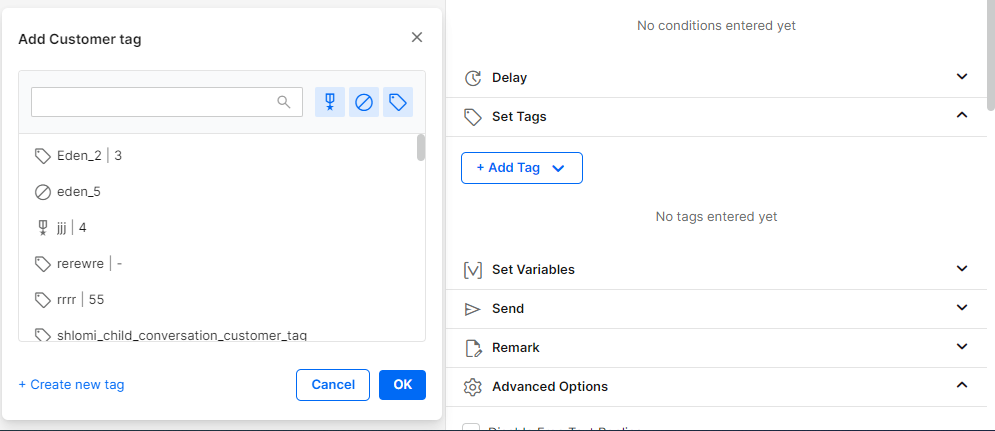
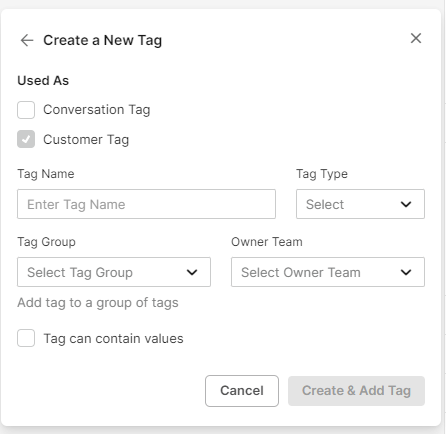
f. Assume we don’t see the tag we need. In such a case we can create a new tag by clicking the +Create new tag button.
g. Enter the tag’s details including the team it belongs to, and click Create & Add Tag. The Tag will be listed in the team’s assets section. Learn more about Tags in clicking here.
After tagging the step you should see the tag icon in the step.
Channels enable businesses to organize incoming calls by creating sub-channels for different departments. This allows targeted call forwarding to specific agent groups equipped to handle those inquiries.
For this demo, we created a subchannel for each “department” to end each branch of the flow by forwarding steps to the specific group of agents with permissions to handle just those calls.
About Ending the Flow
From the business prospective, some conversations, such as product inquiries, have business potential that we want to harness. Others, such as calls regarding technical support, have little value since we can assume the customer will call back if the problem persists.
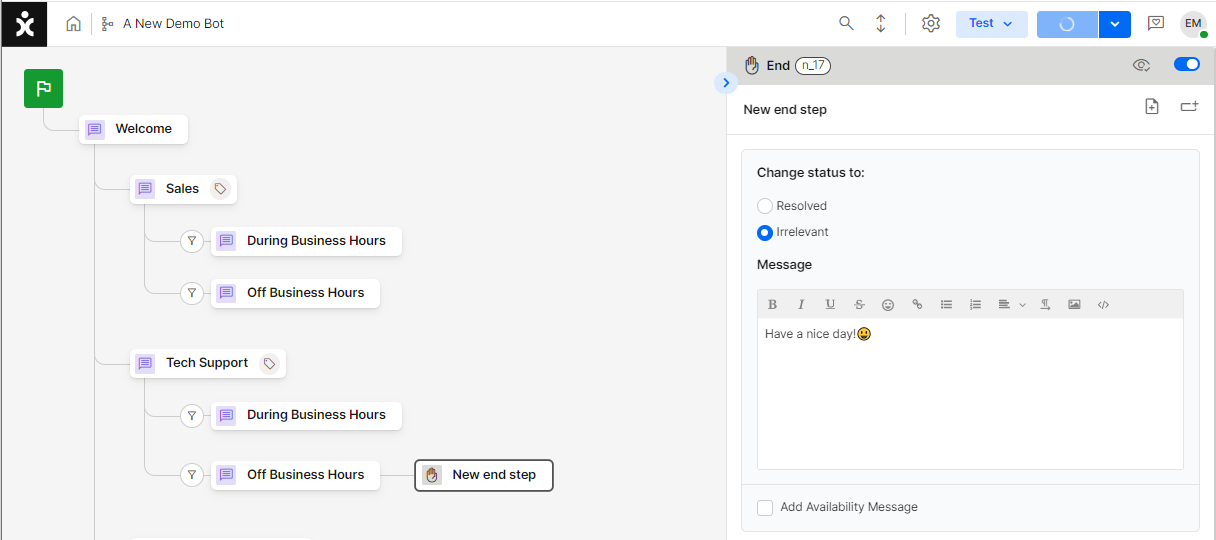
The End step offers two options:
- Resolved - The end user got what they came for (completed a flow that gave them a service)
- Irrelevant - The end user did not complete a flow that gave them service. Usually an end user that abandoned the conversation (stopped replying)
In our tutorial bot, we’ll end the customer service call during off business hour as Irrelevant. For the other calls, will use the Forward to agent step (even the ones that came after business hours). Note that SLA data may be affected.
-
For the Tech support - Off business hours branch, add an End step.
Select the Irrelevant option and add a goodbye message.
-
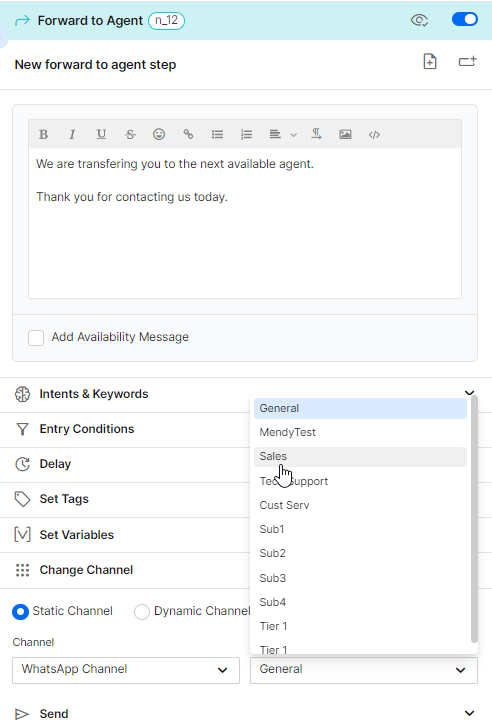
Add a new Forward to agent step to each of the other branches.
In each of these steps, click the Change channel property and select the appropriate channel and subchannel that the call should be directed to.
For the steps that are during business hours, you can add an appropriate message (for example: “You are being transferred to the next available agent. Thank you for your patience”). For the Off-hours steps, we already added a message in the previous step.
-
Click Save at the top bar to save what has been created so far.

-
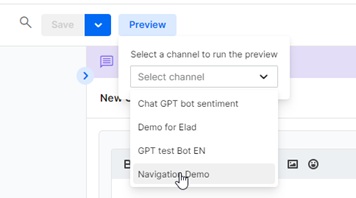
Click the Test button at the top bar and select the Preview option followed by the testing chat channel that will run this preview.
-
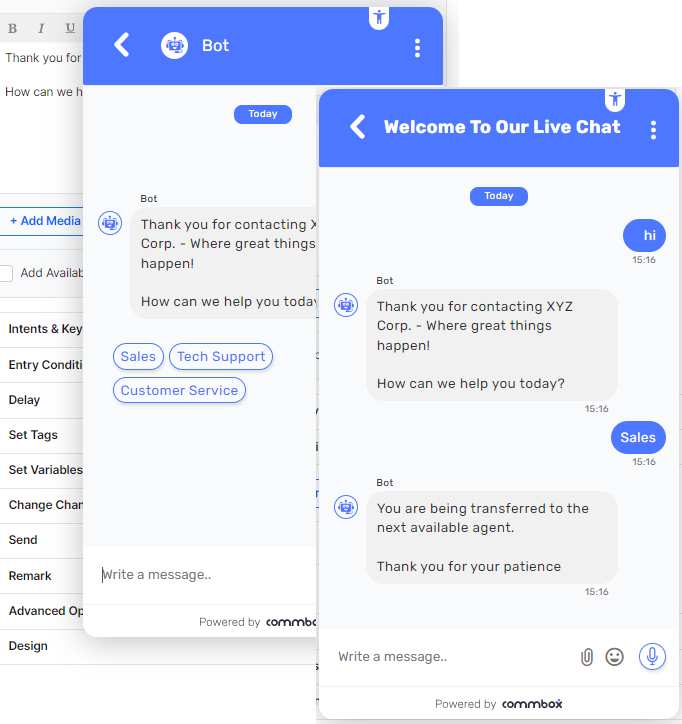
Play the roles of both customer and agent to see the flow’s progression.

Once you finish running the Flow, click on the chat menu and select Logout to reset the conversation. Click the “X” button of the iFrame to close the chat.
WOW! your very first flow!
Learn more about additional automation in the Advanced Capabilities guide to bring your creation to the next level!.
Learn more about incorporating AI into the flow at the AI Agent Settings guide.
Learn more about the website leap to the AI generation at the CommSite guide.